DIY Code Help/Advice

Users who are viewing this thread

michaelmew

New Member
Messages
23
Reaction score
1
Points
3
Location
Dallas, TX
Hello, first time posting, first time tackling a large project and I could use some wisdom.

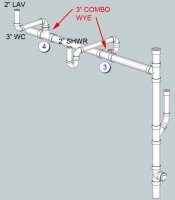
To make a long story short, my inspector is reviewing work that was previously done w/o a permit under my current permit. He has asked me to change the sanitary plumbing while I have the ceiling opened up for another project. Refer to attached images. He does not like the sanitary tee that was used on the 2" shower drain. Additionally, he does not think the 3" line has enough vent. Those two things have made him ask that I tie the 2" line into the 3" line with combo wye's. He will accept the lavatories venting the entire line, once tied in.

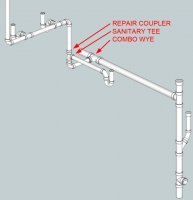
My issue is the plenum clearance. I do not believe I have enough room to allow for slope and the wye to be turned vertically (refer to solution #4). Does the side portion of the wye always have to be either horizontal or vertical? Is it acceptable by code to have it at some angle between those? Refer to images. I have numbered my proposed solutions in the order of preference. #1 would rotate the wye about 45° from horizontal to make the connection. #2 may be possible, but it would be very close after sloping the 2" drain. #3 is my last resort but possible. #4 is not possible but shown anyway for clarity/discussion. Please note: although I am showing different solutions for each, the shower and lavatory drains are intended to tie into the 3" WC drain in an identical manner.

I'm in Dallas, TX, and the inspector recommended that I hire a licensed plumber. If I can save money doing this myself, I really need to save the money. I have worked extensively with PVC under pressure, but never on a sanitary line.


Thanks,
michaelmew
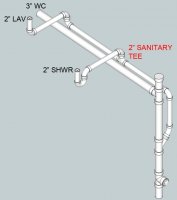
Existing.jpg proposed 1 & 2.jpg proposed 3 & 4.jpg
 

Reach4

Well-Known Member
Messages
38,903
Reaction score
4,438
Points
113
Location
IL
After the trap, the pipe cannot turn down, below the gentle slope of a trap arm, until the line has been vented. If we presume the horizontal pipe is providing the wet venting the trap arm could not come in from above. I am not a plumber.
 

Dj2

In the Trades
Messages
2,611
Reaction score
258
Points
83
Location
California
I din't have time to examine the diagrams, sorry about that. I just noticed this:

"I'm in Dallas, TX, and the inspector recommended that I hire a licensed plumber."

He is not recommending, he is telling you...and he is the authority here.
The faster you listen to him, the faster you will finish your project, have it signed off. Learn to go with the flow.
If you insist on learning plumbing while making mistakes, it will cost you more than hiring a plumber. Cut corners somewhere else.
What you have is not such a big job for a plumber, but can turn into a money pit for a DIY, because of inspector's corrections and lost time.
 

michaelmew

New Member
Messages
23
Reaction score
1
Points
3
Location
Dallas, TX
I din't have time to examine the diagrams, sorry about that. I just noticed this:

"I'm in Dallas, TX, and the inspector recommended that I hire a licensed plumber."

He is not recommending, he is telling you...and he is the authority here.
The faster you listen to him, the faster you will finish your project, have it signed off. Learn to go with the flow.
If you insist on learning plumbing while making mistakes, it will cost you more than hiring a plumber. Cut corners somewhere else.
What you have is not such a big job for a plumber, but can turn into a money pit for a DIY, because of inspector's corrections and lost time.

I appreciate this, but in the context it was said, I'm sticking with my original interpretation. Any thoughts on the images I posted?

-michaelmew
 

michaelmew

New Member
Messages
23
Reaction score
1
Points
3
Location
Dallas, TX
After the trap, the pipe cannot turn down, below the gentle slope of a trap arm, until the line has been vented. If we presume the horizontal pipe is providing the wet venting the trap arm could not come in from above. I am not a plumber.

I've gone back and measured from the bottom of the drain line to the ceiling, and there may be just enough room to extend the p trap and come in from the side. Is that descriptive enough, or would a fresh image help?

If this is the case, would the method be the industry standard way of doing it?


-michaelmew
 

Pauljames

New Member
Messages
11
Reaction score
3
Points
3
Location
Woodinville
Hello, first time posting, first time tackling a large project and I could use some wisdom.

Greetings, I don't have an answer but I am interested in how you produced your graphical plumbing layouts. What specifically did you use?

Thanks
 

MKS

Member
Messages
259
Reaction score
22
Points
18
Location
Illinois
OP read Reach4's first sentence. HJ said no to the three solutions. Stuff suggested some reading, it will help.
Consider those and a solution should be in reach.
 

michaelmew

New Member
Messages
23
Reaction score
1
Points
3
Location
Dallas, TX
Thanks for all the responses. This has been extremely valuable.

The way you have them drawn NONE of the options vent the tub/shower, period.

I see now how this is true. Standby, I am seeking alternative solutions as I learn more. I talked with the person that did the work originally, and the apparent lack of a vent on the shower was an oversight by him.

If anyone sees an obvious solution, please let me know. Until then, I'll keep researching and proposing.


-michaelmew
 

michaelmew

New Member
Messages
23
Reaction score
1
Points
3
Location
Dallas, TX
Greetings, I don't have an answer but I am interested in how you produced your graphical plumbing layouts. What specifically did you use?

This was done with a free program called SketchUp. The trouble for novice users is creating all the little parts and pieces. Luckily, there is a large community library at https://3dwarehouse.sketchup.com/?hl=en with a lot of objects already created. In this instance, I did some quick searching and found a file of all the fittings. Then, I copy and pasted what I wanted into a file and just started aligning things. A small tip for those trying this, change your face style to wireframe when you are aligning, then change it back to shaded to see things as solids. For the straight lengths of pipe, you'll need to use the scale tool and grab the middle grip otherwise things can get skewed. Sketchup is quick, easy, and perfect for things like this. I'm no expert, but I know my way around if you get stuck.

-michaelmew
 

michaelmew

New Member
Messages
23
Reaction score
1
Points
3
Location
Dallas, TX
You need to do some reading up on basic plumbing. Libraries usually have free books. Also review http://www.co.lincoln.or.us/sites/d..._-_helpful_hints_residential_construction.pdf

Thanks! Page 8, the most common mistake... sanitary tee...horizontal drain. This is the exact situation that I am having to replace.
This is great for general knowledge, but I'm dealing with a specific issue not addressed. I'll post a diagram showing a little more of the existing conditions, including the existing Lav vent.

-michaelmew
 

michaelmew

New Member
Messages
23
Reaction score
1
Points
3
Location
Dallas, TX
Existing Revised.jpg
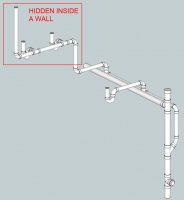
Here's more of the existing conditions. A portion is above the floor and inside the wall, so I can't know for sure what is happening, but I do know the two lavatories tie into the vent and it terminates above the roof.

All I'm trying to do is #1 vent the shower and #2 eliminate the horizontal sanitary tee on the shower. I think my previous diagrams were too complicated (not to mention they didn't solve #1).

A picture is worth 1,000 words. If you can describe it, I will model it and post a fresh image.

Thanks!
-michaelmew
 

Stuff

Well-Known Member
Messages
1,221
Reaction score
130
Points
63
Location
Pennsylvania
Assume you are not able to easily change/fix what is in the wall.

Can you take the shower drain to the left and tie in with the lav before it drops? Then #2 in your second pic should work.
 

michaelmew

New Member
Messages
23
Reaction score
1
Points
3
Location
Dallas, TX
Assume you are not able to easily change/fix what is in the wall.

Can you take the shower drain to the left and tie in with the lav before it drops? Then #2 in your second pic should work.

That's funny. I was reading something else and saw an example of this very thing and had a similar thought. In my updated diagram, I came into the 3" line horizontally; but as you described, coming in vertically should work also, right? Would one be preferred over the other?

Is there something I'm missing in this latest proposal? I'm headed to go check measurements and see if it will practically work.

Thanks!
-michaelmew
Proposed Revised.jpg
 

michaelmew

New Member
Messages
23
Reaction score
1
Points
3
Location
Dallas, TX
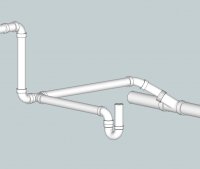
Well, I've done some more practical investigation. Refer to image. The elbow at the bottom of the lav stack is tight against the subflooring above. I don't see how it is practical to cut above it in any way unless I start cutting subflooring and wall plate. Therefore, I'll tie in right behind it with either a wye or sanitary tee (does it matter since this is a wet vent?). The other revelation is that I do not have room to tie into the 3" line from above (original images, #2 & #4). I could theoretically use a wye horizontally with some 1/8 and 1/16 bends but that seems excessive (the run is too short to gradually bring it up). Instead, I can use a single wye turned upward about 45° and a single 1/8 bend (thanks @porcelainvacation for confirming the max angle). The distance between the wye and 1/8 bend is misleading, it is less than 2" max. I had difficulty modeling it accurately so I gave up, you get the intent.

In case it matters, distance from the lav stack to the shower flange is 18". Distance from the lav stack to the center of the 3" line is 36". Distance from the subflooring to the top of the 3" line is 7". I may have to shorten the shower trap inlet to allow 1/4" per ft toward the lav stack.

This is what I am showing in the latest image and what I'm planning to install. I'll wait some time for people to review and comment. If you can, please let me know either way.

Thanks!
-michaelmew
Proposed Revised v2.jpg
 

Pauljames

New Member
Messages
11
Reaction score
3
Points
3
Location
Woodinville
This was done with a free program called SketchUp.

-michaelmew

Thanks for the info ! I have used Visio a lot in the past for a variety of stuff and this Sketchup looks / functions quite similar in a lot of ways. I downloaded Sketchup today (is telling me that it is a trial version that will expire in 400 some minutes), looks like it will be fun to mess around with for things I don't have stencils etc for in Visio, pipe fittings for example !
Thanks again !
Paul
 

michaelmew

New Member
Messages
23
Reaction score
1
Points
3
Location
Dallas, TX
Thanks for the info ! I have used Visio a lot in the past for a variety of stuff and this Sketchup looks / functions quite similar in a lot of ways. I downloaded Sketchup today (is telling me that it is a trial version that will expire in 400 some minutes), looks like it will be fun to mess around with for things I don't have stencils etc for in Visio, pipe fittings for example !
Thanks again !
Paul

There's a Pro version and Regular version. Maybe they don't do the free one anymore. That is odd. Try the trial and see if it goes to just regular when finished. The version I am running is 2015 regular. If I can find the exe, I'll let you know.

-michaelmew
 
Top
Hey, wait a minute.

This is awkward, but...

It looks like you're using an ad blocker. We get it, but (1) terrylove.com can't live without ads, and (2) ad blockers can cause issues with videos and comments. If you'd like to support the site, please allow ads.

If any particular ad is your REASON for blocking ads, please let us know. We might be able to do something about it. Thanks.
I've Disabled AdBlock    No Thanks