jbh3
New Member
Hi,
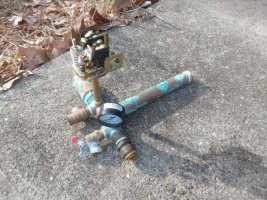
I love this site, and have been using it for years; in fact I assumed I had an account here, but I guess not! My Flotec well pressure tank that I put in 10-15 years ago failed, and I also wanted to replace my brass tee. The tee seemed to have held up well, until I dragged it out into the sunlight. Anyways, I came here to find out what brand of tank to buy, and its here where I found out about the stainless steel option. I'll post my pictures and procedure in case there's someone like me googling for some help. So please criticize/correct anything I put here, in hopes it makes someone else's install better.
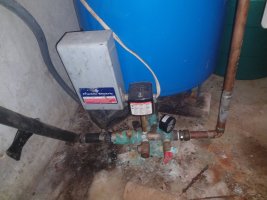
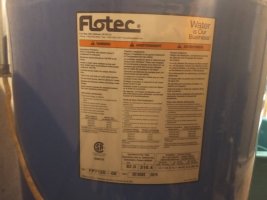
Little background, I replaced the well tank and electric hot water heater shortly after I bought my house, 15 years ago or so. I noticed fast-cycling of the pressure, and, my wife noticed the water had a "rust" taste. I replaced my hw heater anode (for the third time) , and now I'm doing the well tank. When the bladder goes on the Flotec tank, the water is not contained in the bladder; it touches the rusty inside walls of the tank, I *think*. What follows is my review of the tee on amazon, followed by one question for the experts here:
This Boshart package came with almost everything necessary to install a tank. Their website says to use the stainless PTFE tape (included) and put their Boshart Gray Magic pipe sealant over top of the tape. That stuff seems to only be available at the Boshart site (not amazon). I looked it up on Terry Love plumbing website, and the consensus there was that Megaloc (and a few other) general pipe thread sealant over top is not bad idea.
So all these connections got the stainless ptfe + megaloc . And none of them leaked*
My package did not come with instructions but its not hard. Do the pre-assembly as much as you can in a warm upright place. Here's the order I did things:
- well circuit breaker off, photo the electric switch connections, remove electric connections to switch
- drain old tank as much as possible, disconnect well-poly connection, disconnect house supply connection
- drag the 3/4 full old tank outside to actually drain
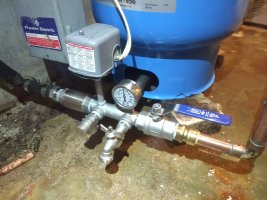
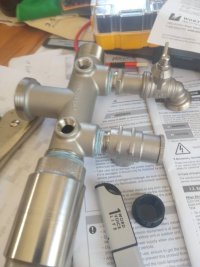
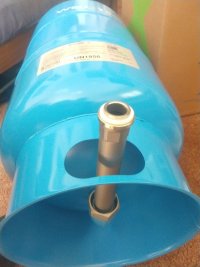
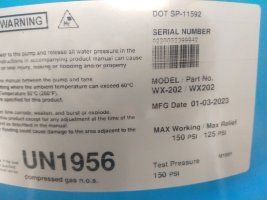
- back upstairs, attach 11" stainless pipe to new tank (wx202)
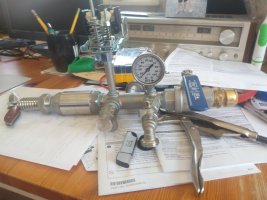
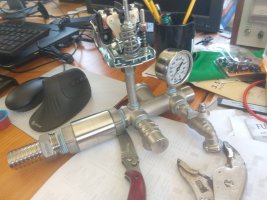
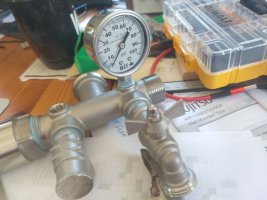
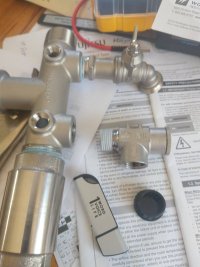
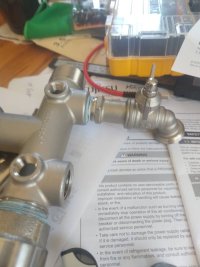
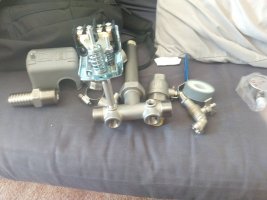
- attach faucet, pressure-relief, guage, switch, backflow preventer, barb..., ball-valve and new shark-bite fitting
- back in the basement, attach the assembled tee to the tank/pipe via union fitting. No ptfe, no pipe dope.
- roughly place the tank. re-attach the electrical; re-attach the poly well line to the barb.
- more accurately place the tank/tee to line up with your house supply, and attach copper house line to the shark-bite (my sharkbite was a 1" to 3/4" reducer as well. had to special order it)
- cross your fingers and turn the electricity on
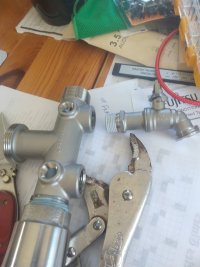
I put the previous brass tee in 10-15 years ago, with the flotec tank, and they worked well. The corrosion on the tee prompted me to spend the extra ...$80? on stainless. Plus, this one has a union, so if the tee lasts forever, I can swap in new well tanks as needed.
My question... Turns out my statement "none of them leaked" was wrong. The connection of the 11" stainless pipe to the Amtrol wx-202 (purchased from NYDIRECT, good value over amazon) has a slow drip. Again, I put the stainless ptfe tape on the threads, and megaloc dope , and got it pretty tight in my office; however during the install in my basement, the pipe was turning a few degrees +/- as I connected to the well supply and house.
I bought a pipe wrench (yeah, all the above was done without a pipe wrench, the bottom half of mine was broken; I used big channel locks) and tightened that sucker up 3/4 of a turn. It was an easy turn. Because I had a heavy pipe wrench? Because I was stripping the shit out the tank or pipe threads? I don't have the experience to tell. As I tightened the tank connection, the stainless union loosens, so I simultaneously tightened that .
It seems the 3/4 turn got rid of most of the drip, but not all of it. My questions
- should I just suck it up and tighten it another turn?
- or, should I re-tape and re-dope and do it again? This would be kind of a big job, draining the tank and ... well yah just draining the tank.
I love this site, and have been using it for years; in fact I assumed I had an account here, but I guess not! My Flotec well pressure tank that I put in 10-15 years ago failed, and I also wanted to replace my brass tee. The tee seemed to have held up well, until I dragged it out into the sunlight. Anyways, I came here to find out what brand of tank to buy, and its here where I found out about the stainless steel option. I'll post my pictures and procedure in case there's someone like me googling for some help. So please criticize/correct anything I put here, in hopes it makes someone else's install better.
Little background, I replaced the well tank and electric hot water heater shortly after I bought my house, 15 years ago or so. I noticed fast-cycling of the pressure, and, my wife noticed the water had a "rust" taste. I replaced my hw heater anode (for the third time) , and now I'm doing the well tank. When the bladder goes on the Flotec tank, the water is not contained in the bladder; it touches the rusty inside walls of the tank, I *think*. What follows is my review of the tee on amazon, followed by one question for the experts here:
This Boshart package came with almost everything necessary to install a tank. Their website says to use the stainless PTFE tape (included) and put their Boshart Gray Magic pipe sealant over top of the tape. That stuff seems to only be available at the Boshart site (not amazon). I looked it up on Terry Love plumbing website, and the consensus there was that Megaloc (and a few other) general pipe thread sealant over top is not bad idea.
So all these connections got the stainless ptfe + megaloc . And none of them leaked*
My package did not come with instructions but its not hard. Do the pre-assembly as much as you can in a warm upright place. Here's the order I did things:
- well circuit breaker off, photo the electric switch connections, remove electric connections to switch
- drain old tank as much as possible, disconnect well-poly connection, disconnect house supply connection
- drag the 3/4 full old tank outside to actually drain
- back upstairs, attach 11" stainless pipe to new tank (wx202)
- attach faucet, pressure-relief, guage, switch, backflow preventer, barb..., ball-valve and new shark-bite fitting
- back in the basement, attach the assembled tee to the tank/pipe via union fitting. No ptfe, no pipe dope.
- roughly place the tank. re-attach the electrical; re-attach the poly well line to the barb.
- more accurately place the tank/tee to line up with your house supply, and attach copper house line to the shark-bite (my sharkbite was a 1" to 3/4" reducer as well. had to special order it)
- cross your fingers and turn the electricity on
I put the previous brass tee in 10-15 years ago, with the flotec tank, and they worked well. The corrosion on the tee prompted me to spend the extra ...$80? on stainless. Plus, this one has a union, so if the tee lasts forever, I can swap in new well tanks as needed.
My question... Turns out my statement "none of them leaked" was wrong. The connection of the 11" stainless pipe to the Amtrol wx-202 (purchased from NYDIRECT, good value over amazon) has a slow drip. Again, I put the stainless ptfe tape on the threads, and megaloc dope , and got it pretty tight in my office; however during the install in my basement, the pipe was turning a few degrees +/- as I connected to the well supply and house.
I bought a pipe wrench (yeah, all the above was done without a pipe wrench, the bottom half of mine was broken; I used big channel locks) and tightened that sucker up 3/4 of a turn. It was an easy turn. Because I had a heavy pipe wrench? Because I was stripping the shit out the tank or pipe threads? I don't have the experience to tell. As I tightened the tank connection, the stainless union loosens, so I simultaneously tightened that .
It seems the 3/4 turn got rid of most of the drip, but not all of it. My questions
- should I just suck it up and tighten it another turn?
- or, should I re-tape and re-dope and do it again? This would be kind of a big job, draining the tank and ... well yah just draining the tank.
Attachments
-
 IMG_20230328_122832539.jpg77.1 KB · Views: 480
 -
 IMG_20230403_122657576.jpg72.3 KB · Views: 428
 -
 IMG_20230403_122519014.jpg72 KB · Views: 458
 -
 IMG_20230403_122415814.jpg70.3 KB · Views: 405
 -
 IMG_20230403_122152499.jpg72.5 KB · Views: 433
 -
 IMG_20230403_121904122.jpg65.6 KB · Views: 449
 -
 IMG_20230403_120557430.jpg63.8 KB · Views: 445
 -
 IMG_20230403_114022636.jpg66.3 KB · Views: 439
 -
 IMG_20230328_122856191.jpg56.6 KB · Views: 470