Replacing Water Heater: A way to test my sweat joints without filling tank?

Users who are viewing this thread

BobD777

Member
Messages
44
Reaction score
4
Points
8
Location
Huntington, NY
Hi--
I had an AO Smith heat pump water heater fail and was provided a new unit by AO Smith. It's pretty straightforward since the plumbing is all in place, and the electrical is no problem as I ran that to the original unit.

I'm ready to cut out the old unit, and connect the replacement. I've done some sweating and have no problem doing that on basic water lines which can simply be redone if there's a problem. Not being a plumber, my hesitancy in working on this is that I don't want to fill the 80-gallon tank in order to test all the joints/connections--and empty it if there is a problem.

Question #1 is, can someone recommend how I could add some pressure to the tank after making all my connections, without first filling it with 80 gallons of water?

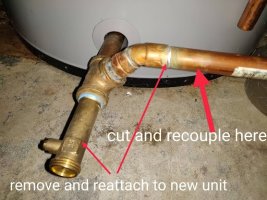
Question #2 is, instead of unsoldering the existing solder joints, I'm thinking that it's easier to just cut the various copper pipes to the threaded copper assemblies that go into the old unit. Then I'll remove those assemblies, reattach them to the new unit, and then sweat in a new coupling to hook everything back up. Sound right? (See the pic below.)

I'll take an answer to either or both questions above as I hope to do this install today (Saturday). Thanks so much in advance!
 

Attachments

  • Hot water heater install pic.jpeg
    Hot water heater install pic.jpeg
    44.5 KB · Views: 38

Weekend Handyman

Active Member
Messages
437
Reaction score
131
Points
43
Location
Nova Scotia
Just a DIYer here.

I would desolder the 45 … one less joint. Coupeling would also be fine.

I would practice soldering some closed loops (e.g. a loop with boiler drain on the leg) that you can pressurize with your garden hose to make sure your soldering technique is on point.

I really like Oaty Tinning Flux, SafeFlo solder, & TS4000 torch.
 

John Gayewski

In the Trades
Messages
4,363
Reaction score
1,348
Points
113
Location
Iowa
You get some threaded fittings and a compressor and air test. Fill to 1.5 times your working pressure for 15 min. The should be no drop in pressure in a 15 min period. The tested portion needs to be empty and isolated from any water filled portions for this test.
 
Last edited:

Jeff H Young

In the Trades
Messages
8,960
Reaction score
2,235
Points
113
Location
92346
1 fill with water part way and test joint with soapy water (tank will have some compressed air and bubble at a joint)
2 yes thats fine
Might be cleaner to unsweat a joint but there is no rule on this , i wouldnt pump air in tank but you could compressed air about 100 times more dangerous than water as a rule of thumb
 

BobD777

Member
Messages
44
Reaction score
4
Points
8
Location
Huntington, NY
Just a DIYer here.

I would desolder the 45 … one less joint. Coupeling would also be fine.

I would practice soldering some closed loops (e.g. a loop with boiler drain on the leg) that you can pressurize with your garden hose to make sure your soldering technique is on point.

I really like Oaty Tinning Flux, SafeFlo solder, & TS4000 torch.
Thanks for that input. I have been practicing, but good idea on the garden hose on a closed loop.

I thought of desoldering, and practiced on a couple of joints. It just seems like there's more room for error in terms of removing the lumps of old solder, cleaning up the joint, etc. On the other hand, desoldering on that bottom fitting would make it considerably easier to unscrew the entire piece without lifting the tank. Being a heat pump, it weighs a few hundred pounds.

I am using the Oatey tinning flux, but just a standard propane torch. I know the Mapp is hotter...
 
Last edited:

BobD777

Member
Messages
44
Reaction score
4
Points
8
Location
Huntington, NY
1 fill with water part way and test joint with soapy water (tank will have some compressed air and bubble at a joint)
2 yes thats fine
Might be cleaner to unsweat a joint but there is no rule on this , i wouldnt pump air in tank but you could compressed air about 100 times more dangerous than water as a rule of thumb
Thanks for that info Jeff. It's exactly the kind of solution I was looking for--partial fill, soapy water test! And as the tank fills, so will the pressure. So I'll keep an eye on it and test it as it fills.

I might try unsweating that bottom section in the pic. I'll have the whole piece removed, so even if it requires some cleaning, it should be easy enough.

Thanks again for the assist--
 

BobD777

Member
Messages
44
Reaction score
4
Points
8
Location
Huntington, NY
You get some threaded fittings and a compressor and air test. Fill to 1.5 times your working pressure for 15 min. The should be no drop in pressure in a 15 min period. The tested portion needs to be empty and isolated from any water filled portions for this test.
Thanks John for that option. I'm going to assess now and charge ahead.
 

BobD777

Member
Messages
44
Reaction score
4
Points
8
Location
Huntington, NY
Also, I'm installing this in an unfinished basement with no floor drain. The plumbers who installed our current unit did not use a drain pan. Is it recommended or optional?
 

John Gayewski

In the Trades
Messages
4,363
Reaction score
1,348
Points
113
Location
Iowa
Also, I'm installing this in an unfinished basement with no floor drain. The plumbers who installed our current unit did not use a drain pan. Is it recommended or optional?
The unit should be up off of the floor. This is in the upc. A plastic base or some kind of blocks are good. Your don't want the bottom to rot out from a small t&p drip or other moisture on the floor. No pan needed.
 

BobD777

Member
Messages
44
Reaction score
4
Points
8
Location
Huntington, NY
The unit should be up off of the floor. This is in the upc. A plastic base or some kind of blocks are good. Your don't want the bottom to rot out from a small t&p drip or other moisture on the floor. No pan needed.
John-- That makes so much sense. Don't know why my plumbers didn't do that.

Since I'm connecting to existing plumbing, I don't want to raise it too high. So instead of blocks, I'm thinking of using a 1/2" composite, tongue-in-groove siding made into a panel that the unit can sit on top of. That will get it off the ground, it won't absorb water, and it will have channels that will lead any water away from the unit. And I can use composite shims on top or below that platform to get it level.

Thanks John!
 

Attachments

  • attachment (9).jpeg
    attachment (9).jpeg
    51 KB · Views: 29

BobD777

Member
Messages
44
Reaction score
4
Points
8
Location
Huntington, NY
The unit should be up off of the floor. This is in the upc. A plastic base or some kind of blocks are good. Your don't want the bottom to rot out from a small t&p drip or other moisture on the floor. No pan needed.
John or other-- Any problem with a large ceramic tile that would get it off the floor?

And is there a problem with it being only 24" wide for a 27" tank diameter? As the pic shows, 1.5" would overhang the tile on either side.
 

Attachments

  • attachment (10).jpeg
    attachment (10).jpeg
    55.5 KB · Views: 43

John Gayewski

In the Trades
Messages
4,363
Reaction score
1,348
Points
113
Location
Iowa
It's up to you. The I can't remember but I think the code requires 1" off the ground. But whatever you think will work should be ok
 

BobD777

Member
Messages
44
Reaction score
4
Points
8
Location
Huntington, NY
Concluding this thread... The new heater is installed and working great. The only hiccup is that I had to turn the circuit breaker off, wait 10+ minutes, and then turn it on a few times before it would exit the diagnostic mode and start up the heat pump.

And at first glance, it looks like electric mode on this heater was using about 300 kWh/month more than the heat pump mode. That's a very rough figure. (I had to use electric while the heat pump was out of commission.)

Thanks to all of you who offered your opinions. Your help was greatly appreciated!
 
Top
Hey, wait a minute.

This is awkward, but...

It looks like you're using an ad blocker. We get it, but (1) terrylove.com can't live without ads, and (2) ad blockers can cause issues with videos and comments. If you'd like to support the site, please allow ads.

If any particular ad is your REASON for blocking ads, please let us know. We might be able to do something about it. Thanks.
I've Disabled AdBlock    No Thanks