PEX installation made easy for old hands

Users who are viewing this thread

Jeff Knecht

Member
Messages
135
Reaction score
2
Points
18
Location
West End, NC
Installing PEX in 24" high crawl and being 6"3", 73 years, benign tremor in the right hand and not as strong as I use to be, trying to devise a plan of attack. I would appreciate your comments.

1. Hard to get leverage on the crimper. On another install in the same area, while lying on back and making a crimp, had to hold the ring (keep from slipping) with the left hand, grip the crimper with the right hand and line up, and supported the other handle on my thigh to push against for leverage. What a dog and pony show that was.
I've been thinking, which isn't my strong point. Is there a PEX and crimp ring, friendly adhesive that can be put on the PEX to hold the ring in place? Or maybe, use a clear Scotch Tape to hold the ring in place? Or place the ring on the tube and give it a slight squeeze and slip over the fitting?

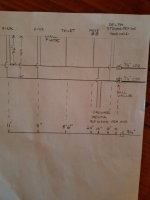
2. To avoid having to make connections on the 10 T's, pre attach all the T's outside on the garage floor and carefully, drag it into the crawl space. Or, perhaps "dry fit" the entire assembly without crimping the device feeds and see how that pans out.

3. For sink and toilet stops, crimp stops, or compression? I think Jeff Handy suggested the Dahl-Eco brand.

4. Start from the valve and connect to the T last? I figure the valve is the valve area is the most critical.

Once again, thanks for all your help.

Jeff
 

Reach4

Well-Known Member
Messages
38,982
Reaction score
4,472
Points
113
Location
IL
1. Hard to get leverage on the crimper. On another install in the same area, while lying on back and making a crimp, had to hold the ring (keep from slipping) with the left hand, grip the crimper with the right hand and line up, and supported the other handle on my thigh to push against for leverage. What a dog and pony show that was.
I've been thinking, which isn't my strong point. Is there a PEX and crimp ring, friendly adhesive that can be put on the PEX to hold the ring in place? Or maybe, use a clear Scotch Tape to hold the ring in place? Or place the ring on the tube and give it a slight squeeze and slip over the fitting?
I don't quite understand. I would not use clear Scotch Tape, but I could see using electrical tape temporarily as a stop to keep the ring from sliding too far onto the pex. I would double the end over to make a little tab to allow removing the tape later more easily. I could also see using a worm gear clamp temporarily as a similar stop. Those can be remove later by unscrewing.

From what I read, the crimp tools take more force that the clamp tools. Stainless steel clamps can be used where the crimp rings can. Yes, it is another tool, but those tools are not all that expensive as pex tools go. https://toolsgeeky.com/pex-crimp-vs-pex-clamp/
 

WorthFlorida

6th clinical trail chemotherapy 5/15/24
Messages
5,804
Solutions
1
Reaction score
1,005
Points
113
Location
Orlando, Florida
Are you trying to do a repair or a whole house replumb? There are couplings and connectors that are push and fit. Sharkbite is about the most common since Home Depot has a good assortment but not all configurations. Problem is it can get expensive doing an entire house but all you do is cut the pipe, push on the coupling for repairs and at stop valves. It doesn't take much to do it. Do search on PEX couplings and there are an assortment of different type of fittings. Sharkbite is one of the few that doesn't need a special tool and only a $3 plastic ring if you ever needed to remove the coupling from the pipe.

Uponor brand uses a tool that stretches the pex ($$), slip on a collar, insert a coupling and it shrinks down to a water tight fit. https://www.uponor-usa.com/en/training/videos

If your doing a whole house replumb, well we are not twenty anymore. I'm 71 with a bum back and in the last few years I've been hiring plumbers, painters and landscapers to do work. Where as years ago I wouldn't think of nothing but to do it myself and going on the roof was no issue. Now, no more of roof climbing. 24" crawl space, no way.
 

Reach4

Well-Known Member
Messages
38,982
Reaction score
4,472
Points
113
Location
IL
Uponor brand uses a tool that stretches the pex ($$), slip on a collar, insert a coupling and it shrinks down to a water tight fit. https://www.uponor-usa.com/en/training/videos
I have the hand tool for expansion fittings ($$), and it has to take more force than the clamp tools for 1/2, and greatly more force for 3/4. I have not yet tried 1 inch; I would want non-awkward access. The Milwaukee electric tool is $$$.
 

Weekend Handyman

Active Member
Messages
437
Reaction score
131
Points
43
Location
Nova Scotia
I am not a Plumber or pro of any kind. For the copper crimp rings, I gently pinch them with a pair of smooth face channel locks (6 inch). I just barely deform the ring enough so it does not slide around. I don’t use regular channel locks because I do not want to score and potentially weaken the ring. Don’t use tape or other adhesives on pex. If you look at page 6 of the BOW Superpex installation manual it supports doing it this way ... it is online in electronic format.
 
Last edited:

JohnCT

Still learning..slowly
Messages
642
Reaction score
206
Points
43
Location
Northeast
I have the hand tool for expansion fittings ($$), and it has to take more force than the clamp tools for 1/2, and greatly more force for 3/4. I have not yet tried 1 inch; I would want non-awkward access. The Milwaukee electric tool is $$$.

The manual expansion tool is a nightmare unless you're blessed with three arms.

The Milwaukee (and DeWalt) tools aren't all that much money if you're doing a complete repipe or if you're a professional. That tool is a dream, particularly in tight spaces (bend the pipe out of the tight area, expand it, bend it back and slide over the coupling).

For a one time repair at home, then yeah it's pricey. I have about $300 into the tool, battery, charger, and two heads. In the scope of the repipe due to pinholed copper, it's insignificant and makes *foolproof* connections. I don't have to worry about a tool out of calibration.

John
 

Terry

The Plumbing Wizard
Staff member
Messages
29,942
Reaction score
3,461
Points
113
Location
Bothell, Washington
Website
terrylove.com
I have not used the crimp method of joining PEX, but do use the expansion fittings.

propex_expansion.jpg


I slip the collar on the end of the pipe, then use the expander to enlarge it, and then slip the fitting inside. I found it to be pretty easy.
I started with the hand expander and that was work. That rechargeable expander has been really nice.
 

Jeff Knecht

Member
Messages
135
Reaction score
2
Points
18
Location
West End, NC
Are you trying to do a repair or a whole house replumb? There are couplings and connectors that are push and fit. Sharkbite is about the most common since Home Depot has a good assortment but not all configurations. Problem is it can get expensive doing an entire house but all you do is cut the pipe, push on the coupling for repairs and at stop valves. It doesn't take much to do it. Do search on PEX couplings and there are an assortment of different type of fittings. Sharkbite is one of the few that doesn't need a special tool and only a $3 plastic ring if you ever needed to remove the coupling from the pipe.

Uponor brand uses a tool that stretches the pex ($$), slip on a collar, insert a coupling and it shrinks down to a water tight fit. https://www.uponor-usa.com/en/training/videos

If your doing a whole house replumb, well we are not twenty anymore. I'm 71 with a bum back and in the last few years I've been hiring plumbers, painters and landscapers to do work. Where as years ago I wouldn't think of nothing but to do it myself and going on the roof was no issue. Now, no more of roof climbing. 24" crawl space, no way.
I am not a Plumber or pro of any kind. For the copper crimp rings, I gently pinch them with a pair of smooth face channel locks (6 inch). I just barely deform the ring enough so it does not slide around. I don’t use regular channel locks because I do not want to score and potentially weaken the ring. Don’t use tape or other adhesives on pex. If you look at page 6 of the BOW Superpex installation manual it supports doing it this way ... it is online in electronic format.
Thanks to all of you for your insights.

I'm doing our master bath and 1 supply feeds hose bib.
I have the crimper, ring cutter and rings.

Comments plesse regarding following:
1. I'm thinking of starting at valves and ending at T's. To me critical alignment is at valves, little more room at Ts.

2. Running PEX all the way to stops. To secure, installing facade about 8 inches high, topped with Sharkbite Stub Out Beacket. Any qualms with a PEX crimp stop? Plan on using the Dahl-Eco stop that Jeff Handy rec. Vanity is on feet with drawers in between floor and p-trap area. FUN.

3. Make crimped T connections on 3/4" PEX in garage and carefully drag through crawlspace. Might even dry fit 1/2" device feeds and see how that flies and adjust. Of course, tape on open ends for debris.

Thank you again, and have a Happy New Year!
Jeff
 

Attachments

  • 16093550668181327123832634938059.jpg
    16093550668181327123832634938059.jpg
    48.7 KB · Views: 182

Reach4

Well-Known Member
Messages
38,982
Reaction score
4,472
Points
113
Location
IL
I have the crimper, ring cutter and rings.
You should also have, and use, go-nogo gauge.

2. Running PEX all the way to stops. To secure, installing facade about 8 inches high, topped with Sharkbite Stub Out Beacket. Any qualms with a PEX crimp stop? Plan on using the Dahl-Eco stop that Jeff Handy rec. Vanity is on feet with drawers in between floor and p-trap area. FUN.
Facade?

What is your objective? Are you pushing the vertical pipe up from the crawlspace, or are you pushing that down from above and hitting a hole in the flooring?

I am not a Plumber or pro of any kind. For the copper crimp rings, I gently pinch them with a pair of smooth face channel locks (6 inch). I just barely deform the ring enough so it does not slide around. I don’t use regular channel locks because I do not want to score and potentially weaken the ring. Don’t use tape or other adhesives on pex. If you look at page 6 of the BOW Superpex installation manual it supports doing it this way ... it is online in electronic format.
Jeff, that seems like a good idea. Does that solve the problem you were describing?
 

Jeff Knecht

Member
Messages
135
Reaction score
2
Points
18
Location
West End, NC
You should also have, and use, go-nogo gauge.


Facade?

What is your objective? Are you pushing the vertical pipe up from the crawlspace, or are you pushing that down from above and hitting a hole in the flooring?


Jeff, that seems like a good idea. Does that solve the problem you were describing?
1. Definitely have a go-no go gauge.

2. An plywood wall, behind the trap, attached to the sides in the interior of the cabinet. Mount the stub out on a Sharkbite, lock-in bracket on top of the wall. I will have more luck pushing it down from above. Not a perfect situation, but I like the idea of fewer connections. I think that the wall/facade and bracket combo will give it stability and I can design it to hide the PEX, for a cleaner look.

3. Better than the method I used in a previous install, where I used my fingers and at the end of the job, my forearms and fingers were pretty tired Smooth jawed, adjustable channel locks.

What do you think of my idea to make 3/4" T connections in the garage and drag it into the crawl?
 

Reach4

Well-Known Member
Messages
38,982
Reaction score
4,472
Points
113
Location
IL
An plywood wall, behind the trap, attached to the sides in the interior of the cabinet. Mount the stub out on a Sharkbite, lock-in bracket on top of the wall. I will have more luck pushing it down from above. Not a perfect situation, but I like the idea of fewer connections. I think that the wall/facade and bracket combo will give it stability and I can design it to hide the PEX, for a cleaner look.
When fishing PEX by pushing, I have run a long stainless steel whip through the path. Then slide the pex over the whip to help guide to the hole. Other rods could be used similarly.

You can run 3/8 pex or 3/8 soft copper alternatively. A 3/8 is plenty big to supply a lavatory. Another construction method is to use drop ear elbows. Then run brass nipples to the valves.

https://terrylove.com/forums/index....ipe-inside-a-finished-wall.76597/#post-561550
 
Last edited:

Jeff Knecht

Member
Messages
135
Reaction score
2
Points
18
Location
West End, NC
When fishing PEX by pushing, I have run a long stainless steel whip through the path. Then slide the pex over the whip to help guide to the hole.

You can run 3/8 pex or 3/8 soft copper alternatively. A 3/8 is plenty big to supply a lavatory. Another construction method is to use drop ear elbows. Then run brass nipples to the valves.

1. Good call on the whip, gives me another option.

2. Trying to visualize the drop ear elbow and the soft copper coil methods. They both seem like they would give more stability but they do add extra fitting(s).

Thanks Reach. You are very kind and patient.
 

Reach4

Well-Known Member
Messages
38,982
Reaction score
4,472
Points
113
Location
IL
brass-sharkbite-brass-fittings-u334lfa-e1_145.jpg
This one is 1/2 inch Sharkbite drop ear elbow fed with pex
brass-pex-fittings-apxdee12-c3_145.jpg
This is 1/2 inch pex drop ear elbow.

To attach drop ear elbows, you have to have to be able to install wood to screw into.

I covered the back of my vanity with thin laminate flooring.
 

Jeff Knecht

Member
Messages
135
Reaction score
2
Points
18
Location
West End, NC
brass-sharkbite-brass-fittings-u334lfa-e1_145.jpg
This one is 1/2 inch Sharkbite drop ear elbow fed with pex
brass-pex-fittings-apxdee12-c3_145.jpg
This is 1/2 inch pex drop ear elbow.

To attach drop ear elbows, you have to have to be able to install wood to screw into.

I covered the back of my vanity with thin laminate flooring.

Got that part. So, no wall needed. Drop ear would be flushed to inside cabinet floor/ Where would the stop be located? Straight stop?
 

Gsmith22

Active Member
Messages
240
Reaction score
54
Points
28
Location
Central NJ
The manual expansion tool is a nightmare unless you're blessed with three arms.

The Milwaukee (and DeWalt) tools aren't all that much money if you're doing a complete repipe or if you're a professional. That tool is a dream, particularly in tight spaces (bend the pipe out of the tight area, expand it, bend it back and slide over the coupling).

For a one time repair at home, then yeah it's pricey. I have about $300 into the tool, battery, charger, and two heads. In the scope of the repipe due to pinholed copper, it's insignificant and makes *foolproof* connections. I don't have to worry about a tool out of calibration.

John

just though i would mention that dewalt sells the pex expander with or without the batteries (ie as a bare tool or with kit). I already had their battery platform from other tools so this allowed me to buy the bare tool with expanders (sans batteries) making it considerably cheaper. Can't remember exactly but I may have even got a fell off the truck model from ebay to save a little more. Frankly, manual expansion is pennywise pound foolish with the advent of the battery powered expanders. As I understand it, uponor came up with the design (that they license to Milwaukee and Dewalt) following notable leaks developing in their piping system from manual expansion done incorrectly where the expander wasn't being rotated.
 

Reach4

Well-Known Member
Messages
38,982
Reaction score
4,472
Points
113
Location
IL
Dahl 611-53-31 probably, if the elbow was on the wall. If it is on the floor of the cabinet, then straight, but on the floor of the cabinet would be unusual.

You would want a brass nipple. If there is no wall between the valve and the nipple, maybe something like this one: https://www.supplyhouse.com/Bluefin-BRN050-150-1-2-x-1-1-2-Brass-Nipple
brn050-150-2.jpg
Use PTFE tape and pipe sealant both on NPT threads.

dahl-611-53-31.jpg
 
Last edited by a moderator:

Jeff Knecht

Member
Messages
135
Reaction score
2
Points
18
Location
West End, NC
Dahl 611-53-31
611-53-31-4.jpg
probably, if the elbow was on the wall. If it is on the floor of the cabinet, then straight, but on the floor of the cabinet would be unusual.

You would want a brass nipple. If there is no wall between the valve and the nipple, maybe something like this one: https://www.supplyhouse.com/Bluefin-BRN050-150-1-2-x-1-1-2-Brass-Nipple
brn050-150-2.jpg
Use PTFE tape and pipe sealant both on NPT threads.

My mind just clicked in, must be close to beer time here in NC. Yep, mount drop-ear on the wall, just like a shower, and thread in nipple and connect to angle stop and install hookups. Brilliant, the drop-ear will provide the stability. I may just run the 1/2" PEX up to the drop-ear. I've seen some fancy chrome tubes with a base ( 3-4" tall), that can be attached to the cabin floor. Yes, I like the sound of that Dahl stop.

If I have not exhausted you yet, what do you think of my scheme to preassemble the 3/4" main line in the garage and then drag
it into the crawl? Would be a 2 person job. I could possibly, hard connect the 1/2" lines device feeds on the wall side too and gingerly, jockey them around and slide them into their respective floor holes. Pre-install (nail) one side of support straps to position the assembly in place and to take the stress off the T connections. Although, I would settle on just preassembling and installing the 3/4" assembly

Can't thank you enough for your time and expertise.
 

Reach4

Well-Known Member
Messages
38,982
Reaction score
4,472
Points
113
Location
IL
If I have not exhausted you yet, what do you think of my scheme to preassemble the 3/4" main line in the garage and then drag
it into the crawl? Would be a 2 person job. I could possibly, hard connect the 1/2" lines device feeds on the wall side too and gingerly, jockey them around and slide them into their respective floor holes. Pre-install (nail) one side of support straps to position the assembly in place and to take the stress off the T connections. Although, I would settle on just preassembling and installing the 3/4" assembly
Pex should be supported every 32 inches. I used screw-in "Talons" for that, centered on the joists. I used my battery-powered drill to turn the screws. It's easier than trying to hit a nail in close quarters.

Regarding pre-assembly, I don't really picture it. But if you picture it, I am confident it will work well.
 

Jeff Knecht

Member
Messages
135
Reaction score
2
Points
18
Location
West End, NC
Pex should be supported every 32 inches. I used screw-in "Talons" for that, centered on the joists. I used my battery-powered drill to turn the screws. It's easier than trying to hit a nail in close quarters.

Regarding pre-assembly, I don't really picture it. But if you picture it, I am confident it will work well.

Really rough sketch of separate hot and cold. Existing 3/4" mains, that I connected to ball valves.
3/4 x 3/4 x 3/4 Tee for hose bib. All others 3/4 x 3/4 x 1/2 Tees. 3/4 x 1/2 coupler/reducer for final feed to sink #2.

Hard connect on garage floor, assuring plumb angle to devices. Much easier than crimping in crawl.
I may dry fit 1/2" feed lines and see how that works.
 

Jeff Knecht

Member
Messages
135
Reaction score
2
Points
18
Location
West End, NC
Really rough sketch of separate hot and cold. Existing 3/4" mains, that I connected to ball valves.
3/4 x 3/4 x 3/4 Tee for hose bib. All others 3/4 x 3/4 x 1/2 Tees. 3/4 x 1/2 coupler/reducer for final feed to sink #2.

Hard connect on garage floor, assuring plumb angle to devices. Much easier than crimping in crawl.
I may dry fit 1/2" feed lines and see how that works.

Meant to send sketch.
 

Attachments

  • 16093700172218375182772495748474.jpg
    16093700172218375182772495748474.jpg
    50.6 KB · Views: 183
Top