Cast iron alcove tub on slab - waste and overflow tips?

Users who are viewing this thread

Messages
34
Reaction score
8
Points
8
Location
redlands. CA
Hello! New member, though I spent a LOT of time researching here a few years ago when I remodeled our master bath from the studs out. I've started in on the main bath now, and thought the tub was going to be an "easy-button" job compared to building the shower from the ground up. Not so sure now. :)

At the moment, I'm just finished with demolition, and am waiting for a custom window so i can re-frame all the termite-eaten exterior wall and get the new window in, plumb in new shower/bath valve and hardware, then install the tub.

I picked up a Kohler Villager cast iron tub yesterday, which is currently in my garage. The tub I removed was a similar left-drain cast iron alcove tub. The drain/overflow was all brass, and I was thinking I'd use the Everbilt Twist and Close 1-1/2 in. 20-Gauge Brass Pipe Bath Waste and Overflow Drain available at the local big box. This guy:
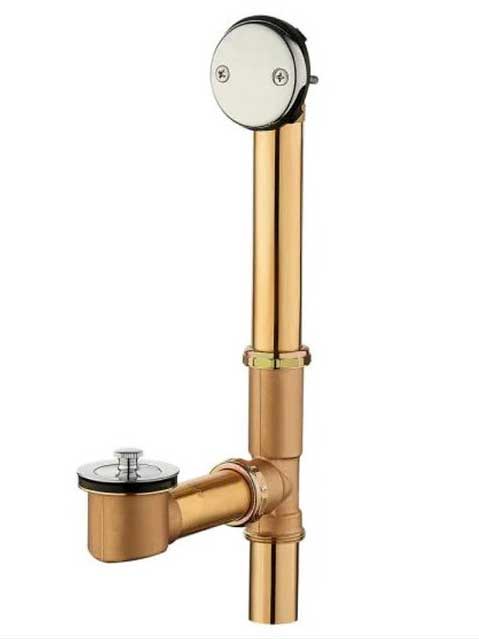
tub-brass-drain.jpg


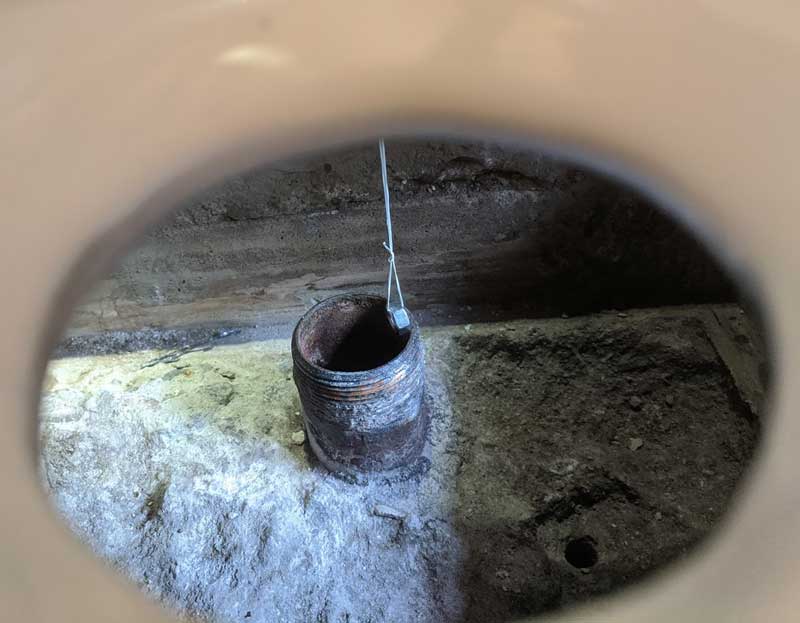
The house is slab on grade with stucco exterior walls. the plumbing is within a wet wall that is shared with the master bath, and is a narrow "box" defined by two stud walls of "sideways" studs. There is tub drain access hole on the exterior wall. Here's a picture:
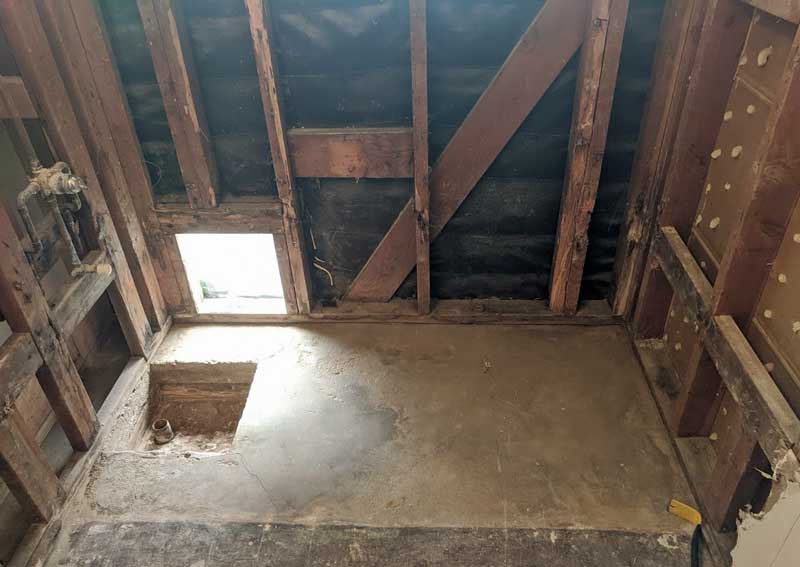
redlands-01.jpg


The drain is set in poured concrete and is a standard 1 1/2 inch ID iron pipe, I assume as old as the house (1956). It has about 3/8 inch of good thread.
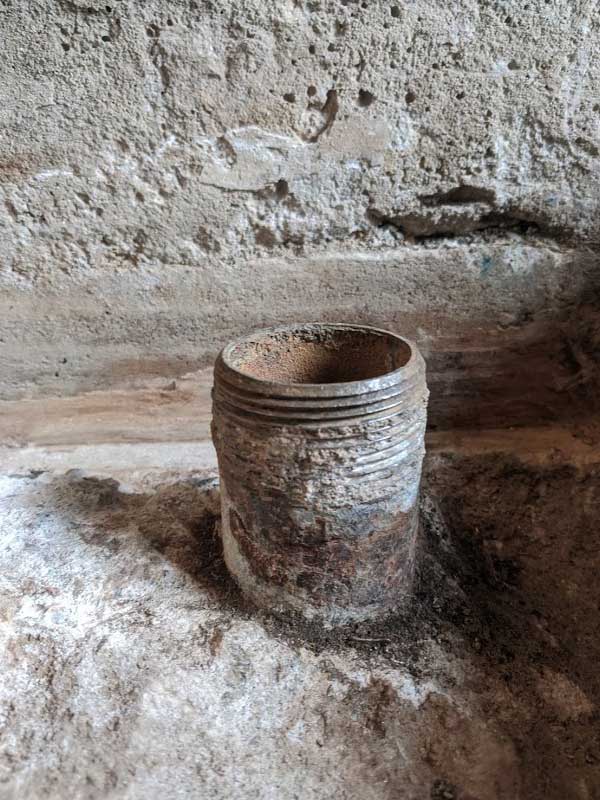
redlands-02.jpg


I had to give the threaded ring that was attached to that a good few days' soaking of sneaky pete followed by a good heating with a torch to get it off in one piece, and it's pretty mangled, but still serviceable, minus the rubber ring that was inside it. I mention that because it doesn't appear that the everbilt drain comes with this part.
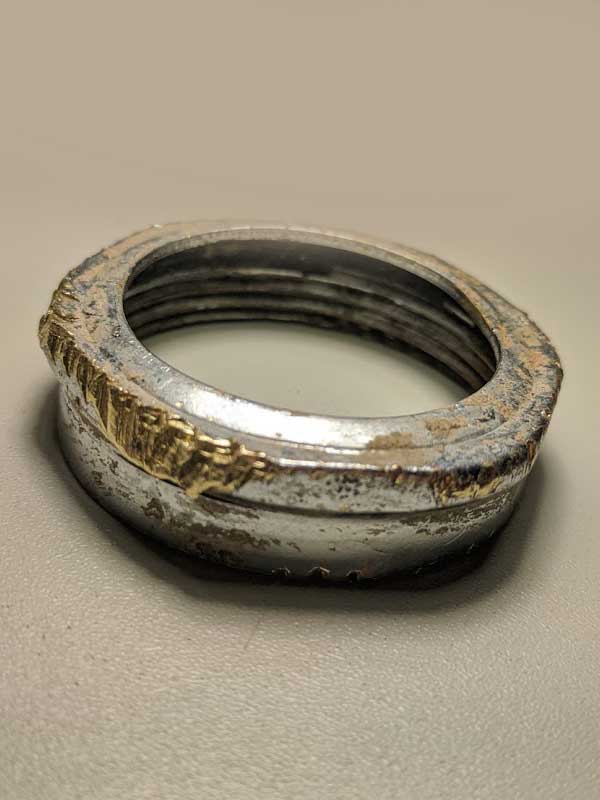
redlands-03.jpg


I have read all of the instructions for both the tub and the drain/overflow, and both assume I know a lot more about plumbing than I do. Most videos out there show installations where easy access is available to the drain from the wall behind it. In this case, the wall behind it is the master bath shower. The exterior access hatch is in a position where you have to be a contortionist to actually use it to access the drain. I'm assuming i'll access it from the side by reaching around and through the wet wall after getting the tub in position.

My question: How much of the drain hardware *must* be attached to the tub before putting the tub in position? Most things I see have it all attached, but this tub is such a pig, I'm worried i'll bang it up while wrestling it into the alcove. I feel like pre-assembling the drain/overflow parts to a good dry fit on the tub, then removing the assembled drain/overflow parts, and sliding that into the drain pipe in the floor, THEN positioning the tub, and attaching the overflow and drain inside the tub, then tightening the sleeve on the iron pipe over the slip-in would be the way to go.

Thoughts? I want to get this right, since everything will be good and built in and tiled over once this job is done.

Thanks!
 

Terry

The Plumbing Wizard
Staff member
Messages
29,942
Reaction score
3,468
Points
113
Location
Bothell, Washington
Website
terrylove.com
The drain in the ground is standard 1-1/2" threaded galvanized pipe for a 1-1/2" slip joint nut and washer.
Most of the time, dry fit the drain to the tub, remove it, and then install it to the ground. You can measure the distance to the ground from the bottom of tub, and have the drain at that height. Then the tub drops down on it. A Villager tub is about 300 pounds. Not an easy installation.

https://terrylove.com/forums/index.php?threads/installing-a-kohler-villager-cast-iron-tub.33212/

With the wall open, the Delta 600 valve should be replaced. It would be a big mistake to try to reuse it.
 
Messages
34
Reaction score
8
Points
8
Location
redlands. CA
The drain in the ground is standard 1-1/2" threaded galvanized pipe for a 1-1/2" slip joint nut and washer.
Most of the time, dry fit the drain to the tub, remove it, and then install it to the ground. You can measure the distance to the ground from the bottom of tub, and have the drain at that height. Then the tub drops down on it. A Villager tub is about 300 pounds. Not an easy installation.

https://terrylove.com/forums/index.php?threads/installing-a-kohler-villager-cast-iron-tub.33212/

With the wall open, the Delta 600 valve should be replaced. It would be a big mistake to try to reuse it.

Thanks so much for the confirmation on the plan, and the link to the villager install thread. That is going to come in super handy! In tub-shopping, I read a review from a plumber who mentioned that he liked installing villagers because he could do it by himself (!!) and that it's short height let him get it into the alcove with the tub on its apron and it fit between studs as it was turned into position. Probably not saying that correctly. After loading and unloading the tub at the big box and at home, I know i'll be getting some help getting it in!

As for the plumbing, it (along with all the framing in the alcove photo) will be replaced. I used some stuff from a company called Inolav in the master bath and have been really happy with it. I'm planning to use them again, specifically, this set.

inolav-is102.jpg


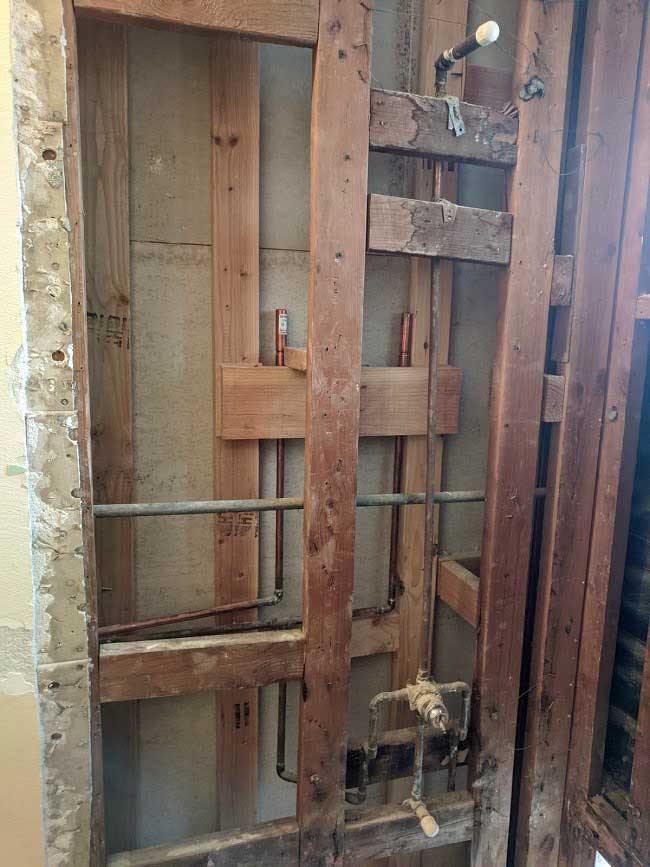
Your mention of the plumbing reminds me of another question i had. I installed hammer arresters on the hot and cold lines in the master bath. There's a bit of convolution in the plumbing between the main and master, but i was still hoping to take advantage of most of the existing copper. Here's a picture where you can see some of that plumbing (including some of the master bath shower plumbing):

redlands-04.jpg


I was hoping to cut the hot and cold water lines on their upward path to the old delta valve and attach the new valve to those with a couple of elbows. One line is about five convoluted feet from the anti-hammer, the other is harder to see, but there might be ten feet between the new valve and the anti-hammer if i use the existing configuration. Will that work? Or will I have to cut in closer to the hammer arresters to take advantage of them?
 

Terry

The Plumbing Wizard
Staff member
Messages
29,942
Reaction score
3,468
Points
113
Location
Bothell, Washington
Website
terrylove.com
Most new tub valves are slow closing and don't require hammer arrestors.

I see where you could have fewer fittings to the valve.
 
Last edited:
Messages
34
Reaction score
8
Points
8
Location
redlands. CA
Most new tub valves are slow closing and don't require hammer arrestors.

NOW you tell me. Ha!

Being an amateur, I've been erring on the side of caution, assuming if i leave something out, I'll live to regret it. The advice on that other thread you sent me to about using a ledger board despite kohler's advice to shim the feet with metal shims instead is solid gold. I had no idea how i was going to manage that in the alcove, and was going to just go with a ledger board. I feel a lot better about doing that now. What a great resource you have here. Thanks again for your quick replies.
 

Tuttles Revenge

In the Trades
Messages
4,458
Reaction score
1,572
Points
113
depending on how OCD you are and I may have just planted the worm in your ear, but I would recomend installing your valve after you set your tub so that the valve lines up with the drain. Or at least install the piping to the valve so that you can slide it left or right a little bit to dial it in. Leave your tub stub out until the tub is set too, as it will be in your way as you take the tub in and out 3x getting the drain dialed in.
 
Messages
34
Reaction score
8
Points
8
Location
redlands. CA
depending on how OCD you are and I may have just planted the worm in your ear, but I would recomend installing your valve after you set your tub so that the valve lines up with the drain. Or at least install the piping to the valve so that you can slide it left or right a little bit to dial it in. Leave your tub stub out until the tub is set too, as it will be in your way as you take the tub in and out 3x getting the drain dialed in.

Ha! You have me figured out. Since I'm under no time constraints, I'll be doing that for sure. I hadn't considered the order of operations, but now that you mention it, i'll save that for after the tub is in and i'll align the valve, spout, and showerhead with the tub drain and overflow. I expect to be looking at this stuff for the rest of my life...may as well not be mad every time i look at it. haha.
 

Tuttles Revenge

In the Trades
Messages
4,458
Reaction score
1,572
Points
113
Its surprises a lot of people when they figure out that the center of the over all tub doesn't align with the center of the drain and overflow on most tubs. I have this discussion a Lot with clients in showers especially.. where is the center? Center of the inside of curb, Tile wall to tile edge? Wall to glass? I also like to really consider where my valves and stub outs will line up with tile I'll install a tub spout from 4-6" above the tub depending on the layout and size of the tile. Control valve is the same depending on whether there are accent lines or other features.
 
Messages
34
Reaction score
8
Points
8
Location
redlands. CA
Back again!

With the advice i've received here, I've managed to get my kohler villager tub from the garage into the main bath alcove by myself. I think it helped a lot that i decided it would just be easier to replace the framing on the wet wall since it was pretty shoddy and most of the framing would have been in the wrong place anyway. With that framing out of the way, i was able to get the tub all the way from the garage to the alcove on it's apron, "egyptian style," mostly sliding it on towels on top of 2 X 4s, with a couple of 3-point turns. Today, I'm trying to get the tub into its final resting place, and I have a few more questions:

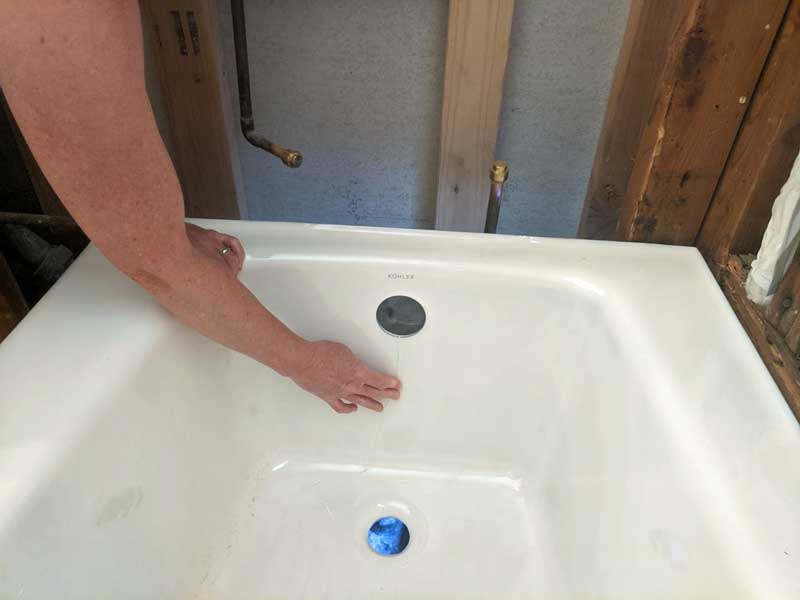
1. The ideal position of the tub (for minimum nonsense in shimming and sister studs on the back wall of the alcove) to make the backer board and tile easy to install is going to be such that the drain in the floor is about 1/2 to 3/4 inch out of alignment off-center with the drain and overflow of the tub. I hung a makeshift plumb bob from the bottom of the overflow hole to check. Like so:

redlands-07.jpg


Looking at the plumb through the tub drain:

redlands-06.jpg


It doesn't seem that this offset is a problem for the waste, at least when i look at it, as there are relatively fat rubber gaskets between each and the tub. Am I overlooking a possible problem here?

2. I checked about 50 different ways with a good bubble level, and in order for the tub to be "perfectly level" (in relation to the tile i'll be installing...the floor actually dips 1/4 inch away from the drain side of the tub), I need it to sit pretty much perfectly on the ledger board i installed. However, if it's set that way, the apron only touches the out-of-level floor on the drain end of the apron. I am planning to fill some little paper takeout containers with stucco brown coat and some wadded up chicken wire (saw that here!), and set those under the feet so when they set, they'll hold the tub perfectly level. As it is, with the tub just set on the ledger board, it will rock if you stand on one spot or another. I know this can be remedied in a lot of ways, even by "nailing" the edge of the tub to the ledger board/studs, but I feel best doing it by supporting the feet in some cement with fine aggregate on the slab floor. I was thinking that after the tub is in, I can float some self-leveling concrete up to (and slightly under) the apron. Does this make sense?

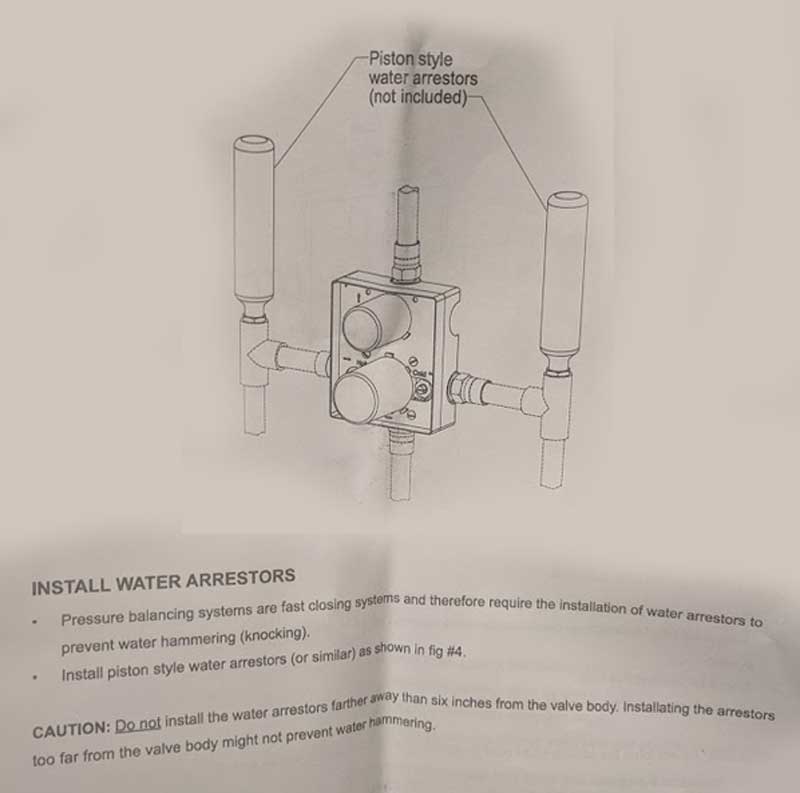
3. The tub/shower fixtures arrived the other day, and I was surprised to find that they specifically recommend hammer arresters be installed. I wondered why i would have installed them with the master bath's shower (same fixture manufacturer) without researching, and now i remember having seen it in the manual for that stuff too. This is contrary to what Terry says above, so I'm inclined to think it's B.S. (though it says this valve is fast-closing...), but here's a picture of that page of the install manual:

redlands-05.jpg


True? Overkill?

Anyway, thanks in advance for all you're good advice!
 
Last edited:

Terry

The Plumbing Wizard
Staff member
Messages
29,942
Reaction score
3,468
Points
113
Location
Bothell, Washington
Website
terrylove.com
It's pretty normal to shim the apron on a tub install in an older home. Often the floors have settled some and are a bit out of level.
If you can also shim the legs that would be nice, but not often doable on the remodel. Access tends to be limited with no open walls.

Hammer arrestors don't hurt, but I haven't needed them yet with the newer slow closing valves.
 
Messages
34
Reaction score
8
Points
8
Location
redlands. CA
Well, I spoke too soon.

On leak test, pretty much every slip nut on the waste leaked. Ha!

It wasn't because everything was a little off-center...rather, it was because everything is a little too far forward. The size of the alcove is such that the back of the tub (where a bather's back would be) is right against the studs, yet the drain and overflow are still maybe 1/2 inch to 1 inch too far "forward," effectively forcing the brass pipe to the overflow to "lean back," which is throwing off the seal where the slip nut attaches to the drain pipe in the floor, and also forces an angle where the drain pipe from the shoe joins the pipe from the overflow to be off of the 90 degrees than it's supposed to be. So the slip nut that joins those leaks, too.

So, while I look around at the many "flexible" tub waste options, I'm curious...is there a way to make the brass work? What I took out was brass, and was definitely also cocked back a little like what I've installed.
 
Last edited:
Messages
34
Reaction score
8
Points
8
Location
redlands. CA
Thanks, Terry.

These Watco innovator things look like just what i need. If the pros are using it, I'm sure it's good enough for me. At first I couldn't figure out how having just one flexible component solves the problem by after some thinking, I got it.

Thanks again!
 

Tuttles Revenge

In the Trades
Messages
4,458
Reaction score
1,572
Points
113
but I feel best doing it by supporting the feet in some cement with fine aggregate on the slab floor. I was thinking that after the tub is in, I can float some self-leveling concrete up to (and slightly under) the apron. Does this make sense?
You will need to "Dam" the recess in the floor where the drain is in order to do this. I tried self leveler under some showers that didn't get set in mortar and all the mud came pouring out the hole cut in the post tension slab. I had to spray foam that hole to get the self leveler to stay under the shower. It worked great after that tho.

What brand shower valve is that? There are a few valves I've seen on Amazon that I fortunately researched because of a post on this site.. then a customer wanted to install them and I rejected them. I don't recognize the diagram.

PS. 2x Terrys drain suggestion.
 
Messages
34
Reaction score
8
Points
8
Location
redlands. CA
What brand shower valve is that? There are a few valves I've seen online that I fortunately researched because of a post on this site.. then a customer wanted to install them and I rejected them. I don't recognize the diagram.

PS. 2x Terrys drain suggestion.

As it ended up, there's only a small gap along the length of the bottom of the apron. The thickness of the tile will conceal it, so I don't need to use the self-leveling concrete after all. Bonus!

The valve is made by Inolav. I used a similar valve and in the master bath shower when i remodeled that a few years ago and it's worked great. I don't know a lot about the industry, but i get the sense there are a lot of outfits like inolav who make the main castings and exterior of the fixtures but use parts from other manufacturers. This company lists all the suppliers that they source their materials from (here) which I like. Not too keen on their prices, but it seems all of this stuff except the ones at the big boxes cost a fortune. The wife likes the way it looks, so it's worth the extra $$.
 
Messages
34
Reaction score
8
Points
8
Location
redlands. CA
The Watco Flex tub waste came in today. The instructions have one hateful line: "DO NOT USE OIL-BASED PUTTY PRODUCTS"

However, they don't tell you what you SHOULD use. Very helpful. I get that you don't want the putty to touch the PVC, but, applied correctly, the putty DOESN'T touch the PVC. So I'm at a loss...should I use some sort of silicone based caulk? I can't find this discussed anywhere...

I do not want to be f-ing with this ten years from now when i discover the putty reacted with the plastic and the drain elbow has turned to dust...
 

Terry

The Plumbing Wizard
Staff member
Messages
29,942
Reaction score
3,468
Points
113
Location
Bothell, Washington
Website
terrylove.com
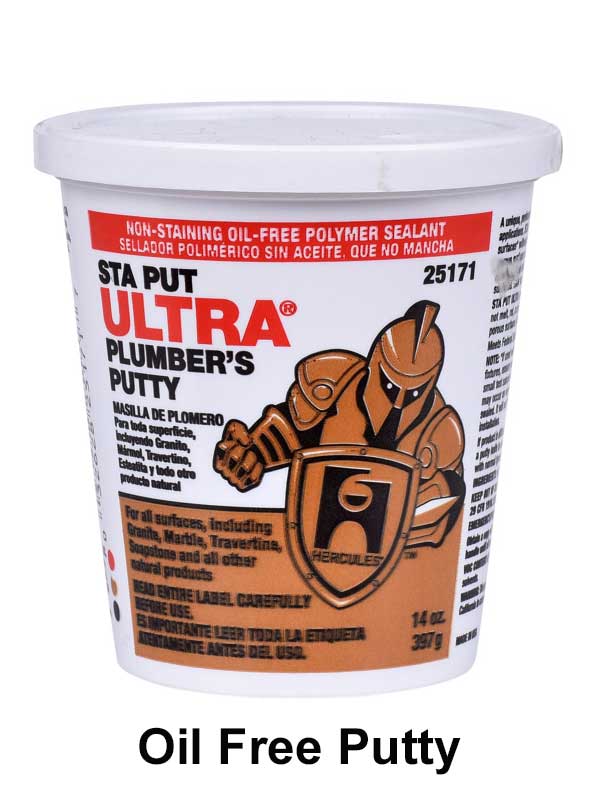
Hercules® Sta Put Ultra®
Stainless plumbers putty is a professional-grade, stain-free polymer sealant that is safe for use in setting most types of plumbing fixtures and surfaces. Oil-free formula can be used without pre-treatment on porous surfaces. A permanently soft and flexible putty. Clean to handle. An odorless and non-toxic putty. Can be used immediately after applied. No set or cure time. Plumbers have come to trust the Hercules offering to provide the highest quality of plumbing products.
AVAILABLE IN 2 VARIATIONS

staput-ultra.jpg
 
Messages
34
Reaction score
8
Points
8
Location
redlands. CA
Thanks, Terry!

I called around and nobody has that particular putty in stock around here. My whole day's work depends on getting this waste in before i can proceed. Any chance that Oatey's "Stain Free" putty would be a good fit? Everyone here seems to have that in stock. The product description reads:

"Oatey® Stain-Free Plumber's Putty is an oil-free, non-staining plumbers putty formulated for setting frames, faucets and basket strainers on natural surfaces...

Perfect for any natural porous surface including granite, marble, quartz, sandstone, corian, plastic or any other natural, porous surface

Not for use on ABS..."

This whole assembly is PVC, not ABS, so i assume this will work... As always, thanks so much for your fast responses...a lifesaver!
 
Messages
34
Reaction score
8
Points
8
Location
redlands. CA
When I read the instructions on the first (brass) tub waste i tried to install, I laughed when I read "installing a tub waste and overflow is one of the most time consuming jobs in a plumber's day." Two full days, two different waste and overflow kits, three abrasions, and two minor burns later, i'm not laughing anymore, but the tub's installed, as is the waste and overflow, and everything has passed the leak test. Good thing i'm not charging myself by the hour. :)

Now that I'm framing the wet wall back up again, i'm scratching my head about what parts i need to make the tub spout flange sit flush against the tile wall. The spout coupling is brass 1/2 inch male pipe thread, so i know i need a 1/2 inch female pipe thread in the wall, but just sweating a 1/2 inch drop ear elbow on isn't going to help...with just a 4 inch (or so) run from the bottom of the valve to the elbow, I don't see how i can have the elbow on any plane but the same one as the valve...

That would put the elbow like 2 inches (or so) behind the surface of the tile. This tub spout has no play at all, so the female threads it screws into have to be in just the right position. Here's a couple of picture of the spout. It's basically a machined chrome plated billet that has a flange between the spout and the coupling, which has a couple of o-rings and is held into the billet with two hex set screws.

redlands-05.jpg


redlands-06.jpg


Any tips on how people who know what they're doing make this work would be greatly appreciated. I assume it's some combination of nipples and adapters, but that seems sort of...inaccurate.

Thanks!
 
Top