Advice on approach to repair this toilet flange

Users who are viewing this thread

ThatIsTheWay

New Member
Messages
11
Reaction score
5
Points
3
Location
Massachusetts
Hi all,

First time poster here. I'm currently in the middle of a bathroom/laundry room floor reno and am particularly stumped on what to do about this toilet flange.

I ripped up the layer cake of tile, cement board, sheet vinyl, then thin plywood underlayment to get to my subfloor. Now that I have the subfloor fairly level, I want to address the toilet flange repair as I embark on putting down Ditra and new tile.

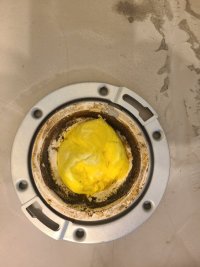
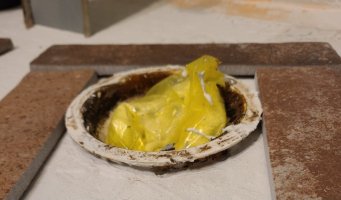
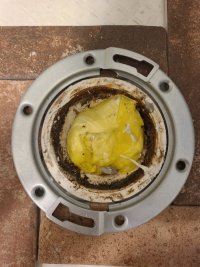
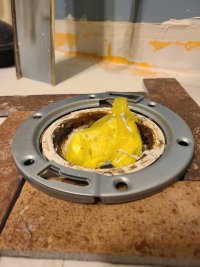
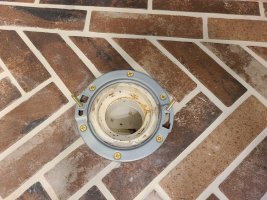
When I removed the old toilet, there was a vinyl spacer on top of a rusted out and completely corroded metal flange closet bolt ring. I chiseled and pryed that out and purchased one of those Oatey Moss Bay 2-piece replacement metal rings.

Unfortunately, as you can see in the picture, it does not fit around the PVC flange at all. I assumed these things were universal, but evidently not. I even bought a few other brands to see if it was Oatey specifically that didn't fit, and they were all too wide.

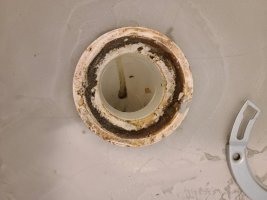
What other reliable solution can be used for this scenario? The flange also appears to be offset if you look straight down into the pipe. Kind of like this: https://www.oatey.com/products/oatey-level-fit-offset-closet-flange-metal-ring-1468302402

Does that limit what retrofit options you can use? The ID of the pipe I believe is 3" if you were to cut off the flared part at the top. I've never dealt with toilet flange repairs before so I'm feeling kind of out-to-sea...

Appreciate any thoughtful advice.
 

ThatIsTheWay

New Member
Messages
11
Reaction score
5
Points
3
Location
Massachusetts
Here's some pics of my set up.
 

Attachments

  • 20230428_114551.jpg
    20230428_114551.jpg
    77.3 KB · Views: 194
  • 20230426_203227.jpg
    20230426_203227.jpg
    49.2 KB · Views: 194
  • 20230426_203251.jpg
    20230426_203251.jpg
    67 KB · Views: 188
Last edited:

Reach4

Well-Known Member
Messages
38,898
Reaction score
4,436
Points
113
Location
IL
No photo. If you take a photo or two, pull the rag out first.

How does the altitude of the existing flange ring compare to that of the finished floor?

PASCO 21013, Jones Stephens C85000, Oatey 42775, and Superior 21015 are repair rings with mounting tabs outside. They may do the job for you. The job is to hold down the toilet.

Ideally the closet flange sits on the finished floor, but people deal with deeper routinely.
 
Last edited:

ThatIsTheWay

New Member
Messages
11
Reaction score
5
Points
3
Location
Massachusetts
No photo. If you take a photo or two, pull the rag out first.

How does the altitude of the existing flange ring compare to that of the finished floor?

PASCO 21013, Jones Stephens C85000, Oatey 42775, and Superior 21015 are repair rings with mounting tabs outside. They may do the job for you. The job is to hold down the toilet.

Ideally the closet flange sits on the finished floor, but people deal with deeper routinely.
I posted a few photos in this thread:


The post with my photos in this thread is held up for moderator approval due to my newbie status.
 

Reach4

Well-Known Member
Messages
38,898
Reaction score
4,436
Points
113
Location
IL
Is that the finished floor in your photos?

If the plastic sits 1/2 inch or less above the floor, I have a solution pictured. If it sits 5/8 inch proud of the floor, maybe still works.

So I am thinking you put some spacer under the plastic to resist the pressure of the wax. Put a repair ring at the floor level, centered on the center of the PVC input. Screw the repair ring down.

Test where the shims need to go to avoid rocking, and place the shims. Lift the toilet, place the wax. Place the closet bolts into your new repair ring. Drop the toilet on the wax and shims, and tighten the closet bolts. I am not a pro.

So the repair ring will be holding the toilet down. The plastic, with some help of shimming under the remnant of the ring, pushes up against the wax..
 

ThatIsTheWay

New Member
Messages
11
Reaction score
5
Points
3
Location
Massachusetts
Is that the finished floor in your photos?

If the plastic sits 1/2 inch or less above the floor, I have a solution pictured. If it sits 5/8 inch proud of the floor, maybe still works.

So I am thinking you put some spacer under the plastic to resist the pressure of the wax. Put a repair ring at the floor level, centered on the center of the PVC input. Screw the repair ring down.

Test where the shims need to go to avoid rocking, and place the shims. Lift the toilet, place the wax. Place the closet bolts into your new repair ring. Drop the toilet on the wax and shims, and tighten the closet bolts. I am not a pro.

So the repair ring will be holding the toilet down. The plastic, with some help of shimming under the remnant of the ring, pushes up against the wax..
Thanks for the suggestion! So what you see pictured above is not the finished floor, but self leveling underlayment. I laid Ditra over that this past weekend and plan to tile over the Ditra. Here's a few new pics of the tile laid around the flange. The flange will essentially be level with the finished floor, and the repair ring would sit about a 1/4" higher than the flange itself.

Would shimming underneath the plastic rim still apply or would you envision a different approach?

Unfortunately there's not enough space between the Ditra and the flange to slide the tile underneath for support, especially when it will be set in a bed of thinset that will only raise it even higher than what's pictured.
 

Attachments

  • 20230501_201829.jpg
    20230501_201829.jpg
    60.2 KB · Views: 181
  • 20230501_202023.jpg
    20230501_202023.jpg
    110.5 KB · Views: 177
  • 20230501_202031.jpg
    20230501_202031.jpg
    89.6 KB · Views: 223

Reach4

Well-Known Member
Messages
38,898
Reaction score
4,436
Points
113
Location
IL
If the PVC pipe holding up the plastic is rigid enough, no packing under the plastic would be needed. Wax does not take a whole lot of force to compress.

Put the repair ring on top of the finished floor, ideally.
 

Jeff H Young

In the Trades
Messages
8,953
Reaction score
2,234
Points
113
Location
92346
if you have solid backing to screw to you can put a 1/2 inch closet ring spacer down then screw the stainless repair ring. just stack em. because you said thats a offset ring thats the best option unless you want to open floor up or cieling below
 

ThatIsTheWay

New Member
Messages
11
Reaction score
5
Points
3
Location
Massachusetts
If the PVC pipe holding up the plastic is rigid enough, no packing under the plastic would be needed. Wax does not take a whole lot of force to compress.

Put the repair ring on top of the finished floor, ideally.
It seems pretty solid. Seeing as I'm alreading going to be tiling around it, maybe I can pack in some thinset underneath where it stands proud for added stability? I can also seal where there's a gap between the flange and repair ring with silicone just in case
 

Jeff H Young

In the Trades
Messages
8,953
Reaction score
2,234
Points
113
Location
92346
I would not put ring over top of finish floor because I dont want to drill tile , and thinset only to find out I dont have solid backing for screws So Id screw flange down befor flooring. plus coming from a construction background our code and inspectors require all flanges installed on top out inspection. I think its easier to do it in rough stage like right now
 

ThatIsTheWay

New Member
Messages
11
Reaction score
5
Points
3
Location
Massachusetts
I would not put ring over top of finish floor because I dont want to drill tile , and thinset only to find out I dont have solid backing for screws So Id screw flange down befor flooring. plus coming from a construction background our code and inspectors require all flanges installed on top out inspection. I think its easier to do it in rough stage like right now
Interesting thanks for the tips. There should be enough backing between the wood subfloor, self leveler, and thinset/Ditra layers I would think. So you would put the spacer down first, then the metal repair ring, and then bolt both down to the subfloor, and tile around them all? Or should the metal ring be on the bottom?

Do you need to add a seal or gasket between the spacer and ring?

Also, what type of screws (type and length) do you recommend when securing the ring and spacer assembly?
 

Jeff H Young

In the Trades
Messages
8,953
Reaction score
2,234
Points
113
Location
92346
Interesting thanks for the tips. There should be enough backing between the wood subfloor, self leveler, and thinset/Ditra layers I would think. So you would put the spacer down first, then the metal repair ring, and then bolt both down to the subfloor, and tile around them all? Or should the metal ring be on the bottom?

Do you need to add a seal or gasket between the spacer and ring?

Also, what type of screws (type and length) do you recommend when securing the ring and spacer assembly?
I would silicone it well . but the wax seals it too .
 

Reach4

Well-Known Member
Messages
38,898
Reaction score
4,436
Points
113
Location
IL
Also, what type of screws (type and length) do you recommend when securing the ring and spacer assembly?
I like Tapcons for attaching into concrete. Others are good with lead anchors, which seem to me as to require more skill to get them placed.

As to length, I think that would differ according to how far down they go to reach the intact concrete.

When drilling for Tapcons, it is important to drill deeper than the point of the screw will reach, and to blow out all of the dust/debris from the hole before screwing in the screws. Use the drill bit that Tapcon sells.

https://www.confast.com/products-tapcon/ says
"Different lengths of Tapcon® screw are used for different thickness of materials being fastened. The Tapcon® screw requires a minimum embedment of 1” and a maximum embedment of 1-3/4”. To determine the maximum length screw to use for any specific application, add the thickness of the material to the minimum embedment of 1” to get the minimum length screw required. Adding the maximum embedment of 1-3/4” to the thickness of the material being fastened will provide the maximum length of Tapcon® screw to use."
 

Jeff H Young

In the Trades
Messages
8,953
Reaction score
2,234
Points
113
Location
92346
I was under impression it was a wood floor with 3/4 inch lightweight at most havent used tapcons for that . generally I use brass screws to real wood backing not plywood or chip board
 

ThatIsTheWay

New Member
Messages
11
Reaction score
5
Points
3
Location
Massachusetts
Forgot to circle back to this thread and thank everyone for all the wonderful advice! I ended up securing the flange on top of the tile with #12 brass screws sinking down to the subfloor, and felt really strong installed. I got one of those diamond coated specialty bits for porcelain and stone drilling. Then followed a tutorial where they recommended making a "dam" with a ring of plumber's putty around your drill site and then pouring water to keep things cool. Worked perfectly!

Got the whole thing shimmed, sealed, bolted, and caulked within a few hours. Seems solid as a rock with no perceivable leaks!
 

Attachments

  • 20230604_104541.jpg
    20230604_104541.jpg
    138.5 KB · Views: 191
  • 20230604_144025.jpg
    20230604_144025.jpg
    96.6 KB · Views: 180
  • 20230604_144111.jpg
    20230604_144111.jpg
    86.5 KB · Views: 170
Top
Hey, wait a minute.

This is awkward, but...

It looks like you're using an ad blocker. We get it, but (1) terrylove.com can't live without ads, and (2) ad blockers can cause issues with videos and comments. If you'd like to support the site, please allow ads.

If any particular ad is your REASON for blocking ads, please let us know. We might be able to do something about it. Thanks.
I've Disabled AdBlock    No Thanks