45 Degree Outside Corner Bead Installation

Users who are viewing this thread

Martina

Member
Messages
79
Reaction score
2
Points
8
Location
Round Rock, Texas
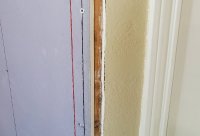
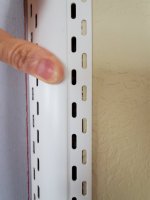
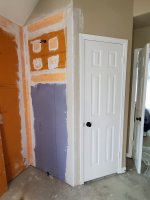
Hello! During our bathroom demo, we cut back one of the walls a tad too far (1/4 - 1/2 inch), leaving us little room to affix the 45 degree outside corner bead to the right wall (see images). Is there a way to fix this issue other than having to cut back the drywall to the door frame and replacing it? Also, I found conflicting information on the web with regards to the installation procedures of vinyl bead. Some use nails, some staples, others glue it down and then I also saw someone embedding everything in mud. Very confusing. What is the proper way to install this type of bead? Thanks in advance for any forthcoming responses.
 

Attachments

  • 20200506_191128.jpg
    20200506_191128.jpg
    50.7 KB · Views: 349
  • 20200506_172024.jpg
    20200506_172024.jpg
    40.7 KB · Views: 290

Jadnashua

Retired Defense Industry Engineer xxx
Messages
32,770
Reaction score
1,190
Points
113
Location
New England
It appears that the drywall section you installed is vertical. FWIW, the paper used on drywall is directional, and it is much stronger when installed horizontally versus vertically. Same sort of thing on how to install plywood on a floor, the long side should cross the joists, not run along them.

If the bead doesn't have some support, if it gets banged, it's more likely to deflect and that can crack the mud and paint. It's good to have the holes supported to near the point where the stuff is rounded. Some drywall screws to hold it in place and then mud it should work. Embedding it in mud can work, too, but it's harder to ensure it stays where you want it prior to things setting up.
 

Martina

Member
Messages
79
Reaction score
2
Points
8
Location
Round Rock, Texas
It appears that the drywall section you installed is vertical. FWIW, the paper used on drywall is directional, and it is much stronger when installed horizontally versus vertically. Same sort of thing on how to install plywood on a floor, the long side should cross the joists, not run along them.

If the bead doesn't have some support, if it gets banged, it's more likely to deflect and that can crack the mud and paint. It's good to have the holes supported to near the point where the stuff is rounded. Some drywall screws to hold it in place and then mud it should work. Embedding it in mud can work, too, but it's harder to ensure it stays where you want it prior to things setting up.
Hello, Jim,

Thank you kindly for your reply and advice. I did not know about horizontal drywall installation offering more strength. I will me mindful of that in the future.

The products we used in our wet area are Schluter Kerdi Board and National Gypsum EXp Tile Backer (see attached photograph). The facer of the NG brand is composed of an acrylic coated fiberglass mat. Is it still recommended to install both the Kerdi and Tile Backer horizontally or does that only apply to regular drywall? On a side note, the reason we mixed the products on one wall is due to the fact that we're still adding a build-out to accommodate a full size shower niche under the shower head. The existing wall plumbing did now allow us to place a niche anywhere, so we're adding this build out over the purple backer board. In the end, everything will be covered in Kerdi.

With regards to the corner bead installation, I 'think' I was able to make it work. I used construction adhesive to secure the corner bead to the walls, and then added dozens of nails around the edges. It seems pretty solid. I then added a good layer of mud, tape (along the sides to cover the bead holes), and another top layer of mud. I'm going to let it dry for a few days now, then sand it down and add another layer of mud. Hopefully it will hold up and not crack on me. We'll see.

Thanks again for your response and advice. Much appreciated.

Martina
 

Attachments

  • 20200507_173258.jpg
    20200507_173258.jpg
    62.1 KB · Views: 278

Jadnashua

Retired Defense Industry Engineer xxx
Messages
32,770
Reaction score
1,190
Points
113
Location
New England
Kerdiboard is has a non-directional outer surface, so it doesn't make any difference how you orient it. MOst cbu is the same, so mount it to get your seams where you want them and minimize cuts or seams.

If you try to rip any paper without first creasing it, you'll find on almost all of them that you'll get a clean rip in one direction, and a ragged one if you try in the other. If you look at copy or printer paper, you'll see a term listed on the wrapper call short or long...that's the direction of the cellulose fibers in the paper, and it can make a big difference in jamming a printer if it pulls it in one direction and the natural curve is in the other (it works best if you pull along the long fiber direction). Drywall is much easier to bend in one direction than the other, just like plywood, so that needs to be taken into consideration when you're asking for strength out of it.

www.johnbridge.com is a great resource for doing things with tile.
 

Martina

Member
Messages
79
Reaction score
2
Points
8
Location
Round Rock, Texas
Kerdiboard is has a non-directional outer surface, so it doesn't make any difference how you orient it. MOst cbu is the same, so mount it to get your seams where you want them and minimize cuts or seams.

If you try to rip any paper without first creasing it, you'll find on almost all of them that you'll get a clean rip in one direction, and a ragged one if you try in the other. If you look at copy or printer paper, you'll see a term listed on the wrapper call short or long...that's the direction of the cellulose fibers in the paper, and it can make a big difference in jamming a printer if it pulls it in one direction and the natural curve is in the other (it works best if you pull along the long fiber direction). Drywall is much easier to bend in one direction than the other, just like plywood, so that needs to be taken into consideration when you're asking for strength out of it.

www.johnbridge.com is a great resource for doing things with tile.
Great information! Thank you so much for sharing, Jim!
 

Martina

Member
Messages
79
Reaction score
2
Points
8
Location
Round Rock, Texas
Build it up the mud in layers with setting time in between so that the final wet layer is not so thick.
Thanks for your reply! I allowed the first coat to thoroughly dry before sanding it and it actually turned out quite nicely with smooth transitions along the edges. If all looks good, should I apply a second coat of mud or leave as is?
 

LLigetfa

DIYer, not in the trades
Messages
7,508
Reaction score
581
Points
113
Location
NW Ontario, Canada
If all looks good, should I apply a second coat of mud or leave as is?
I was talking about what is behind the corner bead. You don't want a lot of gap behind it so if there is still a large gap then layer on more mud and let dry. If it is a small gap apply mud and set the corner bead into it or install without mud under it, your choice. I would embed in mud.
 

Martina

Member
Messages
79
Reaction score
2
Points
8
Location
Round Rock, Texas
I was talking about what is behind the corner bead. You don't want a lot of gap behind it so if there is still a large gap then layer on more mud and let dry. If it is a small gap apply mud and set the corner bead into it or install without mud under it, your choice. I would embed in mud.
Thanks for clarifying. Indeed, there was a decent gap behind the corner bead. I tried pushing in as much mud as I could through the tiny corner bead holes, but am afraid there is probably still a good gap. I did embed tape along the sides which I think really helped, but will apply a second coat of mud. Thanks for your advice. Much appreciated!
 
Top
Hey, wait a minute.

This is awkward, but...

It looks like you're using an ad blocker. We get it, but (1) terrylove.com can't live without ads, and (2) ad blockers can cause issues with videos and comments. If you'd like to support the site, please allow ads.

If any particular ad is your REASON for blocking ads, please let us know. We might be able to do something about it. Thanks.
I've Disabled AdBlock    No Thanks