OldSalt
Member
There's plenty of information on pulling and replacing a MOEN 1222 cartridge from a MOEN "Posi-temp" valve. I have four showers using these valves installed during builder rough-in. I also had hard water problems with my tankless water heater due to hard water problems, which I resolved by adding a strainer to the hot water exit line at the water heater. However, the MOEN valves have been problematic from the start, probably due to hard water sediment inside the valves. So, I pulled another one the other day, and considering the high cost of these cartridges, decided to soak it in vinegar to clean it out. Therein, started my trail of tears. Two days later, with a new valve, it's "all better" (i.e. my wife can take a shower again).
Here are the take-aways I learned:
I've attached photo's of my original, damaged cartridge. I tried to just remove it, soak it in vinegar to clean it, and reinstall. However, the hidden, internal damage inside the valve (pictured) caused the bottom of the stem to stick out "proud" about 1/16th of an inch (also pictured below), preventing complete insertion back into the build. This I did not know, which led to hours of trying to clean out the valve body, lubricate, insert, remove, insert, remove, try jamming the retaining clip in anyways, insert, remove, etc.. New cartridge, lubricate, insert, retaining clip, 5 minutes and I'm done.
I read multiple BLOG posts where people experienced the same problem as I, i.e. their cartridge would not fully insert, and I'm guessing about 2/3's of those people were trying to reinstall damaged cartridges. Disassemble yours, inspect it, and "KNOW" the condition, before you try to reinstall.
Two more tips: New cartridges at 2/3's to 1/2 the cost of a big box or plumbing supply place. Second, Moen has a lifetime warranty, and will send you a new cartridge free. (Shower's, amazingly enough, are constructed without shut-off valves. When these things leak or break, they are always a "crisis" situation, with your home's water supply off until repair. So, get the extra cartridge and have it on hand.)
Pictures attached:
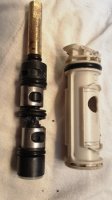
1) Used MOEN 1222b cartridge (without side seals)
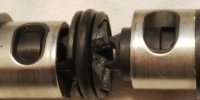
2) 1222b cart. partially disassembled (the stem will also break down, O rings can be replaced, and etc.).
3) 1222b cart. with damaged plastic section, which "lengthened" the stem, preventing full insertion of the stem.
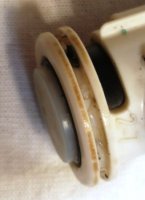
4) 1222 cart., showing where bottom of stem is "proud", i.e. not flush with the body. This will prevent the cartridge from fully inserting into the valve body.
Hope this information helps someone out.
Here are the take-aways I learned:
- These valves are especially "no más" with hard water, and/or tankless water heaters which spew sediment directly into the water lines, versus collecting at the bottom of a hot water tank. Put more succinctly, MOEN's plastic constructed valve components depend on good water quality, and do poorly with grit in them.
- Properly installed and operating, they turn VERY easily. The new valve turns with a flip of my little finger. If yours does not, you probably need to clean, and/or replace the cartridge.
- Cartridge removal can be a problem. Mine was not. I had no tool , but simply took two Phillips screw drivers inserted into the valve on either side of the plastic "H/C" tap, and twisted both with channel locks, to loosen the valve seal. Again, hard water can freeze these cartridges in the valve, and MOEN (plus 3rd party vendors) has a puller tool for that. If you have to use that tool, you might as well save yourself time, and buy a new cartridge while your at it, because the one you pull is probably trashed (or will be, by the time you've removed it.)
- Pro tip #1: "PULL THE RETAINER CLIP OUT FROM THE TOP OF THE CARTRIDGE BEFORE ATTEMPTING TO EXTRACT CARTRIDGE". (No, that didn't happen to me, but I had to chuckle about plumber's stories of homeowners to pulled half their plumbing out of the wall trying to remove the cartridge with the clip still in place. That would be a "challenge".)
- Pro tip #2: When inserting the retainer clip, or working with any small parts in a shower wall, make sure you seal up the hole around the valve, between the valve and the tile, with a lose rag, to prevent those small parts from falling into said hole, and being lost forever at the bottom of the wall. Don't ask me how I learned about this "tip".
- These cartridges can be rebuilt. Moen has a kit with new "O" rings, a new plastic body, and other consumables, and also provides directions on how to disassemble and reassemble this valve. So, if they can be rebuilt, then ....
- These cartridges can be disassembled for complete cleaning. Take it apart, inspect parts for damage, clean away any corrosion or hard water scum, soak it in vinegar for a while (which is far better than using any abrasives on a valve which must remain smooth and within close tolerances to operate correctly). If you do use emery paper or steel wool, remove the "O" rings first to prevent damage. Lubricate, reassemble, test turning the stem to ensure smooth operation.
- "Proud": When you inspect your cartridge, the bottom of the stem should be flush with the plastic case. If it is not, it is either not completely inserted (maybe, tap on it with a rubber hammer), or as in my case, the valve internals had degraded due to grit grinding against plastic through 100's of turns. In either case, if not resolved, when you insert the cartridge back into the valve body, it will likely fail to insert completely, making it difficult to impossible to insert the retaining clip. The valve also stands to leak at some near point.
- "Proud #2": A third reason, in addition to those mentioned in "Proud #1" that a cartridge will fail to insert fully, is debris blockage inside the valve, or perhaps corrosion build up. This could occur with either a new cartridge or rebuilt one. Inspect the inside of valve body with a flashlight. Flush it out with water (i.e. turn on the water supply). If corroded, soak a small rag with vinegar, stuff it into the valve body, and let it soak. Avoid scoring the inside of the valve body with abrasives, but do what you must to clean it out. Vinegar works pretty well; just give it enough time.
- Lubrication: Don't use any kind of grease other than a silicon grease. Petroleum based products (including Vaseline or plumbers grease) will degrade the "O" rings. I used DANCO Silicone Faucet Grease when I was trying to rebuild and replace my existing valve. Compared to the grease provided by MOEN, however, it was very sticky. Moen directs you to lubricate the rubber side seals prior to inserting into the valve body. (The sticky lubricant likely contributed to those seals coming off the cartridge during my multiple attempts to remove and replace it, due to the problems with being unable to fully insert it into the valve body.)
I've attached photo's of my original, damaged cartridge. I tried to just remove it, soak it in vinegar to clean it, and reinstall. However, the hidden, internal damage inside the valve (pictured) caused the bottom of the stem to stick out "proud" about 1/16th of an inch (also pictured below), preventing complete insertion back into the build. This I did not know, which led to hours of trying to clean out the valve body, lubricate, insert, remove, insert, remove, try jamming the retaining clip in anyways, insert, remove, etc.. New cartridge, lubricate, insert, retaining clip, 5 minutes and I'm done.
I read multiple BLOG posts where people experienced the same problem as I, i.e. their cartridge would not fully insert, and I'm guessing about 2/3's of those people were trying to reinstall damaged cartridges. Disassemble yours, inspect it, and "KNOW" the condition, before you try to reinstall.
Two more tips: New cartridges at 2/3's to 1/2 the cost of a big box or plumbing supply place. Second, Moen has a lifetime warranty, and will send you a new cartridge free. (Shower's, amazingly enough, are constructed without shut-off valves. When these things leak or break, they are always a "crisis" situation, with your home's water supply off until repair. So, get the extra cartridge and have it on hand.)
Pictures attached:
1) Used MOEN 1222b cartridge (without side seals)
2) 1222b cart. partially disassembled (the stem will also break down, O rings can be replaced, and etc.).
3) 1222b cart. with damaged plastic section, which "lengthened" the stem, preventing full insertion of the stem.
4) 1222 cart., showing where bottom of stem is "proud", i.e. not flush with the body. This will prevent the cartridge from fully inserting into the valve body.
Hope this information helps someone out.
Attachments
Last edited:


