Removing Washing Machine Outlet Box

Users who are viewing this thread

latenight

New Member
Messages
8
Reaction score
0
Points
1
Location
Maryland
Hello all!

I am repairing a leaking water supply valve for a washing machine. I first tried tightening the nut to no avail, and then repacked the nut with packing (a rope like substance). It is far better - as in no longer squirting out water, but still allows a slight drip which slowly collects under the valve.

This recurring issue, along with the general corrosion seen on the valves, has led me to decide to just replace the valves to avoid any issues in the close future. I have looked up instructions on this, and feel comfortable being able to basically just unscrew the valves and take them to the store to buy replacements. I would imagine this is possible over cutting pipe as some videos show...

Anyways, the QUESTION IS: How do I remove the outlet box from the wall? It seems so simple, and multiple videos online mention cutting into drywall above, but unfortunately, I have wood paneling surrounding the box, which I could not begin to imagine of how to fix. So I would like to remove the box that is installed so I can replace the valves, and either use the same box or replace it with a new one (assuming the hole in the wall is a standard size). When I look up installing the boxes, they seem to screw into the wall behind, which I do not believe is possibile for me to access to simply unscrew. There also seemed to be some outlet boxes that kind of press or clip into place. My box has the valves coming out of it, so I have basically no play/give to push the box in or out for clearance.

My concern with just trying to unscrew the valves with the box still in the wall is that I would twist or break the pipe beneath, as it has not been touched in probably over 10 years and seems corroded.

Could anyone provide some guidance on removing this box? Is there some simple way to remove the box or valve that I am not thinking of? I have thought to just cut part of the plastic box itself out and see if i can then figure out how to remove it and replace it. I just need to be able to access the pipe below to hold while I unscrew the valve. I can then figure out how to put a new box in.

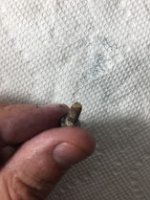
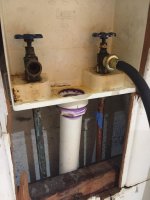
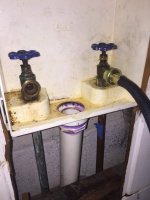
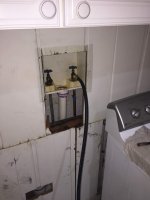
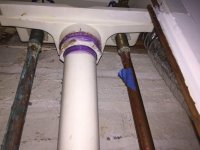
Photo 1 shows the box with the pop out frame hanging off. Photo 2 shows the box without the frame. Photo 3 shows a close up of a valve which shows some corrosion and how it sits in the box.

Thanks in advance for all help!

1.JPG
2.JPG
3.JPG
 

Jadziedzic

Active Member
Messages
310
Reaction score
60
Points
28
Location
New Hampshire
The box is typically mounted to the framing behind the wall surface (i.e., studs on each side of the box) by one or two straps on each side that are nailed into the face of the stud; if you look at your first picture above you can barely make out the place where it appears the straps protrude from the sides of the box. It's quite possible you'll need to remove that section of paneling surrounding the box in order to access the water supply lines.

If I had to guess I'd say those thin vertical wood pieces on the face of the paneling likely cover the edges of the paneling where adjacent panels butt together; if so, you'd pull off those in order to remove a section of paneling. Can you add a picture from further back so we can see the entire area?
 

latenight

New Member
Messages
8
Reaction score
0
Points
1
Location
Maryland
Thank you for your response. Here are some more pictures from farther back. Let me know if any other pictures would help.
4.JPG
5.JPG
6.JPG
 

Treeman

Active Member
Messages
235
Reaction score
34
Points
28
Location
Michigan
You could try to take that valve completely apart and polish the stem with emory/crocus cloth to obtain a good seal with new packing. You would be surprised how rebuild-able many valves are.

Otherwise, it seems that you first need to cut a square access hole under the box to see what you have there and if you can replace the valves without replacing the box. Cut the hole in a manner that you can make a neat repair/cover. Don't cut into any piping.

Just a diyer here.
 

Reach4

Well-Known Member
Messages
38,904
Reaction score
4,439
Points
113
Location
IL
I am repairing a leaking water supply valve for a washing machine. I first tried tightening the nut to no avail, and then repacked the nut with packing (a rope like substance). It is far better - as in no longer squirting out water, but still allows a slight drip which slowly collects under the valve.
I would add some more turns of packing. I would use the white PTFE round stuff. I am not a plumber.
 

latenight

New Member
Messages
8
Reaction score
0
Points
1
Location
Maryland
Thanks for all of the replies!

So there does not seem to be an easy way to remove the box as I had hoped. AND unfortunately it is not drywall, so not a simple fix to just cut out below the box...

So I decided to try to remove the handle, etc and repack and see what happens. I could NOT remove the handle (I think the screw broke off inside? - see attached picture which seems to show part of a broken screw removed. Anyways, I imagine that was the goal from one of the replies which referenced really cleaning it out. I then removed the recently put in packing (I was told to do about 1.5-2 lengths around) and repacked it with more. The handle is now very tight and a bit tough to turn, AND still has the slight leak...

ANy other thoughts, or do I need to cut into the wood paneling?
 

Attachments

  • x.JPG
    x.JPG
    11.6 KB · Views: 1,117

Jadnashua

Retired Defense Industry Engineer xxx
Messages
32,770
Reaction score
1,190
Points
113
Location
New England
How tight the handle turns is mostly a function of how tight the packing nut is...it only needs to be tight enough to prevent leaks. If the shaft is scratched, pitted, or has mineral deposits on it, the packing may not be able to seal. If you broke the handle locking screw off, eventually, the splines on the shaft might get stripped and the handle comes off. Well, it could come off without stripping the splines as well. A handle puller would then likely let you get some locking pliers on what's left of the screw and remove it. A dose of penetrating oil that sat there for a couple of hours may help.
 

Reach4

Well-Known Member
Messages
38,904
Reaction score
4,439
Points
113
Location
IL
Anyways, the QUESTION IS: How do I remove the outlet box from the wall? It seems so simple, and multiple videos online mention cutting into drywall above, but unfortunately, I have wood paneling surrounding the box, which I could not begin to imagine of how to fix.
I expect that is simple enough carpentry if you can get somebody who can do simple carpentry.

Also, you could just cut an access hole a little below there, and cover that with an access panel. So you could get by with no carpentry potentially. The panel will be hidden behind the machine anyway.

So I am thinking new box. You have tried the no-cut options, and will have to go in.
 

latenight

New Member
Messages
8
Reaction score
0
Points
1
Location
Maryland
Hello all. I am just following up on this post.

I ended up cutting out the wood paneling for an access square below the washer line - that part actually worked out easily where I can more or less put the wood square back in there.

HOWEVER, after that work, I was completely unable to remove the valves. Turning the valve fixture would turn the whole pipe. So I then gripped the pipe from below as was initially suggested, but was still unable to separate the two pieces. I ultimately ended up putting a nice dent in the pipe behind the wood paneling where I was gripping it. That sufficiently spooked me and I stopped.

Is the next step just cutting the pipe and welding a new piece? I tried gripping and turning tight to break first, I tried gripping and turning in opposite directions, I tried lubricants, I tried heating the pipe with a hair dryer, I tried a stronger friend, no luck.

Thanks again for any guidance!
 

Attachments

  • IMG_7822.jpg
    IMG_7822.jpg
    71.1 KB · Views: 1,051
  • IMG_7823.jpg
    IMG_7823.jpg
    74.6 KB · Views: 997
  • IMG_7824.jpg
    IMG_7824.jpg
    49.8 KB · Views: 2,313
  • IMG_7825.jpg
    IMG_7825.jpg
    74.9 KB · Views: 1,044

Jadnashua

Retired Defense Industry Engineer xxx
Messages
32,770
Reaction score
1,190
Points
113
Location
New England
It looks like they soldered the pipe to the valve, so it won't unscrew. Many of those type of fittings will allow you to either screw supply hose to it, or to solder the pipe into it...they chose to solder, mostly because it was behind the wall where you can't see or replace a hose when it goes bad.

So, you will need to cut the pipe to remove the valves. WHen reassembling it with new valves (at that point, it might be easier to just replace the whole thing), you could use some Sharkbite fittings so you won't have to solder anything, or you'd have to resolder it like it was originally.
 
Top
Hey, wait a minute.

This is awkward, but...

It looks like you're using an ad blocker. We get it, but (1) terrylove.com can't live without ads, and (2) ad blockers can cause issues with videos and comments. If you'd like to support the site, please allow ads.

If any particular ad is your REASON for blocking ads, please let us know. We might be able to do something about it. Thanks.
I've Disabled AdBlock    No Thanks