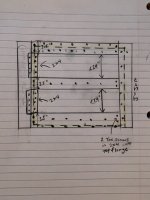
Yes, that matches what I described. Two things are missing, though: "treat the edge like a perpendicular to the joists edge" means you need to support the left edge of your subfloor patch between the flatwise 2x4 blocks, either with plywood splice plates or with more flatwise 2x4 blocks. And the edges of the existing subfloor at the top and bottom (in the drawing) edges of the patch should also get screwed to the flatwise 2x4s; and so those flatwise 2x4s should be centered along the seam. A couple further comments:
The two toe screws connecting each flatwise 2x4 to the I joist solid sawn top flanges, that seems like an OK connection, not super. Someone might have a suggestion for a better detail there. [E.g. if you have a pocket hole jig, you could use some face pocket screws.] Also, if you look up the TrusJoist TJI installation manual (if it exists online), it might have a better detail. Using an upright block seems like overkill. For a header between two joists carrying a cut joist, the TJI manual shows padding out the web flush with the flange and using joist hangers, also overkill for this.
Also, if the edge of your subfloor cut is really very close to that joist under wall, you could just screw a member (e.g. a 2x2) lengthwise along the edge of the top flange to in effect make the flange wider, so its right side is now past the edge of your cutout. Then you can treat the left side of the patch the same as the right side, you don't need the intermediate 2x4 flatwise block, and the top and bottom 2x4 flatwise blocks could remain or be replaced with the plywood splice plates. IMO it would be worth cutting out some drywall to get your subfloor cut closer to the edge of the flange, if necessary.
Cheers, Wayne

")