Better Explanation (Hopefully) and More Pics...
Shucks, looks like I'm either frustrating you good people by not being clear or giving enough info...certainly not what I intended

Will try to fix that here. Also, I'm very willing to try the solutions already proposed to me...I just have a few questions about those paths.
How I Got Here (good, bad, right or wrong!):
- the PVC plumbing in queston was originally connected to a brass drain, which was welded to a copper shower pan
- there was no pre-slope under the pan; no "weep holes" in the drain
- based on reading and suggestions from a ceramic tile forum I removed the old pan/drain, and cut the riser off below the threaded coupling the drain screwed into
- I am proceeding with a Kerdi shower and drain (Schluter Systems; see johnbridge.com); the drain/shower design requires that the top of the riser be approx. 1 1/2" below the subfloor for proper drain height (getting level/plumb was also emphasized)
- The riser section left after cutting the old stuff out was too short, so I was proceeding to build it to the proper height with a coupling and another section of 2" pipe
- I glued the coupling onto the existing riser piece, then before gluing on the final piece, thought to check for plumb
- It wasn't (see previous pics)
- I came here
What I've Got:
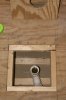
- Pic "shower-drain7" shows the cut-out I made in the sub-floor. Cut out is approx. 14" x 14" (from inside of one joist to another); I built 2 x 4 blocking to support the sub-floor patch that will go in; patch has approx. 5" diameter hole cut for Kerdi drain. This pic also shows the "p-trap" (which Frenchie correctly spotted is actually several elbows glued together) sitting on one of a series of straps or shims that the first floor ceiling sheet rock was attached to.
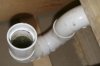
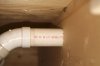
- Pic "shower-drain8" shows what I've been calling the p-trap - actually 3 elbow sections
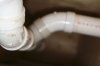
- (OK here we go!) To Genie's last point/question about what comes downstream from the "p-trap", running between the 2 floor joists....there is (are) in order: a small 2" section of pipe; then 2 more elbows (either 22 or 45), each about 5 inches long; then another 3" section of pipe; then a "T" coupling, off of which comes an elbow and piping that heads off 90 degrees through a joist on one side (goes to a tub drain I believe). The distance from the center of the "p-trap" and that T is about 22". Pic "shower-drain12" shows those 2 elbows, the 3" section of pipe, and the T (a little out of focus). Pic "shower-drain9" shows the T more clearly. Pic "shower-drain10" shows the pipe off the T going into the joist. (these pics were the best I could do...holding the camera between the joists without looking and firing!)
- I couldn't get a pic further downstream from that T, but out the other end of the T is another section of pipe, then another 90 degree elbow which takes another piece of pipe through the joist on the other side. The distance from the center of the "p-trap" to this last elbow in the run is approx. 42"
- Per Genie's point, all of this may determine the answer to my question of whether or not I can shim the "p-trap" up a little and put a little stress on the whole assemblage.
What Should I Do?
- Option 1 (no special order): cut out the "p-trap" and start over. Since the "p-trap" is really those 3 elbows, my question here is, "cut where, at what point?" I can get to the elbows (I think) with the existing cut-out in the sub-floor. If I have to cut further downstream I'll have to cut out more sub-floor....not my preference, but I'll do it of no other options are good
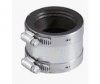
- Option 2: a shielded coupling. Sounds interesting, but being a guy who can't spell "p-i-p-e", I have to ask, "where would I insert it, given the existing assemblage, and how would it help get the riser plumb?"
- Option 3: two street 22's. I was headed happily down this path. Got the 22's; was practicing dry-fitting them with the existing assemblage. Then I started thinking about the height I need for the drain (top of riser approx. 1 1/2" below sub-floor)....a couple ways to go...
-- Method 3A: start from what's there. Coming out of "p-trap" is 1 1/4" of pipe ("riser"); then the coupling at about 1 7/8". Since I'd want to end up with the male end of a 22 to comprise the final "riser" for the drain, I figured I'd put a 2" section of pipe into the coupling...1" into the coupling, and the female end of the 22 would overlap the other 1", so the coupling and 22 would be flush with each other. Finally, it looks like the two 22's glued together would be approx. 5" - 5 1/4" long/high.
Currently, there is 7 3/8" between the "p-trap" and the sub-floor. To have the top of the riser 1 1/2" below subfloor means that whatever I have coming out of the "p-trap" can only be approx. 5 7/8' (say 6 "inches rounded off). 1 1/4" pipe, plus 1 7/8" for coupling, plus 5 - 5 1/4" for two 22's equals approx. 8 1/2".....about 2 1/2" TOO HIGH.
-- Method 3B: cut off the coupling first. Now I start with the 1 1/4" piece of pipe coming out of the "p-trap". Then the two 22's, the female end of the first 22 sliding over the pipe by about 1", with the male end of the top 22 serving as the "riser" for the drain. Now I've got 1/4" of the pipe coming out of the "p-trap", plus 5" or 5 1/4" for a total of 5 1/4" or 5 1/2"....3/4" or 1/2" TOO LOW! Now, will this matter? Not 100% sure, but the specs for the Kerdi drain say it needs at least 1 1/4" of mud floor supporting it, so I'm trying to be precise and get that.
Now this is where I got the idea of "shimming" the "p-trap" up 1/2" - 3/4". If I could do that without causing future problems I could go with the two 22 solution and be a happy camper.
Soooo... sorry for being long-winded but I hope this is clear and that I'm giving all the appropriate info. I'm sure I'm missing something really obvious but I don't see it.
Would you hang in with me for one more round here and help me decide if it should be Door #1, Door #2, or Door #3? (or other?)
THANKS A MILLION EVERYONE!!.....Derek