Pic #5 makes it hard to tell how far the 3" horizontal line is away from the I-beam. So some of my suggestions might involve fittings that would interfere with the top of that beam.
There's a wood packer on top of the steel, and that part at least would be OK to notch as required between joists. But if the fitting would hit the steel, the solution may be to move the 3" horizontal line a little farther away from the I-beam. Which would typically be a lot of work, but if you want to eliminate the san-tees on their back, you'd be replacing it all anyway, so it wouldn't be a problem.
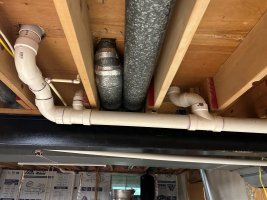
Pic #3 - You're correct, the 3" san-tee on its back is a drain from the 2nd floor master bath. I have attached another pic (pic #5) showing the rest of the pipe. The 2" tee is a drain from the 1st floor half bath. The left section of the 3" pipe is from half bath toilet. Is it even possible to replace the 3" san-tee on its back with a combo with the configuration?
That additional 3x3x2 (1-1/2?) san-tee on its back should also be changed to a combo. Looks like there's a 90 just above it from a horizontal drain in the joist bay? You'd need to double check, but I think you'd have enough height for a combo rolled 45 degrees from plumb, plus a 45.
As to how to change the 3" san-tee on its back, looks like if you use a 45 just below the subfloor, then the diagonal drain line would clear the I-beam (to be confirmed). Then it could either hit the side inlet of a combo rolled 45 degrees from plumb, or depending on the distances, hit a 45 (or 60) to go horizontal parallel to (or at a 45 to) the beam, and then the side inlet of a horizontal combo (or a wye).
Actually executing that would be difficult, as you've got three fittings in a row. So if you want to do all the work from the basement, you'd need to figure out how to remove the upper 90 without damaging the pipe that comes through the subfloor. After cutting the fitting just below the hub, I believe there is a fancy cutter that is a "pipe saver" to cut a hub off an existing pipe; I've never used it. Or it might be possible to cut the hub longitudinally in several places (avoiding going into the pipe), and then use heat and/or leverage to break the glue joint.
All of that is a lot of work, so you could just take the attitude that even though the DWV is wrong in those places, you'll deal with it once/if it finally clogs or stops working well. In which case for the original question of straightening the stack, you'd just need to cut the 3" horizontal line between the 3" san-tee on its back and the elbow where it turns down, to add a little length to get that elbow closer to the wall.
In regard to the 2" san-tee above slab, the plan is to re-use it. How do I connect laundry sink and washing machine standpipe to left side of 3" waste stack? The 2" line is a dry vent.
If I replace 2" san-tee above slab, do I have enough 3" pipe above slab to connect new 2" san-tee? The dimension from the hub coming out of the concrete to exiting san-tee is 2".
2" of exposed pipe would be marginal, the hub depth on a 3" solvent weld fitting is 1.5". Doable if you can get the full 2" clean. You'd glue on a coupling or a new san-tee or wye, depending on how the elevations work out for your sink/standpipe trap arms. Or you could use a banded rubber coupling, that has only a 1" hub depth. Sounds like this is plan B.
Then if plan A is to reuse the 2" san-tee, the simplest arrangement would be, going upstream from the 2" side inlet: LT 90; (possibly street) 2" san-tee for the washer standpipe; (possibly street) 2x1-1/2x1-1/2" san-tee for the laundry sink and vent. If that gives you the elevations you want for the standpipe and laundry sink trap arms, go with that. If not, there are other options.
Cheers, Wayne