Installing a K-304 Kohler Rite-Temp bath & shower valve.

Terry

The Plumbing Wizard
Staff member
Messages
29,942
Reaction score
3,483
Points
113
Location
Bothell, Washington
Website
terrylove.com
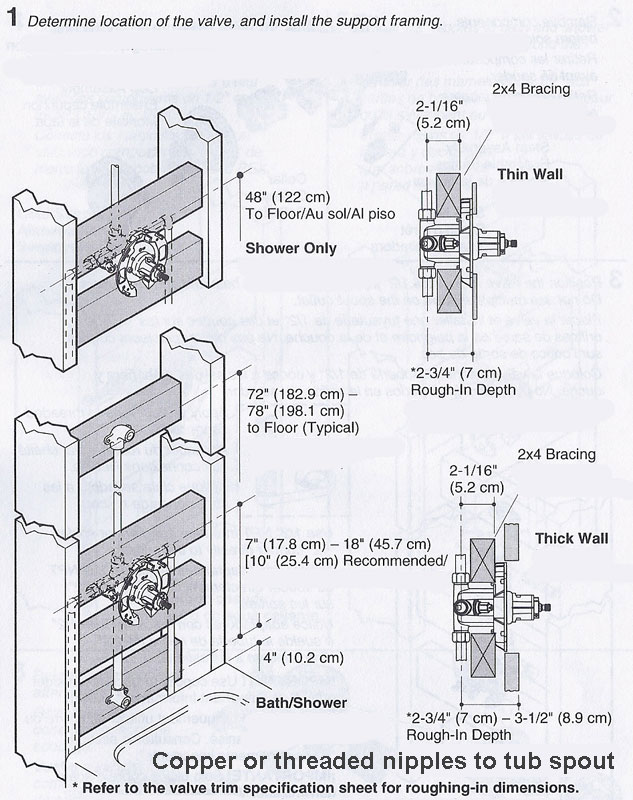
Installing a Kohler Rite-Temp pressure balance bath & shower valve, K-304
Rough in instructions from Kohler with some added tips.

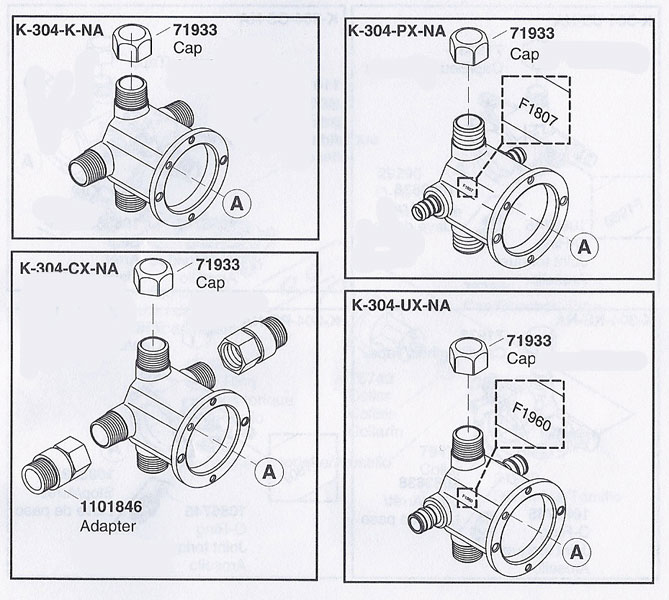
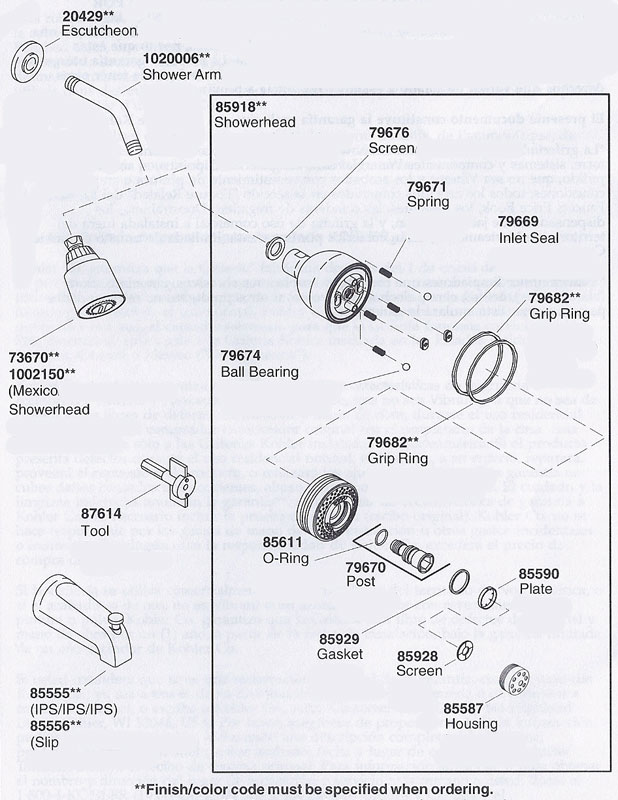
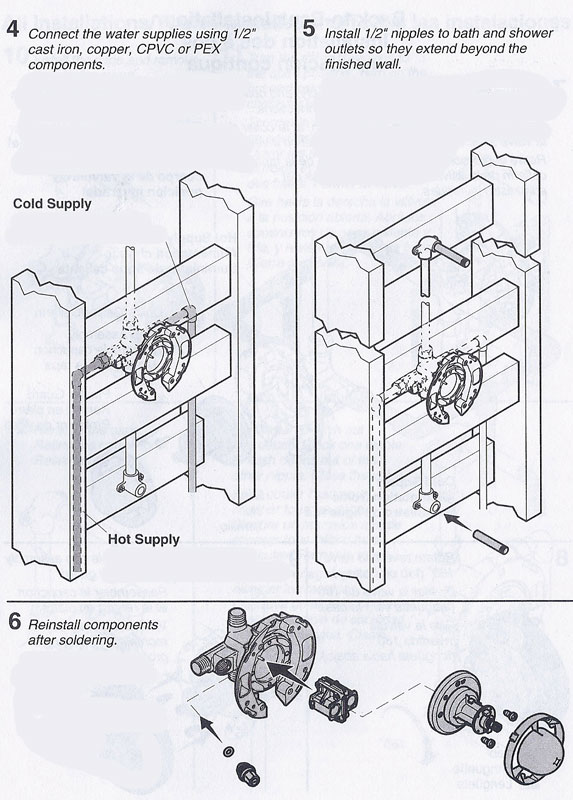
Most plumbers will remove the cartridge, and solder pipe to the valve body first, and then reassemble the valve. The valve comes with the option to thread on a "female adapter", or to insert copper pipe into the brass body of the valve. I prefer to solder copper pipe to the valve.

k-304-r01.jpg


two
k-304-r02.jpg


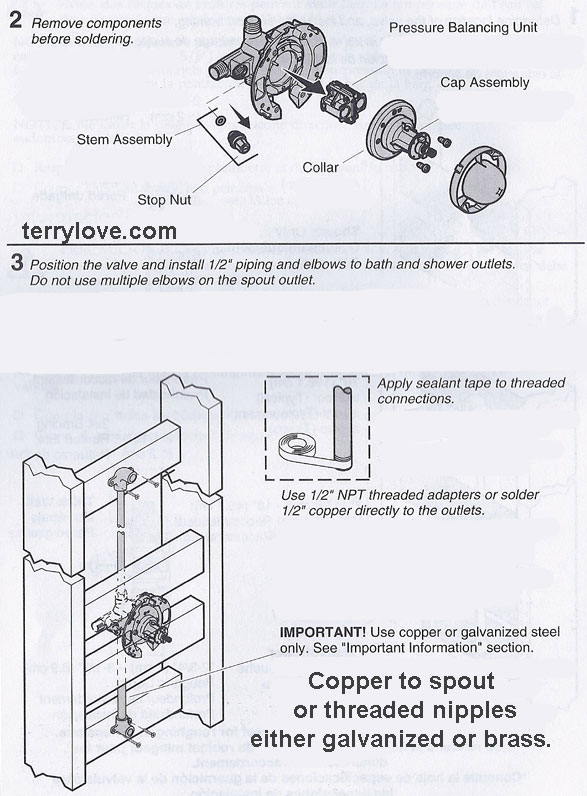
two, The pipe to the tub spout needs to be full size. No PEX here. PEX is undersized for a tub spout and will force water up toward the shower head. Either copper or threaded pipe like galvanized or brass. I use either copper or brass. Galvanized will rust and the first time you open the faucet in the morning, you will get some rusty water.

k-304-r04.jpg


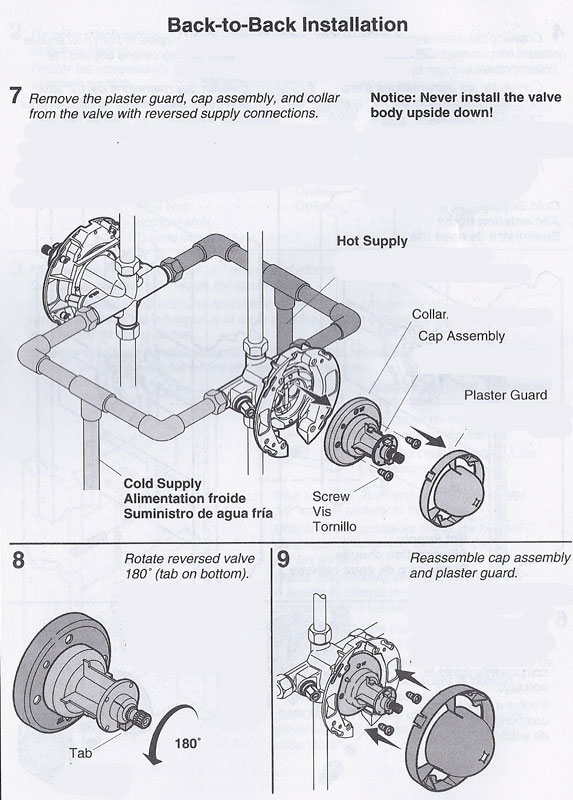
three, if you have a back to back installation like below, you can reverse the valve without making the pipes cross over.

k-304-r07.jpg


four
 
Last edited:
One "minor point". Valves which have the option to solder the tubing directly into the valve, have MALE threads, so you would have to use a "female" adapter, NOT a male one, to connect to the valve. And do you really think plumbers or most handymen/DIYers read the directions?

I just went back and made that edit. It was Sunday, what can I say?
Terry
 
Last edited by a moderator:
K-304-K-NA installed and no water

I have loads of water pressure however, after installing the K 304 valve and turning on the water nothing comes out except a couple of drips. It's like the flow is restricted somewhere. I removed the pressure balancing unit and confirmed that yup, loads of water pressure.

Could my pressure balancing unit faulty right out of the box as it seems to be restricting the water flow to the point of nothing coming out?

I'm at a loss.

Any help would be appreciated. THanks
 
Since it balances pressure, it needs to be equal from the hot and the cold side.
If the water heater is turned off, then no water will come out.
Is the water heater connected?

One other note; it rotates in the opposite direction from the Moen Posi-Temp.

Well now that makes sense. We don't have a hot water heater yet, so that is not plumbed in, just the cold water is. So, if we plumb it so the cold water comes up the hot water pipe as well, then it should work? Where I am cold showers are still pretty warm.
 
As long as both the inputs see similar pressure, then yes, the valve should open and work 'normally'. Course, you'll have no temp adjustment, but you probably knew that.
 
Belize.
I stayed there before, and noticed that some showers only have cold water. Same thing in Guatemala.
You will have to run water to both sides. If you have a water heater hook-up, you can flex the cold over to the hot side.
 
The prohibition "Do not install the valve upside down" ONLY applies for a tub/shower installation. In a shower only installation, I ALWAYS install it upside down. There are two good reasons for doing so;
1. the bottom port is larger than the upper one so you get maximum flow to the shower head, and
2. The capped bottom port, unless it was a "shower" or "tub" only valve, can accumulate debris and eventually stop flow to the shower head. Removing this debris can be a difficult job, especially if it is calcium build up in the transfer tube between the lower tub outlet and the upper shower outlet. (the last one I did was especially challenging because they had soldered the brass cap on. I had to unsolder it, while unscrewing it, and at the same time not drop the hot cap down the wall since I did not have a replacement for it.)


Thanks for the tips. It is a shower only instal so I guess putting the valve in upside down would make better sense. Now, is there anything else I should know before I cut out the PVC (my last weekends' chore) and replumb?

Serious though, thanks for everyone's advice. I know what I'm doing this weekend.
 
Last edited:
quote; It is a shower only instal so I guess putting the valve in upside down would make better sense

Just be sure to "reverse" the cartidge or you will get hot water first instead of cold.
 
quote; It is a shower only instal so I guess putting the valve in upside down would make better sense

Just be sure to "reverse" the cartidge or you will get hot water first instead of cold.

But aren't I just inverting the brass casing and the innards/cartridge would go in the same way? The cold will still come in on the right and hot on the left.

Or, am I missing something?
 
Internally, when the valve is in "upright" the right is cold and turns on first. Rotating it 180 degrees puts that side on the LEFT so the hot will flow first. So you rotate the "core" back 180 degrees so it is oriented the same way it was to start with. If you remove the core and remember HOW it was oriented, i.e. which side was UP, and reinstall it the same way you will do the same thing.

k-304_cartridge.jpg
 
Last edited by a moderator:
I use plastic clips to secure the valve and the pipes to the valve in the wall. The drop ear 90 can be screwed in.
Thanks, Terry. There are also a couple of holes in the plastic face that look like they're expecting screws.

Seems weird the valve body doesn't have a couple of ears to screw in like Delta and others.
 
The plaster guard is often removed once the tiling is done unless you are doing a thin-wall installation, then it is used to sandwich the thin wall and the trim on the outside.
 
Can I remove the plate (shown below A) from the valve? Or does this always have to stay on? It would solve a lot of my problems if I am able to take this off! The language and pictures are quite confusing in the instructions.

The valve is secured to framing so I think the plate is not doing anything? The valve with the plate on is flush with the shower wall.
Here are couple photos.

Thanks,

Scott

IMG_0286.jpg
IMG_0288.jpg


ten

k-304-r21.jpg
 
Back
Top