cyruspinkney
New Member
Hello all, it's me again.
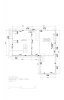
I know some of you are probably tired of hearing about my intentions instead of actions, but I am just about to do the install. I have designed my hopeful setup in a 3D modeling software to help me better visualize how it will all be put together and assist with assembly. I have uploaded a video of an overview of the setup (seen here) and added a few of the screen caps to this post, also see this link for better resolution. Due to tight quarters, I had to make the most of what I had and hopefully you friendly and knowledgeable folks can point out a few easier or more efficient way to do this. For clarity, the copper/pink is all 1" copper line, while the blue is either 3/4 or 1/2". Since Burnham supplies the boiler loop pump, I am really only waiting on the sizing of the pump for the HWH and the system pump, but they're very close in physical sizing that I could mock them up in my model. Here's a link to the higher resolution mockups and plans <here>
I have followed Burnham's "Near Boiler Piping - Heating Plus Indirect Water Heater" schematic from the Alpine manual, and I think I have all of their specified components included in my mockup. In a previous thread, I had used an example that an HVAC specialist and shown me, but using @BadgerBoilerMN 's criticism of overpumping, I decided to go with a system circulator with zone valves as opposed to pumps for each zone (especially since I currently will only have a single zone). I've shown a few Webstone flanges and other Webstone valves since I'm tight on space; while they're not price friendly, they do save me on valuable space.
As always, your comments and criticisms are welcome.
I know some of you are probably tired of hearing about my intentions instead of actions, but I am just about to do the install. I have designed my hopeful setup in a 3D modeling software to help me better visualize how it will all be put together and assist with assembly. I have uploaded a video of an overview of the setup (seen here) and added a few of the screen caps to this post, also see this link for better resolution. Due to tight quarters, I had to make the most of what I had and hopefully you friendly and knowledgeable folks can point out a few easier or more efficient way to do this. For clarity, the copper/pink is all 1" copper line, while the blue is either 3/4 or 1/2". Since Burnham supplies the boiler loop pump, I am really only waiting on the sizing of the pump for the HWH and the system pump, but they're very close in physical sizing that I could mock them up in my model. Here's a link to the higher resolution mockups and plans <here>
Refresher:
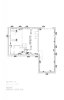
replacing oil-fired combi boiler, Cast iron recessed rads on main living floor, cast iron bases in basement, currently all on one zone, combined single loop. *Installing new Burnham Alpine 080 w/50gal indirect, currently setup for single zone + indirect tank, eventually probably 2 zones. Roughly 72K heat loss calc, with poor shell criteria (slider windows, poor insulation in attic, etc.), hopeful to fix that over time. Northeastern NJ, see floor plans also attached.
I have followed Burnham's "Near Boiler Piping - Heating Plus Indirect Water Heater" schematic from the Alpine manual, and I think I have all of their specified components included in my mockup. In a previous thread, I had used an example that an HVAC specialist and shown me, but using @BadgerBoilerMN 's criticism of overpumping, I decided to go with a system circulator with zone valves as opposed to pumps for each zone (especially since I currently will only have a single zone). I've shown a few Webstone flanges and other Webstone valves since I'm tight on space; while they're not price friendly, they do save me on valuable space.
As always, your comments and criticisms are welcome.