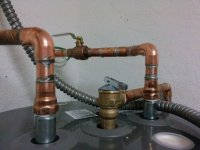
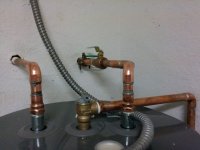
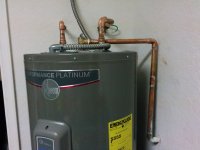
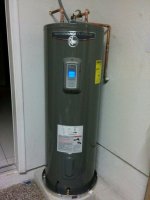
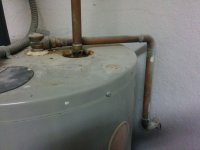
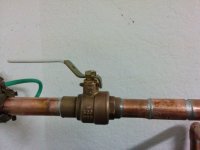
Water Heater Replacment

Users who are viewing this thread

Arnav

Member
Messages
150
Reaction score
10
Points
18
Location
Florida
There is of course a 3" pipe between those 2 fittings on the right. 1.25" into one fitting and 1.5" (if memory serves me right) into the other fitting.
 

Arnav

Member
Messages
150
Reaction score
10
Points
18
Location
Florida
The WH was finally delivered to the store and I finally picked it up so hoping to install it this weekend. A few questions:

1. The supplied T&P valve on the WH is not pointing twards the cold inlet and the discharge line. Its pointing away from the front of the tank 90 degrees to the discharge line (see pics). Should I twist the T&P valve in the direction of the discharge line or use a 90 degree elbow and two more copper pipes to make it to the discharge line (which is embedded in the wall)? I am not sure if it is a good idea to try and twist the supplied / pre-installed T&P valve (i don't want to break anything). What do you normally do?

2. Should I use unions / coupling between the old and new pipes or have the elbows go straight to the old pipes?

3. Is there a minimum pipe length requirement between the WH and before the pipes bend into the wall? I would assume that less pipe is better but I also saw something called "heat trap".

4. I am assuming that for the cold/hot/T&P fittings, you use teflon tape like you do for all not soldered connections....

Thx!
 

Attachments

  • IMG_20160609_162615.jpg
    IMG_20160609_162615.jpg
    76.5 KB · Views: 322
  • IMG_20160609_162631.jpg
    IMG_20160609_162631.jpg
    59.3 KB · Views: 326

Terry

The Plumbing Wizard
Staff member
Messages
29,942
Reaction score
3,459
Points
113
Location
Bothell, Washington
Website
terrylove.com
Pipes are metal for 24" connecting to a water heater. After that they can be PEX or CPVC.
The T&P can be rotated. It's a thread on connection. We will put a pipe nipple in the outlet to prevent a pipe wrench or pliers from egging the female part of the socket.
I like using a union on the discharge from the T&P for future replacement. Tape works on the discharge pipe threads.
If you are connection the water heater with flex for the hot and cold, no tape is used.
If you are hard piping, then tape can be used for the female fittings onto the pipe nipples.
 

Arnav

Member
Messages
150
Reaction score
10
Points
18
Location
Florida
Perfect. Thx as always Terry. I take your post that unions are a good idea then on the hot and cold pipes as well.
 

Terry

The Plumbing Wizard
Staff member
Messages
29,942
Reaction score
3,459
Points
113
Location
Bothell, Washington
Website
terrylove.com
Perfect. Thx as always Terry. I take your post that unions are a good idea then on the hot and cold pipes as well.

In the Seattle area, we use flexes, which have a union. It's 9.0 Earthquake country around here.
Unions on hard pipe are good too.
 

Arnav

Member
Messages
150
Reaction score
10
Points
18
Location
Florida
oh oh, the unions at HD and Lowes got terrible reviews. Not sure if you can really go by that though. Do soldered copper couplers add any value over staright hard pipes (or its really between unions and straight pipes)?
 

Arnav

Member
Messages
150
Reaction score
10
Points
18
Location
Florida
Stupid valve. I finished soldering, powered the WH, and all looked fine but now the cold supply valve is leaking. Not from my soldered connections but the valve itself. Doesn't seem to be from the stem but from where the two pieces meet. I thought I'll be safe if a pick a $15 valve instead of the $6.50 ones. Maybe I subjected it to too much heat. I tried tightening the nut at the stem but it didn't help.
Too bad I need to unsolder all the fittings again to replace. I'll try the watts one next instead. rrrrr
 

Attachments

  • leaky valve.jpg
    leaky valve.jpg
    59.8 KB · Views: 335
Last edited:

Arnav

Member
Messages
150
Reaction score
10
Points
18
Location
Florida
What a pain in the butt. To "save" time, instead of disconnecting the 3 lines, or at least just the cold supply, I decided to try and use a no-stop repair coupling. I simply cut the valve, put on the sleeve, and it was suppose to just slide over to the cut. Not! Maybe once you put on the flux it forms a vacuum, or maybe the pipes where not dead on. What ever it was, it refused to slide. I wrestled with it the whole night. It would have been quicker to do the whole tank over. Eventually I just used a regular coupling with a stop and nudged it in there. rrrr

New valve and coupling:
 

Attachments

  • new valve.jpg
    new valve.jpg
    53.3 KB · Views: 330

Arnav

Member
Messages
150
Reaction score
10
Points
18
Location
Florida
Assuming it is finally done, here is how it came out (same layout as previous tank). It would be nice one day to cut some sheetrock and make the lines coming out higher to allow unions to be used. I have added the cinder-block and pan like discussed at the begging of the thread.

Just in case it decides to act up at night, I put two leaker detectors in the pan... :)
One came with the tank (aduible alarm only) and one is from d-link that sends you an email and an alert to your phone...

Thanks as always for all the help
 

Attachments

  • 4.jpg
    4.jpg
    68.5 KB · Views: 368
  • 3.jpg
    3.jpg
    64.8 KB · Views: 345
  • 2.jpg
    2.jpg
    61.5 KB · Views: 367
  • 1.jpg
    1.jpg
    58.5 KB · Views: 374
Top
Hey, wait a minute.

This is awkward, but...

It looks like you're using an ad blocker. We get it, but (1) terrylove.com can't live without ads, and (2) ad blockers can cause issues with videos and comments. If you'd like to support the site, please allow ads.

If any particular ad is your REASON for blocking ads, please let us know. We might be able to do something about it. Thanks.
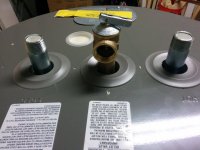
I've Disabled AdBlock    No Thanks