Ontario, Canada. Looking for a confirmation of a proposed DWV layout. Due to a roof leak and water damage etc. we are redoing our second floor bathroom and adjacent laundry room. Taking this opportunity to correct numerous issues, both plumbing and non-plumbing, from previous owners “handiwork” all over the house with some slight rearranging of the fixtures etc.. Since we are redoing it all anyway, we want to ensure it is all done correctly. Apologies in advance if I’m being unclear or using incorrect terminology (Can I blame that on regional differences…?). Thank you.
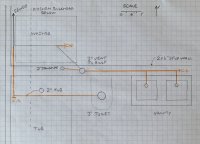
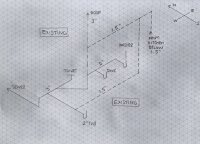
Here is a picture of the existing set up, as far as I can tell anyway, as full demo has yet to take place. If I’m not mistaken, at the very least the existing setup is incorrect due to the sink and standpipe arrangement and inadequate venting. Having said that, we have no issues with the day to day operation of the bathroom or laundry, and the proposed plan does remove this problem. Of course, this could all be a HUGE hot mess and require a complete do over, I’m sure someone will let me know if that is the case.
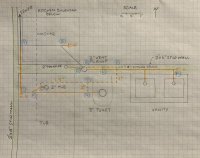
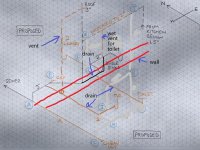
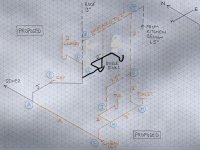
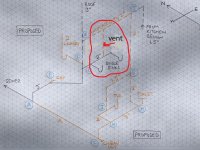
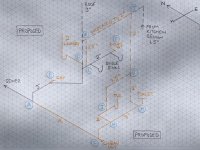
I’ve tried to be as detailed a possible in the two attached diagrams, with additional explanations below if necessary. Written explanations always make things seem more complicated, but if you look at the diagrams it should be relatively straightforward.
A) LAUNDRY STANDPIPE:
Move standpipe to other side of 3” stack (@ Location D), and tie in ABOVE the connection for the sink (w/ proposed double vanity sinks, new 1.5” vent @L, and w/cleanout @F). Thus ensuring the standpipe is dry vented to roof via existing 3” vent, and sinks are not wet vented with a laundry standpipe. Laundry trap arm will be <2’ and sink trap arm will be <4’ to cleanout. I will have a question about the height of the standpipe as the washing machine will be raised up on a pedestal. But I’ll save that till after the general acceptance of the overall proposed changes.
B) TOILET RELOCATION:
Connect additional 3” drain line (@A) for new toilet. Add 2” vent for toilet (@H) and tie in to existing vent connections, but increase entire vent line to 2” (@J) before connecting to existing 3” roof vent (@E, ensure above flood level of sinks). Also install cleanup at end of new toilet drain line where it changes direction within existing bulkhead (@C). Cap existing 3” toilet drain (@B). New 3” toilet drain line will be ~3’ N-S and 5’ E-W.
C) BATHTUB RELOCATION:
Tie new 2” bathtub drain (@K) into the new 3” toilet drain detailed above. Run new 1.5” vent (@I) for bathtub and tie into the new 2” vent (@G, ensure above flood level of bathtub) for toilet also detailed above. For space & simplicity, if there is a more efficient way to vent this, with the bathtub and toilet sharing a single 2” vent the entire way, I’d like to hear it. Bathtub trap arm will be <2’.
Note: The existing drain for the bathtub *could* technically remain in place as-is, but due to some “masterful” butchery of some key floor joists, I’d like to move it as proposed, so I can do structural repairs.
Any comments and recommendations are appreciated. Thank you very much.
Here is a picture of the existing set up, as far as I can tell anyway, as full demo has yet to take place. If I’m not mistaken, at the very least the existing setup is incorrect due to the sink and standpipe arrangement and inadequate venting. Having said that, we have no issues with the day to day operation of the bathroom or laundry, and the proposed plan does remove this problem. Of course, this could all be a HUGE hot mess and require a complete do over, I’m sure someone will let me know if that is the case.
I’ve tried to be as detailed a possible in the two attached diagrams, with additional explanations below if necessary. Written explanations always make things seem more complicated, but if you look at the diagrams it should be relatively straightforward.
A) LAUNDRY STANDPIPE:
Move standpipe to other side of 3” stack (@ Location D), and tie in ABOVE the connection for the sink (w/ proposed double vanity sinks, new 1.5” vent @L, and w/cleanout @F). Thus ensuring the standpipe is dry vented to roof via existing 3” vent, and sinks are not wet vented with a laundry standpipe. Laundry trap arm will be <2’ and sink trap arm will be <4’ to cleanout. I will have a question about the height of the standpipe as the washing machine will be raised up on a pedestal. But I’ll save that till after the general acceptance of the overall proposed changes.
B) TOILET RELOCATION:
Connect additional 3” drain line (@A) for new toilet. Add 2” vent for toilet (@H) and tie in to existing vent connections, but increase entire vent line to 2” (@J) before connecting to existing 3” roof vent (@E, ensure above flood level of sinks). Also install cleanup at end of new toilet drain line where it changes direction within existing bulkhead (@C). Cap existing 3” toilet drain (@B). New 3” toilet drain line will be ~3’ N-S and 5’ E-W.
C) BATHTUB RELOCATION:
Tie new 2” bathtub drain (@K) into the new 3” toilet drain detailed above. Run new 1.5” vent (@I) for bathtub and tie into the new 2” vent (@G, ensure above flood level of bathtub) for toilet also detailed above. For space & simplicity, if there is a more efficient way to vent this, with the bathtub and toilet sharing a single 2” vent the entire way, I’d like to hear it. Bathtub trap arm will be <2’.
Note: The existing drain for the bathtub *could* technically remain in place as-is, but due to some “masterful” butchery of some key floor joists, I’d like to move it as proposed, so I can do structural repairs.
Any comments and recommendations are appreciated. Thank you very much.
Attachments
Last edited: