Look what my previous plumber did...is this legit? Today's project.

Users who are viewing this thread

Tim Moyer

Member
Messages
64
Reaction score
6
Points
8
Location
NJ
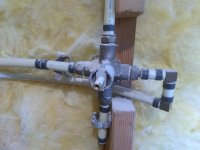
Today's project is to install a new Moen Posi-temp shower valve as part of the shower remodel. The previous plumber (15 years ago) moved the existing valve from one side of the shower to another when we replaced a neo-angle shower with a 42" Sterling fiberglass 3-piece. I'm not sure if this was done properly or not.
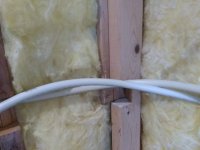
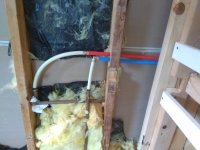
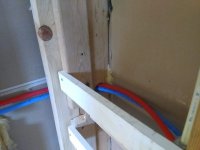
We could use your advice how to best run the PEX (either new or modify the existing) around the inside corner (in the photos the plumber just notched the studs). Our Kerdi board needs to mount flush, so we are thinking of drilling a 2" hole through the studs and possibly using a PEX 90 degree support for the lines.
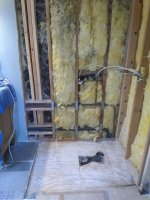
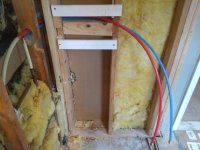
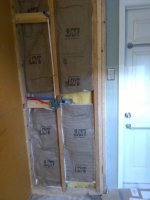
I'm also including a picture of the shower space (pre-Kerdi). We plan to give the valve and drop elbow proper wood blocking and depth for new Kerdi and tile.
 

Attachments

  • IMG_20210712_140554301.jpg
    IMG_20210712_140554301.jpg
    64.9 KB · Views: 432
  • IMG_20210712_140621855.jpg
    IMG_20210712_140621855.jpg
    64.3 KB · Views: 407
  • IMG_20210712_140651023.jpg
    IMG_20210712_140651023.jpg
    53.6 KB · Views: 433
  • IMG_20210713_175645745.jpg
    IMG_20210713_175645745.jpg
    81.5 KB · Views: 511

Tim Moyer

Member
Messages
64
Reaction score
6
Points
8
Location
NJ
Any suggestions how to run the pex lines around the inside corner, I mean the proper way, not the way the plumber did 15 years ago.
 

Weekend Handyman

Active Member
Messages
437
Reaction score
131
Points
43
Location
Nova Scotia
I am not a plumber or pro of any kind. Regarding your plan, some thoughts are: Expansion on the hot side ... you would need to make sure you have space to allow for expansion without stressing the joint. They sell 90' bend supports, you could check those out to see if they may be appropriate / helpful for your situation. Also, there are codes for drilling / notching studs. As I said, I am not a plumber/pro, so I would consult someone qualified to determine what is correct / best.
 

MTy

Member
Messages
84
Reaction score
11
Points
8
Location
TN
Not a pro and am in the process of doing my own bath Reno but a couple of observations based on my experiences recently.

I'd be very concerned about the studs notched like that on an exterior wall so would replace them. That one with all the pipes through it is not going to be fun.

A second look at the last picture and I'd also worry about what the hell is going on with those studs sitting on the horizontal 2x4s. Finding issues like this the price we DIYers pay for opening walls and floors.

Again not a plumber but don't think there is anyway to turn that corner even with 90 fittings because I doubt there is access on the back side. The plumber 15 years ago was lazy. He should have pulled up the subfloor and tied to the pipes, assuming they are down there and then run from there up the wall. That would mean removing the Ts currently supplying the shower. If they aren't right under there then you might could run from the current copper down under the floor and up the wall. I had to do something similar in my Reno with no way to turn a corner like that.

When it comes time to build your schulter shower hop over to https://www.johnbridge.com/ these guys here know their plumbing and the folks at John bridge know their showers. They helped me with mine.
 

Tuttles Revenge

In the Trades
Messages
4,253
Reaction score
1,488
Points
113
If we were looking down on the shower (plan view) and the existing shower valve location were North.. Where on the plan would the new valve be located?

But if you were planning on installing the valve on the wall opposite or east of the existing valve location, I would cut in new copper tees where the pex ties in and run the new hot and cold through the floor and up into your new wall. But I'm guessing that is what you mean by inside wall.
 
Last edited:

Tim Moyer

Member
Messages
64
Reaction score
6
Points
8
Location
NJ
If we were looking down on the shower (plan view) and the existing shower valve location were North.. Where on the plan would the new valve be located?

But if you were planning on installing the valve on the wall opposite or east of the existing valve location, I would cut in new copper tees where the pex ties in and run the new hot and cold through the floor and up into your new wall. But I'm guessing that is what you mean by inside wall.

I asked my designer (aka wife) if we had trouble get the pex around the corner if she would be ok with putting the new valve on the wall with copper and pex (this is where the original valve was when we had a neo-angle shower...hence the shortcut by the plumber 15 years ago to move it to the current side). We still needed to keep the drop elbow on the current side because of the layout of the shower. Having the valve on a different wall would have meant reaching in further with the glass door open to turn the water on to warm up, thus getting more of your body wet than installing the valve below the drop elbow. She wasn't keen on this option.
 

Tim Moyer

Member
Messages
64
Reaction score
6
Points
8
Location
NJ
Ok, so we only had a couple hours today, but I think we made some improvements. Feel free to tell us what we did wrong and hopefully what we did correct. Today's tasks:
-Connect new pex to existing, improve the path of the pex to allow for Kerdi Board to be installed tomorrow, and drill 2" holes through studs to location for valve. Looking at the photo reminded me to go put on a stud protector over the pex that goes behind the stud.
-Remove old valve and add blocking for the new valve and drop elbow. (You can see in the earlier photos the "job" the plumber did.
-Set the proper depth for the new valve using 3/4" 1x's to simulate the Kerdi Board, tile and grout. We will test the fit when the new valve is in place tomorrow with the cover plate of the new trim.
-Cap off the pex with Sharkbite stops and test for leaks (so far so good).
-This was our first time using the pex crimp rings, crimper tool, and go/no go gauge. Pretty cool!
- I should point out that neither of these walls are load bearing.
 

Attachments

  • IMG_20210714_150442859.jpg
    IMG_20210714_150442859.jpg
    71.5 KB · Views: 399
  • IMG_20210714_150455153.jpg
    IMG_20210714_150455153.jpg
    52.1 KB · Views: 500
  • IMG_20210714_150506895.jpg
    IMG_20210714_150506895.jpg
    73.1 KB · Views: 661

Weekend Handyman

Active Member
Messages
437
Reaction score
131
Points
43
Location
Nova Scotia
I am not a plumber / pro.

A few thoughts:
- I try to protect the pex where it will be rubbing up against anything.
- Are all of your rings the correct distance from the edge of the pipe (some look close - could just be the picture).
- Is there stress on the joint on the hot side where the copper transitions to the pex.
- To cap things off, I just use some brass caps. I have a de-crimping tool (SharkBite brand), so I just keep them and re-use them.

Here are a few videos on making Pex connections that I found helpful:
-
-

Also, read the manual for whatever brand of pex you are using. I usually use SharkBite brand, but I also found this manual to be helpful https://pexhouse.com/wp-content/uploads/2018/01/SuperPEX-Installation-Guide.pdf.
 

Tim Moyer

Member
Messages
64
Reaction score
6
Points
8
Location
NJ
Not a pro and am in the process of doing my own bath Reno but a couple of observations based on my experiences recently.

I'd be very concerned about the studs notched like that on an exterior wall so would replace them. That one with all the pipes through it is not going to be fun.

A second look at the last picture and I'd also worry about what the hell is going on with those studs sitting on the horizontal 2x4s. Finding issues like this the price we DIYers pay for opening walls and floors.

Again not a plumber but don't think there is anyway to turn that corner even with 90 fittings because I doubt there is access on the back side. The plumber 15 years ago was lazy. He should have pulled up the subfloor and tied to the pipes, assuming they are down there and then run from there up the wall. That would mean removing the Ts currently supplying the shower. If they aren't right under there then you might could run from the current copper down under the floor and up the wall. I had to do something similar in my Reno with no way to turn a corner like that.

When it comes time to build your schulter shower hop over to https://www.johnbridge.com/ these guys here know their plumbing and the folks at John bridge know their showers. They helped me with mine.

Yes, they have been very helpful to me as well. It is indeed great to have a forum like this one and the John Bridge forum to help DIYers. I have learned plenty and very much appreciate the help and knowledge.
 

Tim Moyer

Member
Messages
64
Reaction score
6
Points
8
Location
NJ
I am not a plumber / pro.

A few thoughts:
- I try to protect the pex where it will be rubbing up against anything.
- Are all of your rings the correct distance from the edge of the pipe (some look close - could just be the picture).
- Is there stress on the joint on the hot side where the copper transitions to the pex.
- To cap things off, I just use some brass caps. I have a de-crimping tool (SharkBite brand), so I just keep them and re-use them.

Here are a few videos on making Pex connections that I found helpful:
-
-

Also, read the manual for whatever brand of pex you are using. I usually use SharkBite brand, but I also found this manual to be helpful https://pexhouse.com/wp-content/uploads/2018/01/SuperPEX-Installation-Guide.pdf.
Thanks for this.
We tried to improve the stress on the joint where the copper and pex were joined. Although, it seemed to be okay for the last 15 years.
 

Jeff H Young

In the Trades
Messages
8,991
Reaction score
2,251
Points
113
Location
92346
Whatever? you got 15 years out of it I'm assuming it worked, yea its crappy work. Now you got walls open clean it up shouldn't be that big of a deal. questionable joints cut out
 

Tim Moyer

Member
Messages
64
Reaction score
6
Points
8
Location
NJ
Whatever? you got 15 years out of it Im assuming it worked, yea its crappy work. Now you got walls open clean it up shouldnt be that big of a deal. questionable joints cut out

Hopefully we cleaned it up better than we found it. Here is a picture of the new valve we installed with integral stops.
 

Attachments

  • photo 2.jpg
    photo 2.jpg
    53.4 KB · Views: 380

Jeff H Young

In the Trades
Messages
8,991
Reaction score
2,251
Points
113
Location
92346
Hopefully we cleaned it up better than we found it. Here is a picture of the new valve we installed with integral stops.
looks good. I don't work much with PEX but because its so bendable it usually looks pretty bad even on a good job , much of it is cosmetic but keeping stress off joints , pipe rubbing on edges of wood etc can wear into it stuff like that make a difference in the long run
 
Top
Hey, wait a minute.

This is awkward, but...

It looks like you're using an ad blocker. We get it, but (1) terrylove.com can't live without ads, and (2) ad blockers can cause issues with videos and comments. If you'd like to support the site, please allow ads.

If any particular ad is your REASON for blocking ads, please let us know. We might be able to do something about it. Thanks.
I've Disabled AdBlock    No Thanks