Leaking Plumbing Vent (inside)

Users who are viewing this thread

IaHawk

New Member
Messages
27
Reaction score
0
Points
0
Hi all,

I've got a leak problem that I think I may be able to handle myself, but I'm wondering the best way to go about it. I am a novice, but I have actually joined some pvc pipe together.

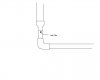
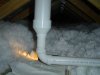
Noticed a little black spot on our son's ceiling (drywall) and thought I'd better check it out. First went outside and checked the roof in the approx. spot and sure enough, it's where the plumbing vent pipe sticks out. I live in Iowa and we've recently had a ton of snow. First thought it was probably the flashing around the pipe, but I hoped in the attack and strolled over to the pipe to check it out. What I found was that the water does not appear to be coming in around the flashing and the hole in the sheating. I dried off the DWV pipe and watched it with a flashlight. The DWV pipe runs quite a ways across the trusses and goes from 1.5 inches to a 3 inch pipe. The 1.5 inch elbows to 1.5 inch, runs up for about 4 inches and then goes into a reducer coupling that transitions to a 3 inch pipe that goes up through the roof.

The water is not dripping down the 3 inch pipe. It is actually leaking at the point where the 1.5 inch pipe goes into the fitting that transitions to a 3 inch. Hope that makes sense.

My best guess is that there is just a lack of adhesive at this point??? Not sure. The plumber that installed must have just not put enough on???

So, the amount of water on the sheetrock was actually more than what had soaked through. Right now, I've got a good sized pan sitting underneath until I can fix it, but I want to fix it asap.

My first thought was to cut the pipe create a new section and just replace the section with some couplings on the 3 inch and 1.5 inch. Here's my first question though, how do you replace a mid section? The pipe won't have a lot of give and won't I have to have at least an inch greater than the opening so that the existing pipe can cement into the new couplings?

My other option would be to replace the whole elbow and vertical section, couple the 3 inch pipe and then try to use a compression fitting on the longer horizontal 1.5 inch section. I've never used a compression fitting though and I don't know if that would be up to code. I think that might be the easier way to fix it even though it will require more parts.

Is there a third and better alternative?

I appreciated any advice anyone can offer. The house is only two years old and I'm a little bummed this happened. Please don't say call the builder. If I actually thought his guys would fix it the right way, I would.

I drew up a picture, but I'm not sure how to insert the photo. Thanks.
 
Last edited:

IaHawk

New Member
Messages
27
Reaction score
0
Points
0
Figured out the photo attachment. Hope that helps. Thanks.
 

Attachments

  • Photo.JPG
    Photo.JPG
    9.6 KB · Views: 433

GrumpyPlumber

Licensed Grump
Messages
1,521
Reaction score
57
Points
48
Location
Licensed Grump
I'm assuming it's white PVC pipe.
It's very possible the plumber missed gluing the joint..try pushing the 3" upward and see if it seperates, if so, prime & glue it heavily and pull back together, DON't push it up any more than necessary and be sure the rubber flange hasn't folded down on the pipe on the roof when done. (use a small flat head screwdriver to edge it back up if so)
If not, cut from above the 3" fitting and 3" past the horizontal part of the 1-1/2" 90...replace the whole thing.
 

IaHawk

New Member
Messages
27
Reaction score
0
Points
0
Thanks. You are correct. It is the white PVC DWV Schedule 40 non pressure pipe--if that helps. I assume this is pretty standard stuff that I can buy at Home Depot, Lowes, or *******.

When I was up there, I did push on the various parts, but I didn't notice that anything was loose. I can only suspect that there is a slight gap in the glue. I didn't want to push up too much though because I was concerned I might disturb the roof flashing or sleeve or whatever that thing is called that has the rubber flange. I didn't notice a bead of glue around the joint, but maybe I just put too much glue on in the past when I do this stuff. I've always heard clean, prime, glue around the male, light coat in the female, glue male again, insert and slight twist.

So, if I replace the whole thing as you suggest, the only question I have is how to go about reinserting everything. I will take good measurments and check the dry fit first, but let's say I attach the 3" piece first, now when I go to reattach the horizontal 1.5 inch, I'll be sticking over a half inch or so. I'm concerned about having to "bend" the vertical piece back to the left to get the 1.5 inch connection made. My worry is that in bending that piece, I'll disturb either the glued assembly I made or the roof flashing. If I push back on the 1.5 inch piece, I'm worried I'll rattle something else loose down the line on the 1.5 inch

Am I too concerned about this movement? I just don't want to creat more problems. I've read about the compression fittings for making a splice, but I don't know if those are up to code--though no one would probably ever know since it's in the attic. My preference would be the glue though since that's what's there, or what's supposed to be there, now.

Any thoughts? Thanks so much for the prompt response. I plan on doing this this afternoon. Even with the big pan up there, I don't like the idea of the leak not getting fixed for a few days.

Thanks.
 

GrumpyPlumber

Licensed Grump
Messages
1,521
Reaction score
57
Points
48
Location
Licensed Grump
Slip coupling.
Thats a coupling that has no stop inside, so it can slide down the length of the pie.
You can put it all together, place a 1-1/2" slip coupling on the horizontal piece then swing the 1-1/2" 90 into place with the stub already glued.
You won't be able to glue the inside of the slip coupling...so be generous on the 1-1/2" before sliding it into place, be sure to rotate all joints 1/4 turn while wet.
 

IaHawk

New Member
Messages
27
Reaction score
0
Points
0
Thanks, but now is where I really show that I'm a novice. So I slide on the slip coupling over the 1.5 inch horizontal pipe. I glue the vertical part, then glue the elbow once aligned with the horizonatal pipe? Now my horizontal pipe would almost connect and I assume this is where the slip coupling comes into play. So, do I just liberally glue both ends of the 1.5 inch and then slide the slip coupling over the split? My past experience in working with this stuff makes me wonder how I can get the coupling to cover the split before the glue dries. Again, I attached a pic of how I see it in my mind.

Could I just use a rubber slip coupling and tighten the straps around the tube? Again, I'd prefer the glue option as long as I can slide it over the whole seam. I'm just worried that once the coupling hits the glue, it's going to stop before I even get it over the gap.

Hey, thanks again for the response. I do appreciate it.
 

Attachments

  • photo.JPG
    photo.JPG
    21.4 KB · Views: 416

GrumpyPlumber

Licensed Grump
Messages
1,521
Reaction score
57
Points
48
Location
Licensed Grump
A picture is worth a thousands words, you got it.
Correct also, you could use a no hub coupling as well..be sure it's sleeved.
They're a few more bucks, you slide the stainless steel sleeve down the pipe like you would the slip coupling, fold the rubber gasket back so you have room to swing the pipe in place, the fold back over the pipe and put the sleeve on & tighten.

proflex.jpg
 
Last edited by a moderator:

IaHawk

New Member
Messages
27
Reaction score
0
Points
0
Hey thanks a bunch. I do appreciate your advice and help. If I do go the glue route, do you just have to ram it over the split quickly to prevent the glue from sticking it in place too quick. Wouldn't that tend to push the glue away in the direction you're sliding it? Just curious. Thanks again.
 

GrumpyPlumber

Licensed Grump
Messages
1,521
Reaction score
57
Points
48
Location
Licensed Grump
Personally, I'd use the slip coupling..but in lieu of what you said, I'd suggest the no-hub.
We're talking a difference of $4-$5 for assurance.
 

IaHawk

New Member
Messages
27
Reaction score
0
Points
0
Thanks. You guys are awesome. Happy New Year. I'll take a pic when I'm all done and post it if you're interested. Thanks again.
 

IaHawk

New Member
Messages
27
Reaction score
0
Points
0
Well I didn't get to complete my proj. today...way too cold. I'm going to wait till Sat. when the temp goes up to 40.

I did take some measurements though and I did notice something else when I was up there. The rubber flange on the 3 inch pipe that goes up through the roof is folded down--all the way around. Seems like that should be pointing up. I looked at two other vent while up there, on one the rubber part is pointed up, on the other its half down and then bends up. Mine are the kind that are aluminum with the rubber part around the hole where the pipe sticks through. How can someone not notice that?

Is this a roofer issue or a plumber issue, or both. Is it as simple a fix as me just edging the rubber up with a small flat blade screw driver? Starting the one that is pointing down completely might be tough.

Anyway, thanks for any input on this issue as well. Amazing the stuff you find when you crawl around your attic!
 
Last edited:

Mikey

Aspiring Old Fart, EE, computer & networking geek
Messages
3,024
Reaction score
17
Points
38
Location
Hansville, Washington
Sounds like the whole pipe assembly has dropped and brought the rubber gasket down with it. Is that horizontal run supported adequately? If that's indeed the problem, you can probably fix it by pushing the pipe up an inch or so, which should pop the gasket up into the proper shape. This probably won't work at 40 degrees, though; wait for summer, or heat it (from below will work) with a hair dryer to make the rubber flexible.
 
Last edited:

IaHawk

New Member
Messages
27
Reaction score
0
Points
0
This is the type I have.
 

Attachments

  • flash01.jpg
    flash01.jpg
    2 KB · Views: 371

GrumpyPlumber

Licensed Grump
Messages
1,521
Reaction score
57
Points
48
Location
Licensed Grump
Take a thin, blunt object and push that flange back up..THAT could be the trouble.
A 36" ruler or similar ought do it...nothing sharp.
 

IaHawk

New Member
Messages
27
Reaction score
0
Points
0
Here's a pic of the actual part I'm replacing. It seems to be supported ok. There's one of those j-shaped plastic hangers holding it about two feet from the elbow--maybe a little closer. I can always add support when I'm up there. There's definitely nothing right underneath the elbow though.
 

Attachments

  • DSC05005.jpg
    DSC05005.jpg
    86.9 KB · Views: 336

IaHawk

New Member
Messages
27
Reaction score
0
Points
0
Thanks for the replies. I still believe my leak is where I described earlier. Since it's about 10 below today, there isn't water but instead ice. A little in the tray that I placed below the assembly, but not much. There is no ice on the top of the 3 inch coupling. The ice is only on the top of the elbow.

How much give is in that rubber typically? I can certainly wait until it's warmer, but around here that's going to be a few months. Hairdryer would work I suppose. I just don't want to screw the flashing up on top of the roof.

Many people would probably say, why not just call the builder since the house is only two years old. The builder owns the HVAC company and the plumbing co. that did the work in the house. I wouldn't hire either of them independently. In other words, I'm not sure they would investigate to the level that I have to determine the root cause of the problems. If these sound like DIY fixes, I'm willing to try them, but I don't want to screw anything up.

Hope you guys are having a Happy New Year.
 

GrumpyPlumber

Licensed Grump
Messages
1,521
Reaction score
57
Points
48
Location
Licensed Grump
Going by that pic, I don't see any signs that the reducing coupling was primed or glued.
I will say that you might be surprized the leak is coming from the flange off the roof.
Not much water inside that vent to create a leak like this..the roof is a different story when the sun comes out.
Push up that flange first and see if it remedies the problem.
Not too impressed with your contractor either at this point.
 

Herk

Plumber
Messages
545
Reaction score
0
Points
0
Location
S.E. Idaho
I kind of wonder if this pipe is properly supported or just resting level on the joists. The downward flexed flashing seal might indicate that it had sagged a bit.

Still, I think I'd start with pushing up the rubber seal with something ilke a yardstick and see if the leak persists. That flashing seal can hold water that would then leak over time down the pipe.

Although it's not pretty, I would never install PVC without purple primer. A glue joint without primer is something that can easily crack. It is possible that this had a clear primer, but it's impossible to tell. (Which is the reason for purple coloring.)

The vent should pitch back toward the drain a minimum of 1/8" per foot.
 

IaHawk

New Member
Messages
27
Reaction score
0
Points
0

Not too impressed with your contractor either at this point.

That makes two of us. I think at this point I'm going to do both--push the flange up while replacing the section we've talked about. I really gave the coupling a good tug while I was up there and it won't budge. Seems like it was glued, but not very well. I was hoping the lettering on the pipe would run into the coupling because it seems like that stuff smears when the glue is applied. It didn't though, so I couldn't really tell. If he did glue it, he didn't use much on that jointed area.
 
Top
Hey, wait a minute.

This is awkward, but...

It looks like you're using an ad blocker. We get it, but (1) terrylove.com can't live without ads, and (2) ad blockers can cause issues with videos and comments. If you'd like to support the site, please allow ads.

If any particular ad is your REASON for blocking ads, please let us know. We might be able to do something about it. Thanks.
I've Disabled AdBlock    No Thanks