Cantilever floor, underside and insulation

Users who are viewing this thread

Steve Palm

New Member
Messages
4
Reaction score
0
Points
1
Location
Rockford, IL
Hi Everyone, first time poster, longer time reader. :)

The last two winters where we had some pretty steep sub-zero temperatures, the PVC drain line of our kitchen sink froze up. It is on an outside wall, and that wall is cantilevered over the foundation by two feet. So I decided to look at what was going on when I finally remembered to do so this summer. :)

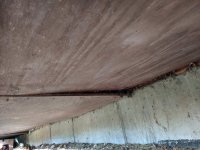
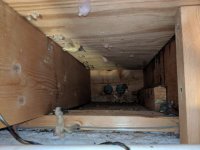
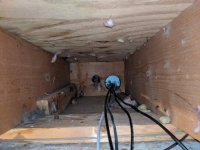
The sheathing underneath really has me puzzled, as at the end of every 8' section of sheathing it is dropped down. I can't fathom why, so I'm hoping someone here can help me understand why this was done. Even stranger, it definitely seems to have been done on purpose as going on the inside and looking into the cavity between the joists I see a board tacked alongside the floor joist that is intentionally pushed down lower than the joist and meeting the sheathing. Hmmmm....

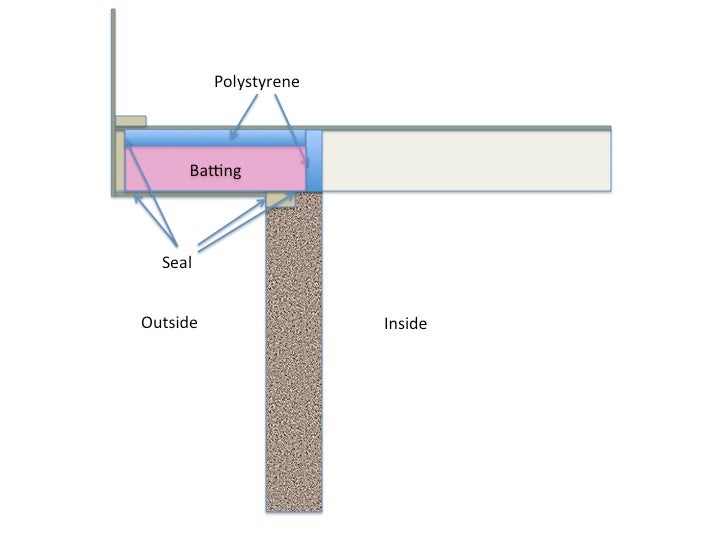
All the cavities are filled with fiberglass insulation. It isn't just "set in" they sort of rolled/bundled it up and wedged it in there in every cavity.

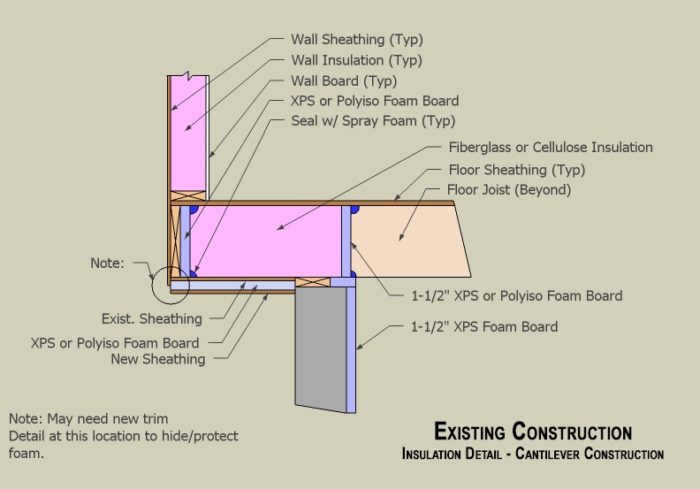
I have a guy coming who is willing to come inside, pull those boards out, push the sheathing up, put a foam board under that sheathing and put another layer of sheathing under it to seal it all up. Maybe overkill, I don't know, but it bothers me that such an area of overhang has no real bottom-side insulation.

Also, wondering what to do about the rim joists... I'm thinking of putting some foam board in there and trying to seal around it with either a caulk or expanding foam. But...

The cantilever is about 2', so for me at least, I'm presented with a challenge of how to effectively reach that far rim joist to seal it. Probably could push the foam board back in there somehow, but sealing it presents another issue... I don't know all the tools available, but I'm hoping some kind of rigid extension on a foam can might be available to reach back in there.... And the cavities that have the heating ducts and plumbing present more challenges, but that's another story. :)

I attached a few images of the underside where you can see the sheathing hanging down on the ends, and also a few cavity photos from the inside.

Any thoughts would be most welcome.
 

Attachments

  • Underside1.jpg
    Underside1.jpg
    112.2 KB · Views: 921
  • Underside2.jpg
    Underside2.jpg
    83.8 KB · Views: 803
  • Cavity1.jpg
    Cavity1.jpg
    74.3 KB · Views: 1,020
  • Cavity4.jpg
    Cavity4.jpg
    80.1 KB · Views: 1,234

Dana

In the trades
Messages
7,889
Reaction score
509
Points
113
Location
01609
Most of the details have been covered in these threads, but I have no idea why the sheathing would intentionally installed with that sag/skew. You may have to pull a section apart to see what's really going on- it looks like the fasterners may have rusted out to the point where it's sagging. Ideally you'd be able to air seal those seams in the plywood.

It's most important to air seal the band joists to the subfloor, and to air seal the bottom sheathing. No matter how much insulation you have in there it WILL be defeated by air movement even from a light wind unless it's air tight.

Install the insulation only between the plumbing and the exterior sheathing/band joist, not between the plumbing and subfloor. Be sure to include a solid air barrier on the plumbing side of your insulation and air-permeable (read "fiber") insulation, or there will be wintertime moisture accumulation in your (now colder) band joist and sheathing.

Even though it's heat lea and less than ideal, the bays with heating ducts can be simply insulated with blown cellulose- they aren't a freeze-up risk. As long as the duct aren't leaking air and you can air-seal adequately around them where they pass over the foundation it won't create moisture problems in the cantilever.
 

Steve Palm

New Member
Messages
4
Reaction score
0
Points
1
Location
Rockford, IL
Thanks for the quick reply! I'm just a homeowner, trying to learn about this all as quickly as possible to verify what is being proposed. I don't even pretend to be in the trade and know best practices or code. I had read the other threads and learned a lot from them, and will go re-read them again.

The strange thing is, about the sagging, I can't say it is compromised fasteners and that it sagged later, becuase that board they tacked alongside the joist is nailed so that it is down below the joist up against the plywood. Could it be that at some point the previous owner put those in because something ELSE caused the plywood to sag and that was their attempt to close the gap? I don't know. But odd in that it was every 8' section done that way which made me think it was on purpose, which is why I was looking for someone who knows far more than me to tell me why it made sense, becuase I couldn't make sense out of it. LOL

Anyway, I think the planned changes are OK, and it lines up with what I learned here and the diagrams for existing construction I saw in the other threads. He is going to pull those boards out from alongside the joists, flatten out the existing plywood as best as he can, put some foam board underneath sealing the edges with foam, then put a new layer of plywood sheathing under it. Then I will just have to re-examine the best way to seal the cavities from the inside.

Still have to find an tube-type extension to reach in and get the foam/sealant around the foamboard if I put it at the end of the 2' cavity on the rim joist. maybe a piece of drain line could work...
 

Dana

In the trades
Messages
7,889
Reaction score
509
Points
113
Location
01609
Expanding can-foam sealants don't stick very well to most rigid foam board, but do what you can. Sealing the joists, subfloor, and sheathing to the band joist works better using polyurethane caulk, if you can reach every corner and seam. Rigid foam isn't absolutely essential here, and is sufficiently vapor-retardent to potentially create moisture traps if applied to the exterior (cold in winter) side of the assembly, such as the sheathing or band joist.

A plywood subfoor is a pretty good interior side vapor retarder if it's air tight (seal all plumbing and electrical penetrations to the subfloor with whatever works best- can foam is best for gaps a half inch or smaller, polyurethane caulk works better on small seams.) The air-barrier where the joist bays cross the foundation and any air-barriers between the plumbing and fiber-insulated side of the cavity too. But in your climate keep any foam board on the warm-in-winter side of the insulation layers when combining with fiber insulation, and make it air tight. Foil faced polyiso is easy to air seal reliably with temperature rated foil HVAC tapes (eg Nashua 324a, available at most box stores. There are others.)

It's conceivable that somebody thought they were protecting the sheathing from rotting by venting it to the outdoors with those offsets, but that's no way to build a moisture resilient, efficient assembly.

IRC 2018 code minimum for US climate zone 5 (that includes Rockford) for overhanging cantilevered floor is R30 between the joists, or whatever fits, as long as it's at least R19. For the band joist it needs to be at least R15. That might not be possible in a retrofit using fiber insulation, or even with R6/inch foil faced polyiso board, but do what you can, where you can. Where the insulation is only at the bottom sheathing to accomodate plumbing, insulating and air tightness at the band joist becomes imperative. It's fine to pack batt insulation around duct work etc, which will help with the overall air-retardency. While accessible when the sheathing is down, seal any duct & duct boot seams & joints with duct mastic, and seal the duct boots to the subfloor the best you can to prevent air-handler driven duct leakage into the cavity. (You may be able to improve on the duct boots from above.)
 

Steve Palm

New Member
Messages
4
Reaction score
0
Points
1
Location
Rockford, IL
Thanks, I have to re-read that a few times to get it all becuase it is a bit overwhelming.

But a few points to be sure I am not getting it wrong:

1) He is not planning to remove the existing sheathing, I am almost positive that he said he was going to put F6/inch foil faced board on the BOTTOM side of the existing sheathing and then put another layer of sheathing under that.

That means that I own't have access from the bottom side to touch up any vents/etc, I only have access to what I can get from the open end inside the basement along the foundation wall.

2) Is that in contradiction to what you say here? "But in your climate keep any foam board on the warm-in-winter side of the insulation layers" ???

I was going by the diagram posted in another thread....

Cantilevered%20Floor%20Detail%203-700x489.jpg


That is what I thought he was trying to accomplish, putting the foam board/sheathing in addition to the existing on the bottom side. That's when I looked at it and thought putting that foam board against the rim joist in the far end would help.

Sorry for being so slow to take it all in. Maybe he knows what he is doing and I should just let him do it, and maybe just leave all the fiberglass insulation that is in the cavities stay there as it is. :)
 
Last edited:

Dana

In the trades
Messages
7,889
Reaction score
509
Points
113
Location
01609
If the cavity is full of fluffy insulation putting R6 foil faced foam on the bottom side of the existing sheathing is all but guaranteed to create super-high moisture conditions in that sheathing over the course of a winter. In zone 5 more than 25% of the total R would have to be on the exterior to be able to keep the average temperature at the existing sheathing above the anticipated indoor air's dew point temperature, and the cavity has to be made reliably air tight to the indoor air, so that vapor diffusion is the predominant moisture transfer mechanism.

So if it's a well-fitted R15 batt on top of the sheathing, and R6 on the bottom side you'd have R6/R21= 28.6% of the total R as exterior side foam. Anything more than R15 in the cavity becomes a problem for the bottom sheathing. Any air leaks from the first floor or basement into the cavity could also become a moisture problem for the sheathing. And that doesn't address the fact that the band joist is still a significant heat leak, even if it's made air tight. Any more fluff than that keeps the sheathing too cold in winter, and the foil facers block any possibility of drying to the exterior.

The version in that picture is problematic, since with exterior-side foam it is relying on perfect air sealing between the cavity and indoors, both at the subfloor and at the 1.5" XPS air dam between the basement side and cantilever side of the joist bays. It doesn't sound as if you'll be able to adequately air seal the subfloor, but that might be enough if your air dams to the basement are ultra-tight.

It's far better in your case if the rigid insulation is snugged up to the underside and outer side of the plumbing detailed as an air barrier, then filling the space between the rigid insulation and sheathing/band-joist with the fluffy stuff, leaving nothing but air between the plumbing and the subfloor. If there were nothing in the cantilevered bay, this would be the better stackup, since it keeps interior side moisture drives from reaching the cold sheathing:

index.php


or:

80476d1390982868-another-cantilever-insulation-question-slide2.jpg


Even if it's less insulation overall, stuffing a batt in there and compressing it in place with the 1" foil faced polyiso wedged between the batt and plumbing would be preferable to the 1" foil faced on the exterior side of the sheathing.

It's remarkable just how badly detailed most cantilvered floor designs are- even those being built today. Yours is pretty typical, not an outlier by any means.
 

Steve Palm

New Member
Messages
4
Reaction score
0
Points
1
Location
Rockford, IL
Thank you so much for your time, I am going to have to regroup and study this a lot more.

The inside is not sealed at all, and I wasn't thinking about doing that at this point. There is air coming in, because when the drain pipe froze and I was removing insulation to get some heat in there there was rushing cold air until I wedged some in to block it off. That was the thought about putting the foamboard and sheathing underneath, to try to just sealt that off well.

I don't like how that sheathing is gapped like it is, and would like to close that up, but now you have me terrified (not a bad thing) about doing something and causing moisture problems and potential mold/rot. So, instead of putting an insulation foamboard layer in there, would it be better to just get some of the polyurethane caulk you mentioned, or foam if there are larger gaps, and just seal the board that is there doing nothing else? Or is sealing it up going to cause problems?

Another thing I don't like about the gaps that are there now is that if you get air ingerss/movement in one joist cavity, it easily moves to the others becuase the plywood sheathing is not up against the joists. That is why I was glad to think the poroject would seal all of that up, but now I don't know.

Hats off to folks who do this all day every day and know it inside and out. :). It seems deceptively simple until you start to realize all the interactions that can go on.

I know that air can get in there, becuase in the few cavities I took the insulation out of, there are bug carcasses, and where bugs can get into, air can get easier. This also becuase more of an issue as I am working out of the basement now and have been having an issue with fungus gnats and a few other kinds of small flies, only in the area along this wall... I have looked for every other source that I can think of, can't find anything, so I was guessing they were finding a way in here. Can't prove it though. :) Especially since they died off whne the winter came on last year, didn't see any until it started getting nice and warm, which makes me think they are coming from outside, not that they have a nice happy home inside or they would be there year-round I'd think.
 

Dana

In the trades
Messages
7,889
Reaction score
509
Points
113
Location
01609
The fundamentals boil down to this:

1: Air sealing the exterior sheathing is essential for controlling the freezing risk. A well insulated wind tunnels doesn't help anything.

2: Air sealing the interior is essential for controlling the moisture risk (whether or not the exterior is sealed). One square inch of air leak can move more moisture into the cavity in winter than 500 square feet of vapor diffusion through 3/4" plywood subfloor. When the temperature of the plywood sheathing is below the dew point of the indoor air (about 35-40F in winter, higher if you are actively humidifying) it will take on moisture in the form of adsorb (not condensation), and the vapor redardency of the plywood is low enough that it takes months to move that moisture out to the outdoors.

Boxing-in the plumbing with foam board so that it's essentially "indoors" keeps it from freezing, and if made air tight can help limit the overall air and moisture migration in either direction.

Insulating the rest of the cavity (or cavities without plumbing) with blown cellulose will also slow down air movement far better than with low density fiberglass batts, and safely shares the moisture burden with the structural wood. It's not exactly the same as air sealing everything with caulk, but it's pretty good. There would still need to be a vapor-retardent (or true vapor barrier) air dam in each joist bay blocking air and moisture migration from the basement air. In US climate zone 5 (all of northern IL) the water vapor retardency of that air barrier in the joist bays doesn't need to ultra-low (it could be plywood / OSB, or even wallboard painted with latex primer) but it doesn't hurt if it's true vapor barrier (such as foil-faced foam board.)

If you end up replacing the bottom side sheathing, consider using MDF instead of plywood or OSB. MDF is more moisture tolerant, and it's quite a bit more vapor-open, with a drying rate several times that of OSB. Your local Menards sells single sided asphalted fiberboard MDF, which is perfect for this application. The asphalted side should be facing the exterior (the untreated side toward the cavity), and leave it unpainted. Asphalted fiberboard runs about 15-20 perms, compared to 0.8-5 perms for half inch OSB (depending on moisture content), or 1-8 perms for half inch CDX.
 
Top
Hey, wait a minute.

This is awkward, but...

It looks like you're using an ad blocker. We get it, but (1) terrylove.com can't live without ads, and (2) ad blockers can cause issues with videos and comments. If you'd like to support the site, please allow ads.

If any particular ad is your REASON for blocking ads, please let us know. We might be able to do something about it. Thanks.
I've Disabled AdBlock    No Thanks