Campbell well cap piping

Users who are viewing this thread

smokebug

New Member
Messages
5
Reaction score
0
Points
1
Location
sw missouri
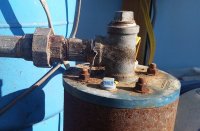
I need to replace the piping from the top of the cap. The piping now is galvanized it has a tee at the top of the cap the tee is resting on the cap no visible nipple under it. It has a plug on top and one end in the well the other to the switch and pressure gauge, there is a nipple and then a union after the tee. The 90 on the cap is loose not leaking just easy to turn. I have tried to open the union but it is tight and it begins to pry on the plastic cap I believe it will break before I get the union loose. My question is if I take the 90 at the top of the cap off will the inner pipe fall. I can post pictures if it would help. Thank you Smokebug
 

Reach4

Well-Known Member
Messages
38,903
Reaction score
4,439
Points
113
Location
IL
My question is if I take the 90 at the top of the cap off will the inner pipe fall.
Probably yes. Also, don't remove any of the 4 screws because something can fall.

I can post pictures if it would help.
A picture would help.

If you have what I think you have, they call that a well seal.

Is this in a pit?
 

smokebug

New Member
Messages
5
Reaction score
0
Points
1
Location
sw missouri
Probably yes. Also, don't remove any of the 4 screws because something can fall.


A picture would help.

If you have what I think you have, they call that a well seal.

Is this in a pit?
 

Attachments

  • 20200625_083749.jpg
    20200625_083749.jpg
    94.7 KB · Views: 141

smokebug

New Member
Messages
5
Reaction score
0
Points
1
Location
sw missouri
No pit. The power control box shows the well to be 320 feet. I would find it hard to believe that seal cap is supporting that much weight, but you never know. My goal is to replace the galvanized pipe to brass and to add a new brass pressure tank connection with new gauge and switch. I am going to try to remove the plug at the top of the tee and maybe see whats in it.
 

Reach4

Well-Known Member
Messages
38,903
Reaction score
4,439
Points
113
Location
IL
Good picture.

That tee is holding up the pipe below. Don't try to change out that tee without the right equipment.

That plug on top could be removed. The well guy may screw something into the top of the tee for lifting with the hoist.
 

Valveman

Cary Austin
Staff member
Messages
14,633
Reaction score
1,304
Points
113
Location
Lubbock, Texas
Website
cyclestopvalves.com
Yes, that tee is holding up all the weight. That galv tee could also be screwed onto sch 80 PVC pipe going through the well seal. If you bend the tee sideways and break it off from the PVC pipe, the pump and everything will fall to the bottom of the well. In other words, make sure to use a proper back up wrench so as not to turn the tee and break it off. Unions are a bixxx! Make sure you are turning the collar in the correct direction. First hold a large hammer to one side of the union collar while hitting the other side with a smaller hammer. The keeps the tee from breaking off and helps loosen a stuck collar. Then keep the back up wrench handle beside the main wrench handle and pull them apart, pushing on one while pulling on the other. If you don't keep the wrench handles together you will put sideways stress on that tee. If all else fails on the union, get out the Sawsall.
 

Reach4

Well-Known Member
Messages
38,903
Reaction score
4,439
Points
113
Location
IL
Make sure you are turning the collar in the correct direction.
Proper direction is the top of the big union nut toward the pressure tank, right?

If you use the Sawzall, I think you would want to cut off the pipe to the left of the picture. Then use the big nut on the union to unscrew. Maybe the joint that lets go first will be the one at the tee (which you are holding securely as Valveman described).
 

smokebug

New Member
Messages
5
Reaction score
0
Points
1
Location
sw missouri
Thanks guys! I did remove the plug and can see a pipe on the bottom of the tee. I am ok with the correct direction on the union, me and my son on the pipe wrenches it was flexing the seal cap enough to make us nervous. So I think now maybe some heat on the union or the Sawzall. and only replace from the nipple in the pictured union back to the tank.
 
Last edited:

Reach4

Well-Known Member
Messages
38,903
Reaction score
4,439
Points
113
Location
IL
Heat sounds like a fine idea.

If you decide to cut, don't go buy a Sawzall for the purpose. A hand hacksaw or a metal-cutting blade on your jigsaw will do fine for this one-time operation. Angle grinder with a cutoff wheel would be a great tool for that too.
 

Valveman

Cary Austin
Staff member
Messages
14,633
Reaction score
1,304
Points
113
Location
Lubbock, Texas
Website
cyclestopvalves.com
That is a plastic well seal. And if the pipe below the tee is also plastic, be careful with the heat. You won't put any sideways pressure on the tee if you have both handles of the pipe wrenches together and both of you have one hand on each, pushing on one while pulling on the other. If the pipe wrench handles are not parallel you will put sideways stress on the tee.
 
Last edited:
Top
Hey, wait a minute.

This is awkward, but...

It looks like you're using an ad blocker. We get it, but (1) terrylove.com can't live without ads, and (2) ad blockers can cause issues with videos and comments. If you'd like to support the site, please allow ads.

If any particular ad is your REASON for blocking ads, please let us know. We might be able to do something about it. Thanks.
I've Disabled AdBlock    No Thanks