Best way to fix defective fiberglass tub drain opening?

Users who are viewing this thread

DIYChad

New Member
Messages
3
Reaction score
0
Points
1
Location
New Hampshire
Hello,

I am new to the forums, but have benefited from the advice offered here many times. Thanks to all for the time you spend answering questions here.

I recently purchased a 2005-built home and discovered that the upstairs tub/shower has a leak from the drain (would've been nice if the inspector had noticed this, but oh well...) I was able to remove a ceiling trim piece that hid the plumbing and access the underside.

After water started spilling from the downstairs bathroom ceiling (around the trim piece I mentioned) I isolated the source of the leak--the tub drain.

I've done all of the standard fixes at this point--
  • I replaced the plumber's putty around the drain -- didn't work
  • I replaced the drain with a new drain -- didn't work
  • I purchased a new rubber gasket to go between the tub and the drain elbow -- didn't work
  • I tried drains with gaskets and drains with putty -- didn't work
I know I am getting a good seal around the top of the drain (with putty and with gasket drains) because I can fill the tub with water and leave it a long time--no leaks. However when the tub drains, it always leaks around the gasket between the tub and the drain elbow.

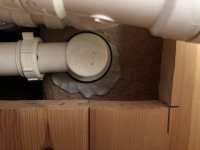
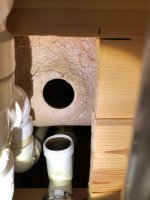
After a lot of searching online I came across folks mentioning that some fiberglass tubs have defective openings, but I didn't see much in the way of successful "How to deal with this?" information. I removed the drain elbow and discovered that my fiberglass tub is also defective, and the plumber's putty that had been used (I assume in 2005, but I have no idea how many times this has been "fixed") to "correct" the problem failed. There was a lot of putty that I kept scraping out between the gasket under the tub and the bottom of the tub. When I removed the elbow, I could see why! Please see attached photos.

What can I do to correct this problem in a more permanent way? This will be my kids' tub/shower and will see a lot of use. The tub is otherwise fine, no signs of cracks or any other damage, and nothing else is leaking (overflow/shower/inlet valves). I can't get the rubber gasket to make a good seal against this tub bottom.

Thanks to anyone who takes the time to read this and offer thoughts!

Best regards,

-DIYChad

OZcamLALTia9sTTl44Gxjg.jpg
 

Attachments

  • T8MgCTUIShaTAPsn6KrCQg.jpg
    T8MgCTUIShaTAPsn6KrCQg.jpg
    67.4 KB · Views: 417
Last edited by a moderator:

DallasDIY

New Member
Messages
23
Reaction score
0
Points
1
Location
Dallas, Texas
Chad, it seems you might get a better seal if you could smooth out that surface where some of the fibers have gotten close to the drain hole. Not sure how much working room you have in that space, but have you considered using a disk/random-orbit sander to flatten out that surface where the gasket and drain pipe would make contact with the bottom of the tub? You might start out with something fine like a 150- or 180-grit and see if it is coarse enough to smooth things out. Personally, I'd steer clear of coarser-grit paper unless absolutely necessary as you'd be better off smoothing it slowly.

If you were more comfortable and wanted to test the process before breaking out the power tools, you could buy some sanding sponges and see how they work on that surface. You might find they are sufficient to give you a decent surface. I'd finish that off with 220-grit or a similar, fine paper to get as smooth as possible.

Once you have a good, flat mating surface, you'll have a better chance of a seal. As a last resort, maybe some Permatex gasket maker/sealer could be of value but I don't know that it would react well with a rubber washer under there. You could check specs.

Good luck!
 

Jadnashua

Retired Defense Industry Engineer xxx
Messages
32,770
Reaction score
1,191
Points
113
Location
New England
Yep, sand it smooth first, then try reassembling. If it still leaks, some have used a bead of silicon as the seal, but getting it off at a later point in time may be near impossible without destroying things.
 

DIYChad

New Member
Messages
3
Reaction score
0
Points
1
Location
New Hampshire
Thank you very much for the advice!

After many failed attempts, I finally seem to have a fix that's creating a good seal. We've put the tub/shower through a rigorous set of tests and had our kids wash in showers and full tubs, and not a single drop from below.

Based on advice from this thread, I used some JB WaterWeld to build up a surface around the portion of the fiberglass tub opening that was defective and had almost no flat area for a seal to press against. It's hard to see in my original photos, but the defective area rapidly "dives away" from the level I need the material at to make a level seal--this is why I didn't just try sanding the existing fiberglass bottom straight away.

After allowing a day or so for the WaterWeld to fully cure, I sanded it all down as recommended here. The access to the underside of the tub was too small to fit even a small power tool up there (no sander, no Dremel) so I purchased some sanding sponges in the grits recommended by DallasDIY to smooth things out. I'm no pro, so I just kept sanding and feeling the surface with my hand until it felt nice and smooth, moving from coarser to finer grits along the way. This knocked down the small irregularities from my application of the WaterWeld.

I cleaned all the dust off and allowed it to fully dry, then tried what had always failed before--tightening the drain shoe to the drain elbow with only the gasket between the elbow and the tub. I had purchased a replacement drain shoe from the orange store and the crossmembers broke off during tightening. After ordering a Superior Tool 05255 1.5" Tub Drain Extractor to remove the broken drain shoe (that did an awesome job) I replaced the broken drain shoe with the cast brass drain shoe that came with the house, made by Gerber. It's not terribly pretty but it's nice and solid.

I sealed the top of the drain shoe (between the top of the drain shoe and the inside surface of the tub) with plumber's putty, and didn't put anything between the gasket and the new surface I'd made with the JB WaterWeld and the existing, undamaged fiberglass surface. Just to be clear, the off-white material in the photos here is all JB WaterWeld, not putty or anything else. I used about half a tube of WaterWeld to build up underneath where I needed the flat surface.

Full tubs, showers, lots of use for a couple days... not a single drop from below!
RgMo9B6YRSarzsMGBQHYEw.jpg
 

Attachments

  • j40aZIN6Tc2pkriLJ%PgcQ.jpg
    j40aZIN6Tc2pkriLJ%PgcQ.jpg
    51.7 KB · Views: 505
Last edited:

Cacher_Chick

Test, Don't Guess!
Messages
5,458
Reaction score
213
Points
63
Location
Land of Cheese
It’s not much fun working upside down, but this is a very doable repair. If need be, additional layers of fiberglass cloth and resin can be added to build up the thickness around the opening and then sanded smooth and flat to make a good sealing surface for the drain.
 
Top
Hey, wait a minute.

This is awkward, but...

It looks like you're using an ad blocker. We get it, but (1) terrylove.com can't live without ads, and (2) ad blockers can cause issues with videos and comments. If you'd like to support the site, please allow ads.

If any particular ad is your REASON for blocking ads, please let us know. We might be able to do something about it. Thanks.
I've Disabled AdBlock    No Thanks