Advice on Flange modification

Users who are viewing this thread

AhToilet!

New Member
Messages
22
Reaction score
0
Points
1
Location
San Diego, CA
Morning everyone.

First time poster and just want to say that I appreciate all advice I have read on here. Especially with toilets and how each situation is unique regarding flange height and wax ring use, with or with out a horn!

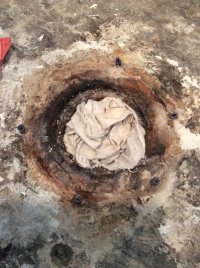
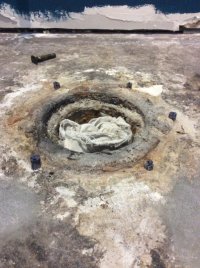
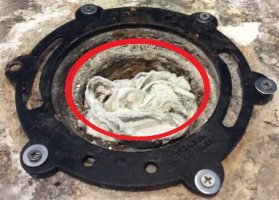
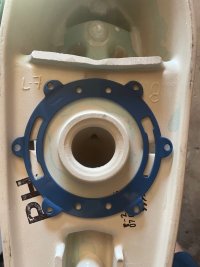
Anyways, long story long. Remodeled my bathrooms in 2018 and removed the toilet to reveal a cast iron pipe flush with the concrete slab. The "fix" by the previous installer was a collar type flange drilled into the concrete.

The pictures are from 2018 before I reset the toilet pretty much put it back the way I found it. But I have never been happy with that gap between the flange and the floor. I think I may have caulked it or something.

I am planning to replace the toilet soon and fix the flange as I was cheap and used an old toilet because I thought I would be out of this house by now (navy guy). Wife wants a new toilet.

Questions: Does this setup work? Wouldn't it leak from the gap from the flange to to the floor?

I understand one fix is to rip into the concrete but I don't want to go that route if I don't have to.

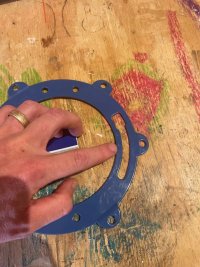
I have seen a post where Terry recommended a twist and seal... also found this on HD https://www.homedepot.com/p/OATEY-4-in-PVC-Open-Toilet-Flange-Replacement-43539/100139480

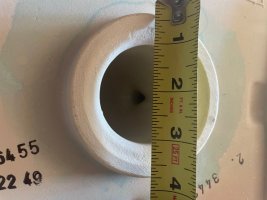
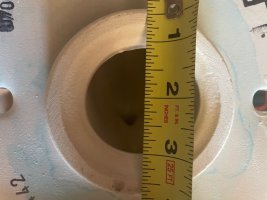
But now that I am looking at the pictures and of these twist and seals I don't know if they would be wide enough, I mean the replacement flange width, like wide enough for the screw holes to drill into the slab. The pipe itself seems very wide/flared where it meets the concrete.

I am sorry I don't have current pictures or measurements. I was looking for some pre advice before I remove the toilet.

Oh yeah and its a San Diego 1957 tract home single story slab if that helps. One plumber told me so what if it leaks a little, there is not downstairs ceiling to worry about...

Thank you for your time and I am just looking for some suggestions!

Jake
 

Attachments

  • IMG_1093.JPG
    IMG_1093.JPG
    137 KB · Views: 143
  • IMG_1098.JPG
    IMG_1098.JPG
    117.3 KB · Views: 145
  • IMG_1100.JPG
    IMG_1100.JPG
    118.5 KB · Views: 181

Reach4

Well-Known Member
Messages
38,903
Reaction score
4,439
Points
113
Location
IL
1. The https://terrylove.com/forums/index.php?attachments/img_1100-jpg.87165/ looks good. Why would you be asking about a Twist-N-Set for that?
2. If you were a candidate for a Twist-N-Set, those seal down the hole. Yet you covered that up with your rag in your photos. You have probably gotten too worried about sewer gases for a short time.

So with your repair ring in place, I would be thinking that you would be using some amount of wax. Wax from rings without horns can be formed to what you need-- you don't have to just drop the already-made pieces. When forming wax, I wear nitrile gloves. The wax is not harmful to your hands, but the gloves make cleanup easy.

So I am thinking probably two rings, as Terry has described. Custom formed no-horn on the bottom, and horn on top.
 
Last edited:

AhToilet!

New Member
Messages
22
Reaction score
0
Points
1
Location
San Diego, CA
1. The https://terrylove.com/forums/index.php?attachments/img_1100-jpg.87165/ looks good. Why would you be asking about a twist n seal for that?
2. If you were a candidate for a twist n seal, those seal down the hole. Yet you covered that up with your rag in your photos. You have probably gotten too worried about sewer gases for a short time.

So with your repair ring in place, I would be thinking that you would be using some amount of wax. Wax from rings without horns can be formed to what you need-- you don't have to just drop the already-made pieces. When forming wax, I wear nitrile gloves. The wax is not harmful to your hands, but the gloves make cleanup easy.

So I am thinking probably two rings, as Terry has described. Custom formed no-horn on the bottom, and horn on top.

Thanks for the quick reply Reach.

Ok so you think that set up works? I don't know I just thought it was a little gangster looking.

And I was concerned about the gap from the bottom of the replacement flange to the floor. About 1/4". The flange was resting on plastic anchors.

Ok so to be sure, you are saying take a regular wax ring and form by hand to fill in all that extra space? Smush it in there. and then once that is good just treat it like a regular install with a horned wax right to guide it a little bit? Am I reading that right?

Also I have heard so much the dread of horns in wax rings but yet you advise me on it? Not doubting just wondering what calls for the different situations.

Thank you!
 

Reach4

Well-Known Member
Messages
38,903
Reaction score
4,439
Points
113
Location
IL
I am not a pro, but that is what I would be considering. If I decided more wax would be better, I would add wax from an additional ring. They are usually returnable, but cheap enough that I might not bother.

For wax, you do not want to expand wax. Compress only. So the deal is to drop the toilet with no wax for a test. Figure out what shims are needed to prevent rocking. Mark where the shims are. Lift the toilet. Fix the wax. Place the shims. Gently drop the toilet. Snug the nuts. Sit on the toilet. Tighten the nuts. Cut or break off the excess closet bolt if it prevents the dress cap from seating.

A nut on each t-head closet bolt will hold the bolt in position so you can fit the holes over the bolt.

https://www.homedepot.com/p/Blue-Monster-Advantage-1-4-in-x-3-1-2-in-Closet-Bolts-73069/320653675 looks interesting. Brass, which is desirable. Comes with plastic clips that hold the closet bolt in place in lieu of an extra nut. What really looks innovative is the break-off flat area to allow you to prevent the T-head from rotating.

If the toilet does not rock, the thing that can make a wax seal fail is the vigorous plunging into a blocked drain below the toilet. There are less vigorous plunging techniques. Modern toilets seldom need plunging, but it can happen.
 

AhToilet!

New Member
Messages
22
Reaction score
0
Points
1
Location
San Diego, CA
I am not a pro, but that is what I would be considering. If I decided more wax would be better, I would add wax from an additional ring. They are usually returnable, but cheap enough that I might not bother.

For wax, you do not want to expand wax. Compress only. So the deal is to drop the toilet with no wax for a test. Figure out what shims are needed to prevent rocking. Mark where the shims are. Lift the toilet. Fix the wax. Place the shims. Gently drop the toilet. Snug the nuts. Sit on the toilet. Tighten the nuts. Cut or break off the excess closet bolt if it prevents the dress cap from seating.

A nut on each t-head closet bolt will hold the bolt in position so you can fit the holes over the bolt.

https://www.homedepot.com/p/Blue-Monster-Advantage-1-4-in-x-3-1-2-in-Closet-Bolts-73069/320653675 looks interesting. Brass, which is desirable. Comes with plastic clips that hold the closet bolt in place in lieu of an extra nut. What really looks innovative is the break-off flat area to allow you to prevent the T-head from rotating.

If the toilet does not rock, the thing that can make a wax seal fail is the vigorous plunging into a blocked drain below the toilet. There are less vigorous plunging techniques. Modern toilets seldom need plunging, but it can happen.


Right Oh I have learned the lesson of bolting down the flange bolts. So much easier.

Well if I am going to use this ring where should I set it as in what height would be best or how do I acheieve that? As I said currently in the photos it is simply resting on plastic anchors.

Also I am sure when I pull the toilet I will see what I am working with and post new info.
 

Reach4

Well-Known Member
Messages
38,903
Reaction score
4,439
Points
113
Location
IL
Also I am sure when I pull the toilet I will see what I am working with and post new info.
Your photos are from after the toilet was pulled. Are you asking what you will see after you do the trial fit with no wax? That trial fit is done by feel. You will attempt to rock the toilet, and add shims that prevent the toilet from rocking. You will mark what part of the shims stick out. You will then lift the toilet, and see the shims. Mark the position of the tips. Cut the shims to remove the part that stuck out during the test. Then place the cut shims back into position.
 

AhToilet!

New Member
Messages
22
Reaction score
0
Points
1
Location
San Diego, CA
Also I am sure when I pull the toilet I will see what I am working with and post new info.
Your photos are from after the toilet was pulled. Are you asking what you will see after you do the trial fit with no wax? That trial fit is done by feel. You will attempt to rock the toilet, and add shims that prevent the toilet from rocking. You will mark what part of the shims stick out. You will then lift the toilet, and see the shims. Mark the position of the tips. Cut the shims to remove the part that stuck out during the test. Then place the cut shims back into position.


Oh no I meant that these photos are from 2018 before I put the toilet in. But I did not put a bunch of wax in as you described and I have always been concerened with that 1/4" gap.

I meant I will post photos when I pulled the toilet to see if this set up works and either if:

- just add some more wax to fill the holes.

- modify another method such as a twist and seal or something

- or pull out the big guns and have a plumber tear out and replace the iron flange. I don't think so tho.

Also, Reach you mentioned in your first reply that I wasn't eligible for a twist and seal replacement flange. Why is that? Because it depends on condition of the pipe?

That is essentially what my posting is about. Is the current method suitable or are there better alternatives.

As I said, it looks a little "put together" but I am not a pro.

Thanks.
 

Reach4

Well-Known Member
Messages
38,903
Reaction score
4,439
Points
113
Location
IL
Twist-N-Set would be instead of your repair ring, but yes, it needs the pipe to be fairly smooth 4 inch or 3 inch at the right depth.

What is the shortcoming that you are trying to fix?
 
Last edited:

Jeff H Young

In the Trades
Messages
8,962
Reaction score
2,237
Points
113
Location
92346
I'd be ok with the repair, you could grout the void . or use the twist and seal I'd probably have quick drying concrete patch and just fill the void
 

AhToilet!

New Member
Messages
22
Reaction score
0
Points
1
Location
San Diego, CA
Reach,
The shortcoming is that I didn't know if I had a shortcoming. I assumed in my opinion that the ring wasn't a real fix but your confidence has me thinking otherwise. I am not trying to be difficult, I just want to make sure I understand all options available to me.

The whole goal of this post is that four years ago I took off a toilet with that ring in place and threw it back on because I assumed it worked and I wasn't planning on being in the house this long. Now I am swapping out the toilet and using the opportunity to do it "right", both with staying in the house longer and realizing it is better to do things the proper way then the easy way.

Regarding the twist and seal, as you have mentioned has its own dilemmas as well and as I said I am not sure the bolt holes will clear the iron flange. I may buy one to see it as an option but I was under the odd impression that the expansion ring itself holds it within the pipe, but no it still has to be secured. So that would be new holes into the slab.

I am feeling confident with the repair ring I have and with the holes already there. Only option is how to fill the void as Jeff so expertly put both the definition of my situation.

Jeff: Hmmm I never considered grout or concrete and initially that sounds sturdy, but the more I think about it I have done some repairs with quick dry stuff and often if it isn't perfect it can fall out or loosening and go into the drain. Reach's idea of packing with excessive wax to me seems sticker in a way. But I do have grout on hand and gonna think about that.

When I pull the toilet will post updated pictures of the progress. I am trying to learn from my previous mistakes of remodeling by not having equipment or advice before hand. I bought a hammer drill today just in case and picking up my new Toto tomorrow. Panning to do the toilet swap next week unless some time opens up for me.

Thank you guys both for the advice and thank you Reach for the sustained effort. It is appreciated.
Jake
 

AhToilet!

New Member
Messages
22
Reaction score
0
Points
1
Location
San Diego, CA
And Reach what I mean by post the new pics when I remove it is to see whether this repair works within the past four years. I think I caulked the void and basically it was my first time installing toilets. And.... I didn't screw down one of the holes of the bracket, don't know why, becuase again I didn't know what I was doing.
I figured you are probably wondering why I am going to repost pictures of a product that is already evident.
 

Jeff H Young

In the Trades
Messages
8,962
Reaction score
2,237
Points
113
Location
92346
A second look and I don't really see a need for the grout ring looks solid I don't necessarily see need for wax other than good thick wax unless its too low and needs double isn't the pic from 2018 ? has it been leaking?
 

AhToilet!

New Member
Messages
22
Reaction score
0
Points
1
Location
San Diego, CA
Morning Jeff,
No it has not been leaking. Wife just wants a new toilet. When I remodeled I put the old one on just being cheap. Toto has had great improvements though.

But what I see with these repair flanges is that usually they are flush against an old pipe. The grout you mentioned or wax Reach mentioned would be to fill in the gap about 1/4" under the repair flange to the floor. I think I may fill that with caulk, something heavier duty.

Also another concern is wax seal. There is such a slim surface area on the repair ring for wax to work.

I picked up an abs and cast iron twist and seals to check alignment of holes. Most people seem to think I should stick with set up I currently have and caulk the gap. The twist and seal securing bolt holes may lay over the flange itself. Pulling toilet on Friday.
 

Reach4

Well-Known Member
Messages
38,903
Reaction score
4,439
Points
113
Location
IL
You don't need wax on the repair ring at all, but it would not hurt. You want the wax to form a seal inside the repair flange, from the toilet down to the area around the pipe in the floor, but wide enough to give some strength against reasonable compressive forces.

If you put in a Twist n seal, with its fairly thick plastic ring, will you need to remove your sturdy repair ring to make space?
 

AhToilet!

New Member
Messages
22
Reaction score
0
Points
1
Location
San Diego, CA
Hey Reach. Whoa sometimes these forums can be a challenge because of writing versus talking and in person.

Now I am confused. I know the basics of a toilet/ring application. I was stating that the Repair Metal Ring has such a slim surface area near the bolts for wax to catch. And it is placed over such a large opening. As you said You want the wax to form a seal inside the repair flange, that inside area is quite large! Couple with the small surface area of the ring itself what is to stop wax from simply falling through.

My inclination towards a twist and seal is that the flange Surface is larger for bowl to flange mating of the wax.

It may be my confusion but I thought you originally told me to fill the space Beneath the repair flange (that is raised by plastic anchors) with wax. And this could also be done with caulk or grout.

It seems to me the Repair Flange is very wide along with a wide draining hole resulting in a loss of wax. Granted I haven't had a leak but also the toilet base is sealed so I haven't noticed.
Sort of why I want to post updated pics when I pull the toilet to see how it held up.

I guess what I am trying to say is that in most applications when using this Repair Ring Flange is that it is flush against an old broken flange, in my situation it is different with the large amount of space beneath.

Thanks!
 

AhToilet!

New Member
Messages
22
Reaction score
0
Points
1
Location
San Diego, CA
1666211207498.png


For example that makes total sense in this application. There is plenty of the old flange to create a seal of wax. My thing is mine is hovering almost over an open void.
 

Reach4

Well-Known Member
Messages
38,903
Reaction score
4,439
Points
113
Location
IL
You want the wax seal in the area above and below the red ring. If this takes more wax, take more wax.

And regarding your void size maybe 3 inches down, what does that measure across? 4.00 inches?
 

Attachments

  • img_2.jpg
    img_2.jpg
    98.9 KB · Views: 143

AhToilet!

New Member
Messages
22
Reaction score
0
Points
1
Location
San Diego, CA
Ah okay. Yeah now we are connecting. I agree with you that more of an area needs to be present for wax. What you highlighted would make a good seal!

I was just about to post some pics of new ring with new toilet to show the thin line. I will get a measurement for down the pipe.
I agree this Repair flange holds the toilet in place no problem. But its the seal that I don't believe it would do a good job with.

See like on pic 1611 you can see through the flange bolt hole of toilet. Pretty crazy. Unless this repair flange was FLUSH against a broken original.

Also I had to already return one toilet today due to a big chip straight out the box and then when I took these photos I noticed how small the exit hole is. Only 2"! I thought they were normally a little wider than that. Like 2 3/4 or something. Gonna look up specs on the Drake.
 

Attachments

  • 68791128292__2C71D0DC-FE29-4B15-B994-58EC0ED167CD.jpg
    68791128292__2C71D0DC-FE29-4B15-B994-58EC0ED167CD.jpg
    118 KB · Views: 133
  • IMG_1611.jpg
    IMG_1611.jpg
    82.7 KB · Views: 128
  • IMG_1610 (1).jpg
    IMG_1610 (1).jpg
    75.1 KB · Views: 119

AhToilet!

New Member
Messages
22
Reaction score
0
Points
1
Location
San Diego, CA
I agree this Repair flange holds the toilet in place no problem. But its the seal that I don't believe it would do a good job with.

See like on pic 1611 you can see through the flange bolt hole of toilet. Pretty crazy. Unless this repair flange was FLUSH against a broken original.

Also I had to already return one toilet today due to a big chip straight out the box and then when I took these photos I noticed how small the exit hole is. Only 2"! I thought they were normally a little wider than that. Like 2 3/4 or something. Gonna look up specs on the Drake.
Reach you are the best.
 

Attachments

  • IMG_1613.jpg
    IMG_1613.jpg
    65.6 KB · Views: 124
  • IMG_1612.jpg
    IMG_1612.jpg
    70 KB · Views: 133
Top
Hey, wait a minute.

This is awkward, but...

It looks like you're using an ad blocker. We get it, but (1) terrylove.com can't live without ads, and (2) ad blockers can cause issues with videos and comments. If you'd like to support the site, please allow ads.

If any particular ad is your REASON for blocking ads, please let us know. We might be able to do something about it. Thanks.
I've Disabled AdBlock    No Thanks