View Full Version : Moving toilet location in concrete slab.
piperca
07-04-2009, 06:43 PM
I need to move a toilet approximately 36". My dilemma is, can I cut into the existing 4" stub out from the sewer to make the transition or do I need to cut into the sewer. If it needs to be the sewer, then I'm out of luck, since it is not accessible. I've attached a rough sketch of what I am proposing. Obviously, I'll be making more fluid connections than what is shown ... lol!
http://momentoffame.com/photopost/data/515/Toilet2.jpg
jadnashua
07-04-2009, 08:01 PM
The only potential problems are if you have a post-tensioned slab (typical in earthquake country) or if you don't have enough depth to move it 3'. That's only 3/4" difference at 1/4" per foot and 4" pipe can work with less, so you should be okay.
piperca
07-04-2009, 08:06 PM
It is a post tension slab; however, I've got that covered. I have the cables marked already. There is one cable right of the existing closet flange, within a couple of inches, but that is the only cable that will be of any issue. I think I can tunnel under that one without any problem. My greatest concern was using fittings to angle to where I need the new flange. I wasn't sure if that would be allowable or cause any issues with blockages, etc. Do you seen anything I might be concerned with?
piperca
09-04-2009, 07:14 PM
Okay, here are a couple of pictures to show you where I am at and how far I need to move the toilet. As you can see, I've located all of the cables and am ready to start plumbing!
http://i275.photobucket.com/albums/jj316/piperca/SDC10884.jpg
If you look to the left of the toilet, there is a cross where I need to relocate the toilet ... better seen in this photograph. So, some pipe between the new location to the old, using a couple of street elbows, would suffice?
http://i275.photobucket.com/albums/jj316/piperca/SDC10885.jpg
WE cannot tell you what fittings you need because you have to see the existing connection first.
piperca
09-05-2009, 08:55 PM
Okay, here are a couple of more pics with the drywall off.
From the center of the closet flange to the center of the pipe behind the toilet with the cleanout is 18". The waste runs directly between those two locations. The center of the closet flange to the center of the new location is 28". Does this help or do you need more information?
http://i275.photobucket.com/albums/jj316/piperca/SDC10894.jpg
http://i275.photobucket.com/albums/jj316/piperca/SDC10895.jpg
We would still only be guessing. You will probably be able to move it using a 60 degree bend or a 90, depending on what you find, but since the installer could have been creative, until you actually see the pipes under the floor you will not know how you can revise it.
piperca
09-06-2009, 10:43 AM
So, basically, what you're saying is that if it is a straight shot from the 3" behind the toilet, I can put an elbow in it, make sure it has 1/4" to the foot fall, and I'll be fine?
This is a track home that is poorly framed. The plumbing chase you see in the photograph is the only plumbing services in the entire house. It extends into a similar bathroom to the right and the kitchen is on the other side of the plumbing chase ... I don't think there was any creativity used ... LOL!
jadnashua
09-08-2009, 09:28 PM
You want to minimize the turns in any drain line...until you expose what's there, you won't know the 'best' way to do it. Depending on where the main line runs, it may work out best to cap what's there (or cut it out) and install a new fitting where you need it. No way to tell (easily anyways) until you tear it apart. You might get an idea if you take the toilet off - you should be able to see what fitting they used and may be able to probe a little with a wire to get an idea where it is going. I doubt it's worth the expense of using a drain camera.
piperca
09-08-2009, 10:21 PM
Jim, the drain runs directly back to the 3" vent that you see in the photograph, behind the toilet (I've had this toilet off many times). Center to center, 18" of run. I can't get to the actual sewer line, itself, since it is in the plumbing chase and I'd have to disturb the framing to do so ... don't really want to do that. I'm thinking that I'll be able to cut the pipe a few inches from the 3" vent and install an elbow to get it to the new location. Here are a couple of more photographs that show the layout a bit better.
http://i275.photobucket.com/albums/jj316/piperca/SDC10907.jpg
http://i275.photobucket.com/albums/jj316/piperca/SDC10908.jpg
delta d
09-11-2009, 07:39 PM
does sound like a job that could use this friend of mine 1st name jack last name hammer. Rent one and do the job right, get the perfect fall.I'm just saying..
piperca
09-12-2009, 12:14 AM
Yes, I intend on renting one from HD for the afternoon. I have to plumb a drain for the vanity area, which I'm moving across the room, so I'll need it for that, too. I hope to be able to cut the drain very close to the 3" line, so I can get the bend right at the 3"; I'd feel a lot better with it there.
piperca
09-19-2009, 08:41 PM
Okay, finally back to my project.
I opened the floor today and found what I expected:
http://i275.photobucket.com/albums/jj316/piperca/SDC10919.jpg
My problem is this:
http://i275.photobucket.com/albums/jj316/piperca/SDC10922.jpg
Here is the flange where it needs to be:
http://i275.photobucket.com/albums/jj316/piperca/SDC10923.jpg
This is using a 60 degree fitting; would using a 45 degree and a 22 degree fitting help get me where I need to be ... another 7 degrees? What would be the best way to set this up? Any suggestions would be greatly appreciated.
Also, the original drain uses a "closet stabilizer." The top of the 3" is about 10 inches below the surface of the slab, so I'll need to add something to the closet elbow. I've never seen one of these stabilizers before; are they necessary for concrete applications?
I have never seen a "stabilizer" before so I guess that means you do not need one. You do not say any more about you sink drain, and that could be much more complicated than your toilet relocation.
piperca
09-20-2009, 10:27 AM
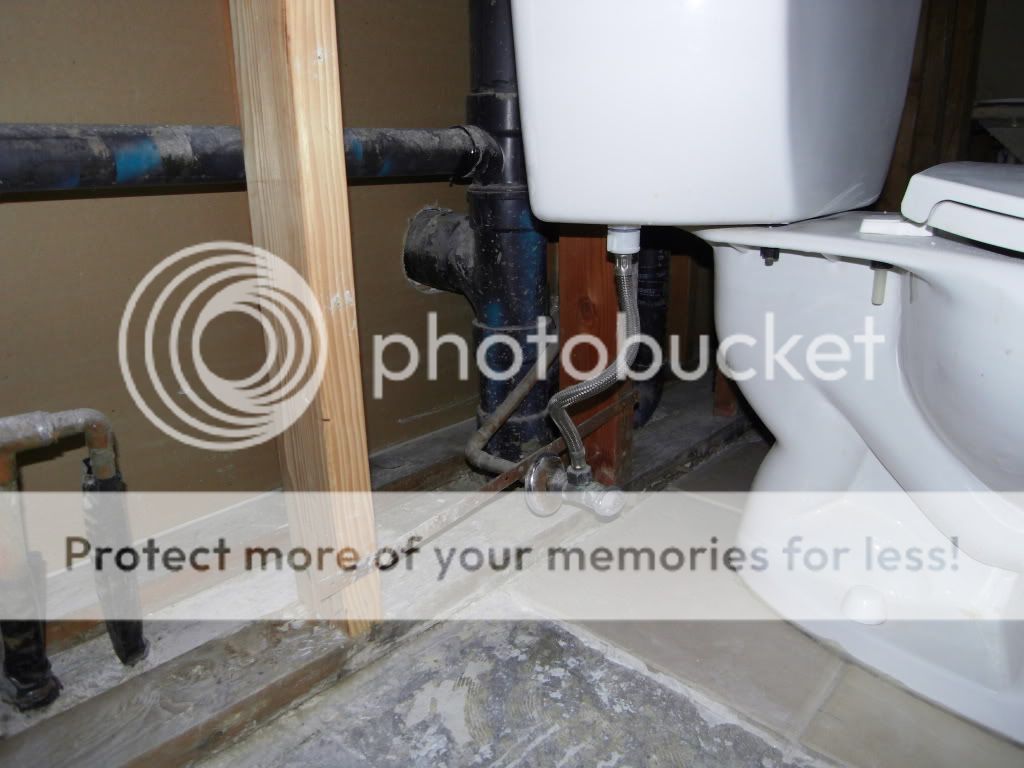
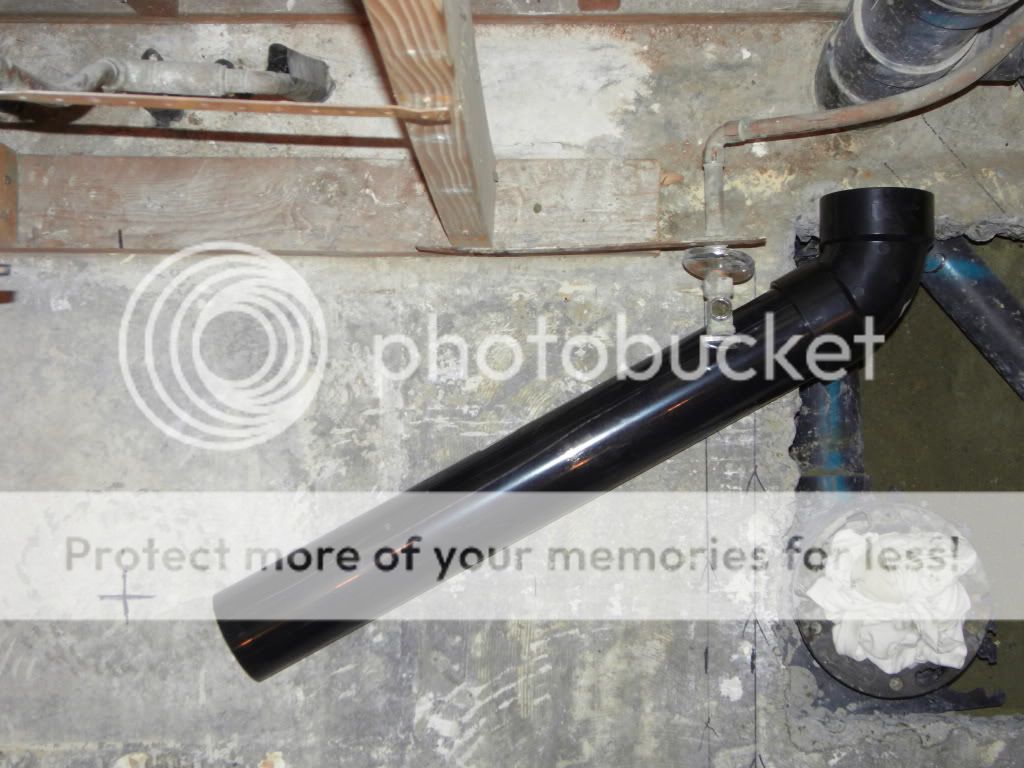
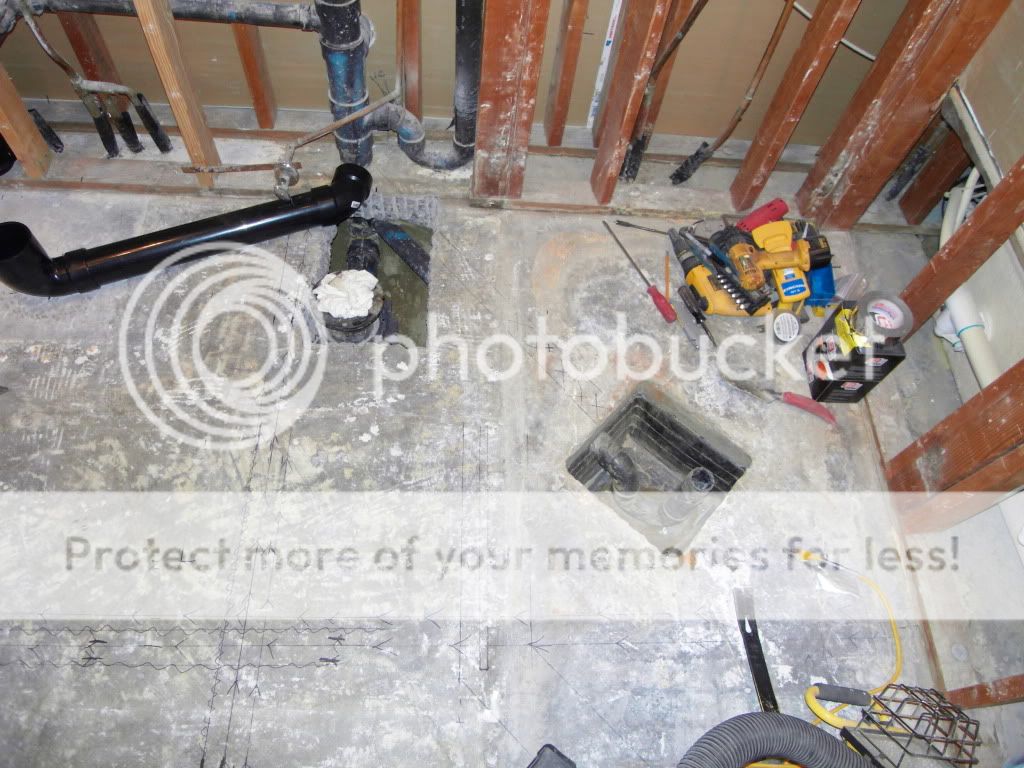
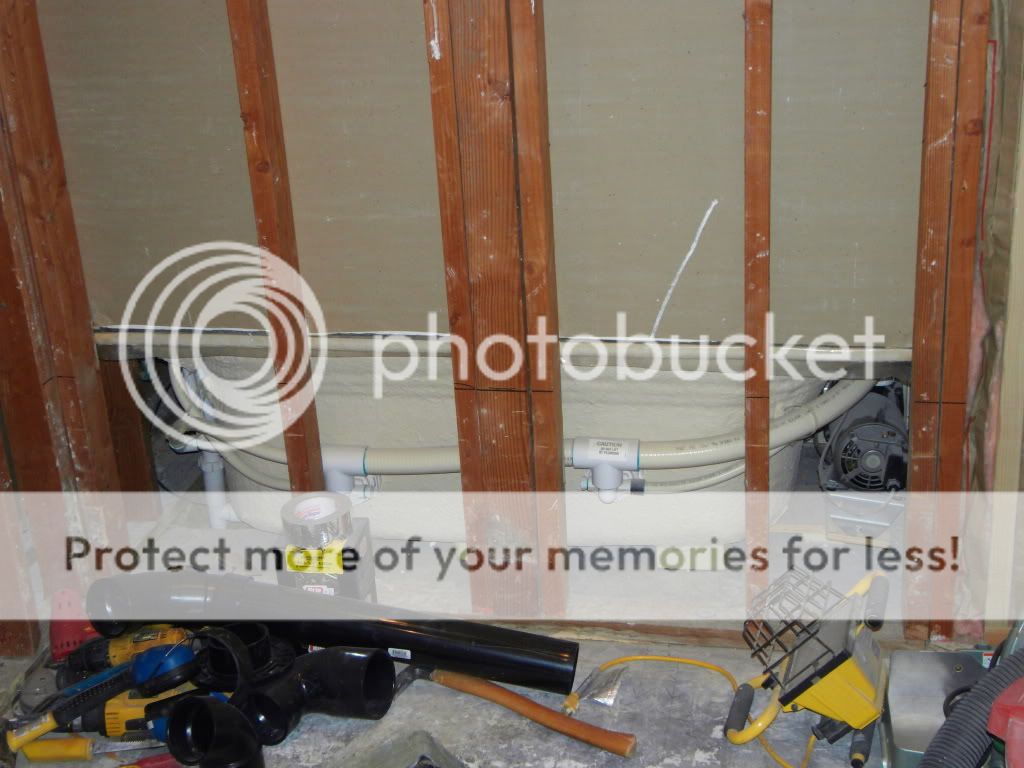
The sink drain, I am not too worried about. Here is what I have (excuse the mess of tools):
http://i275.photobucket.com/albums/jj316/piperca/SDC10924.jpg
http://i275.photobucket.com/albums/jj316/piperca/SDC10925.jpg
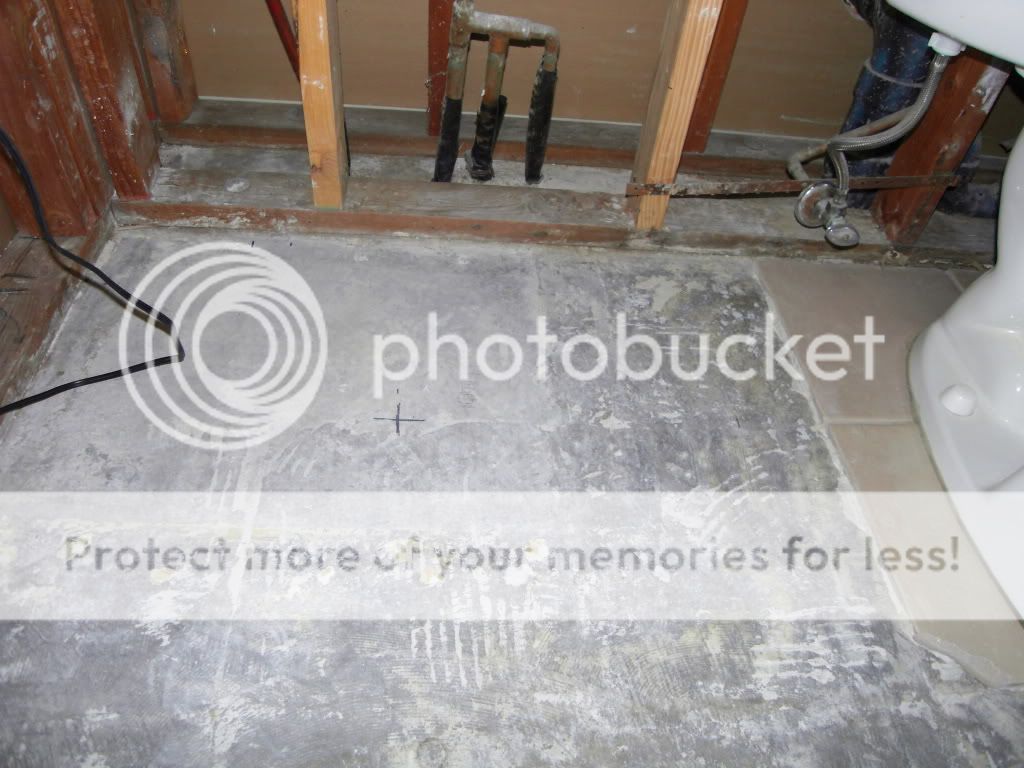
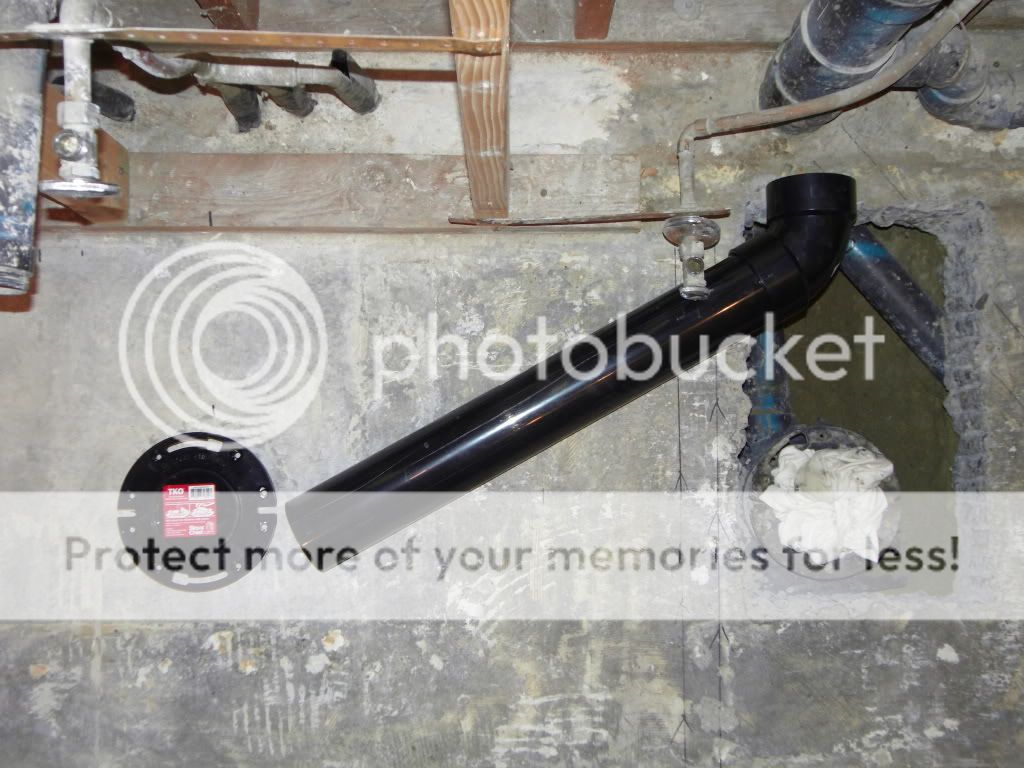
I intend on raising the floor or the shower the width of a 2x4 and running the drain from behind the shower drain trap to a chase I will build against the wall. Fortunately, my wife wants a ledge in the shower, rather than a step, so it will fit the bill perfectly for the plumbing chase.
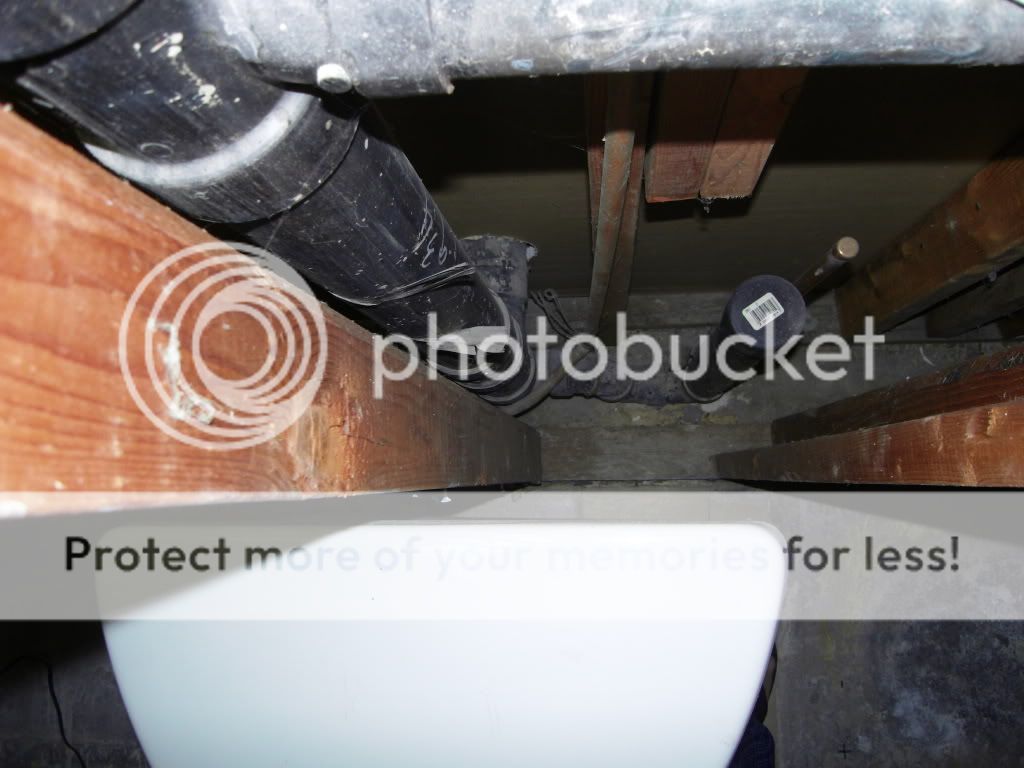
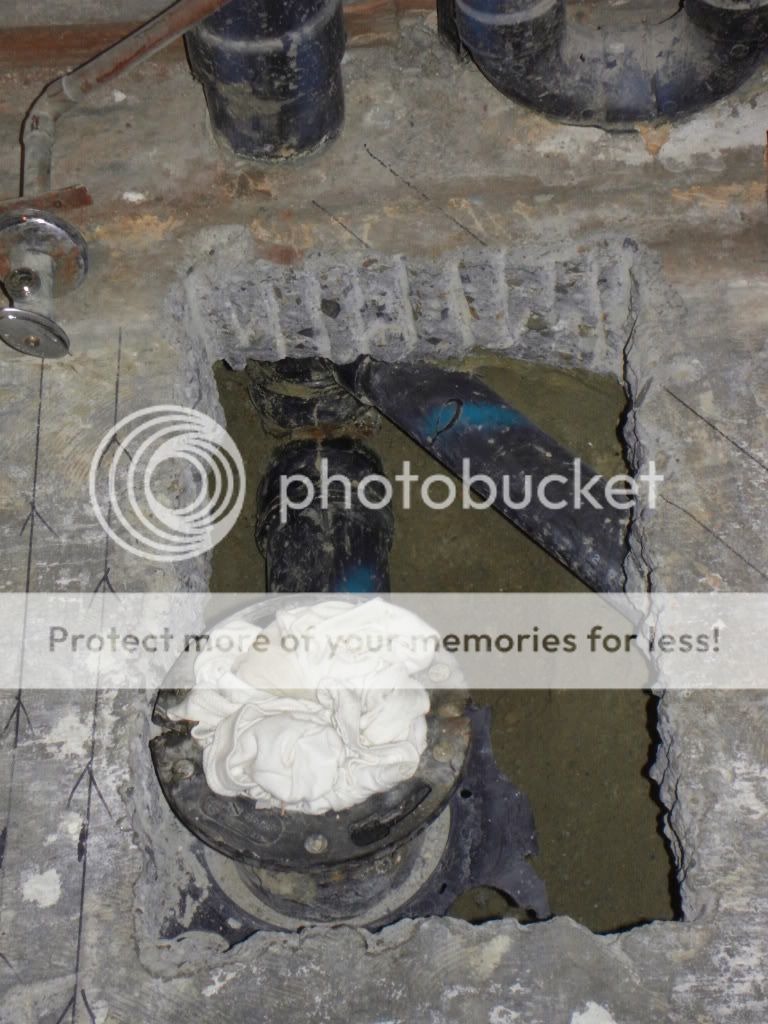
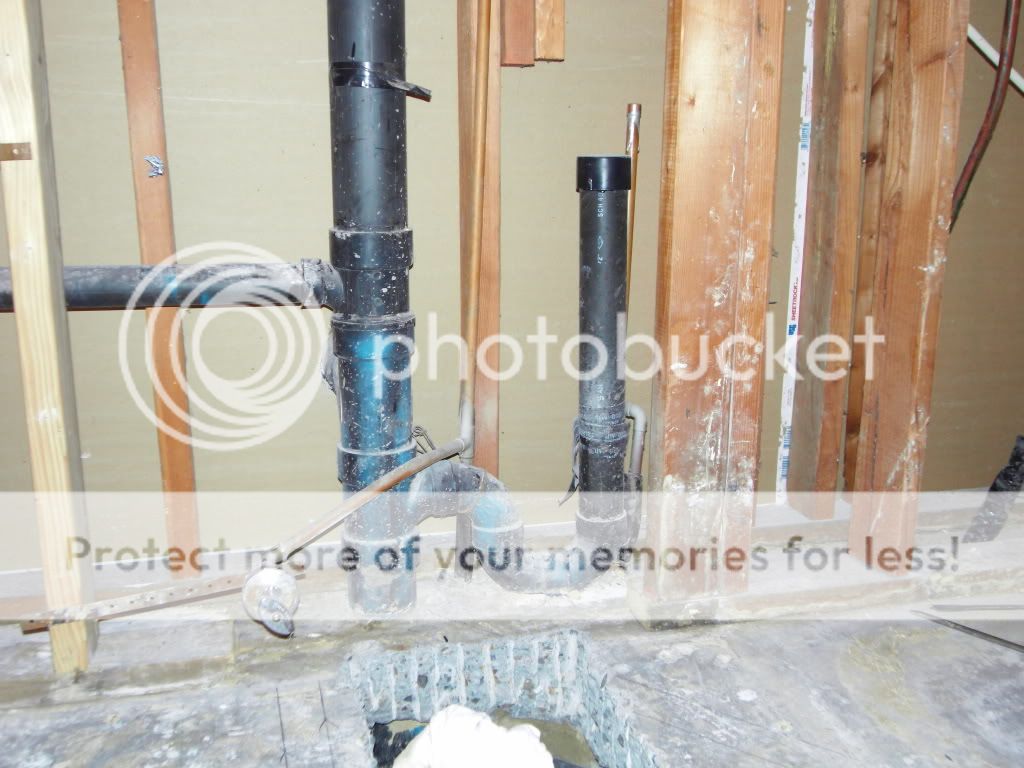
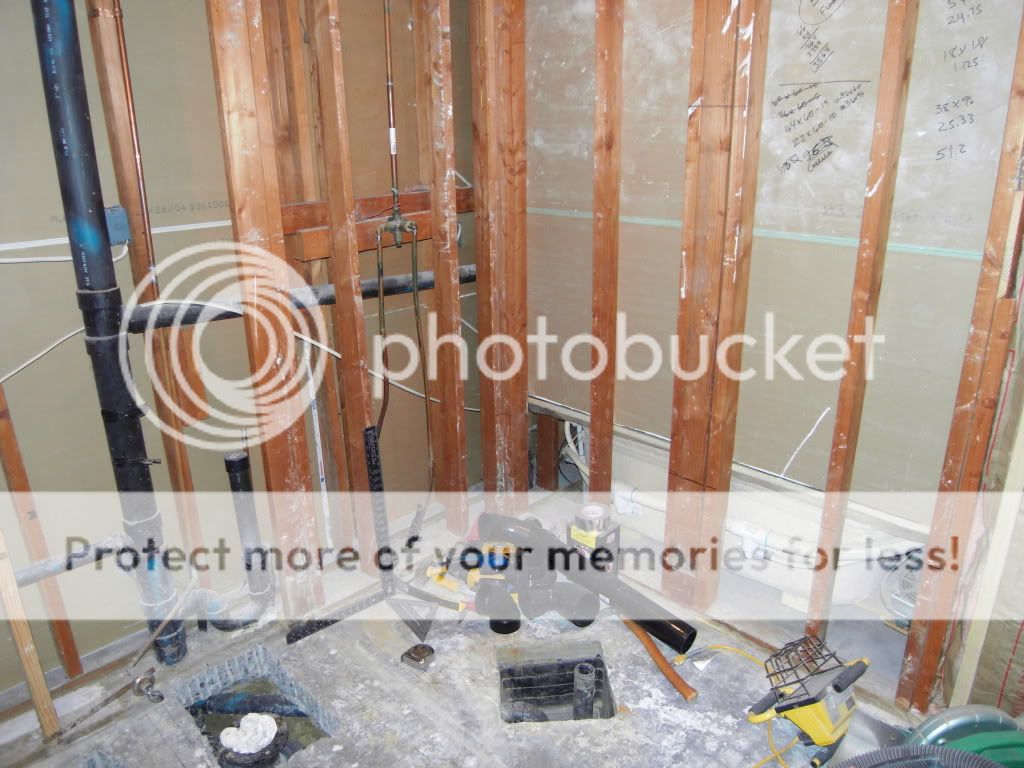
Here's a close up of the shower drain:
http://i275.photobucket.com/albums/jj316/piperca/SDC10926.jpg
I am going to put a T behind the trap and run the sink drain from there ... what do you think; will it work?
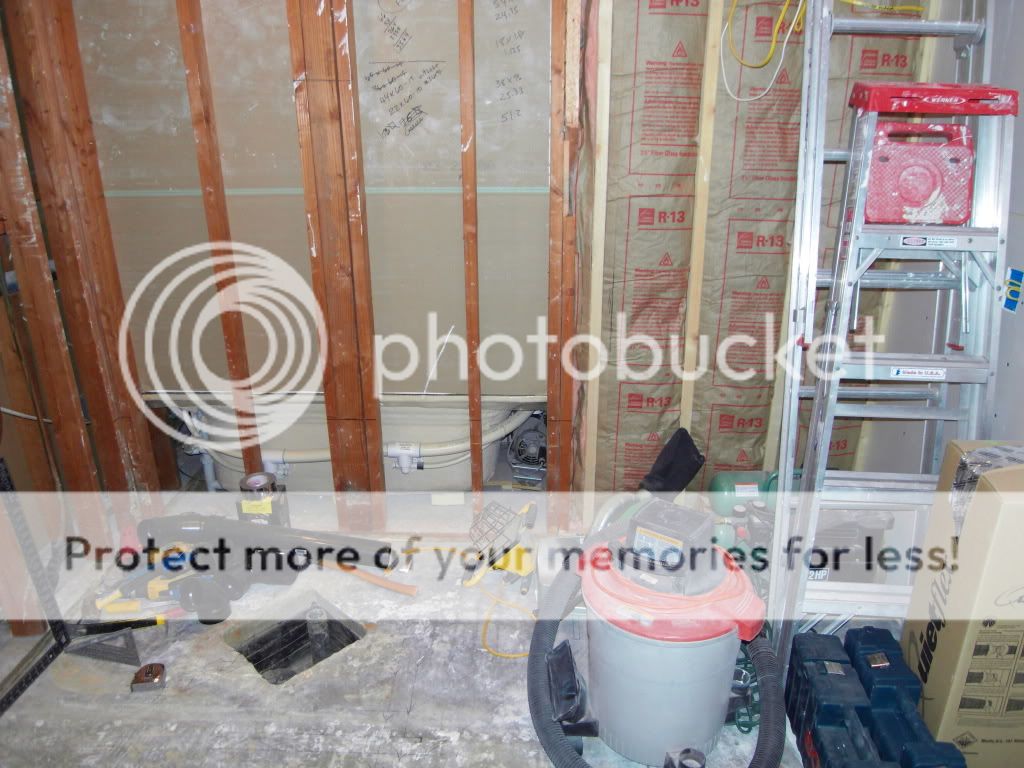
I can also run the drain from this extinct washing machine drain, since the washer and dryer are now in the garage:
http://i275.photobucket.com/albums/jj316/piperca/SDC10927.jpg
If going this route, would I need to cut out the trap?
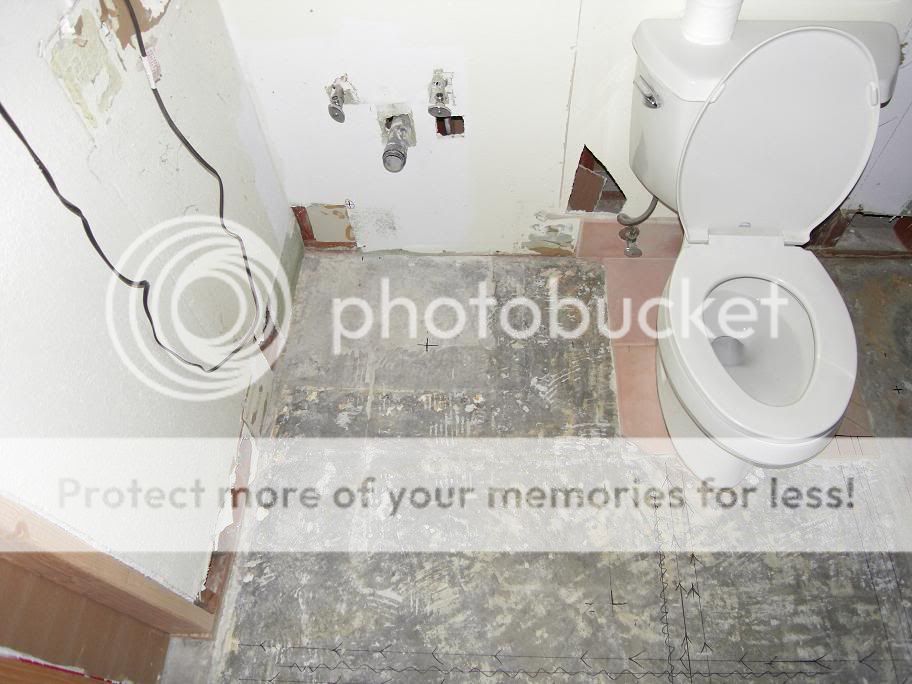
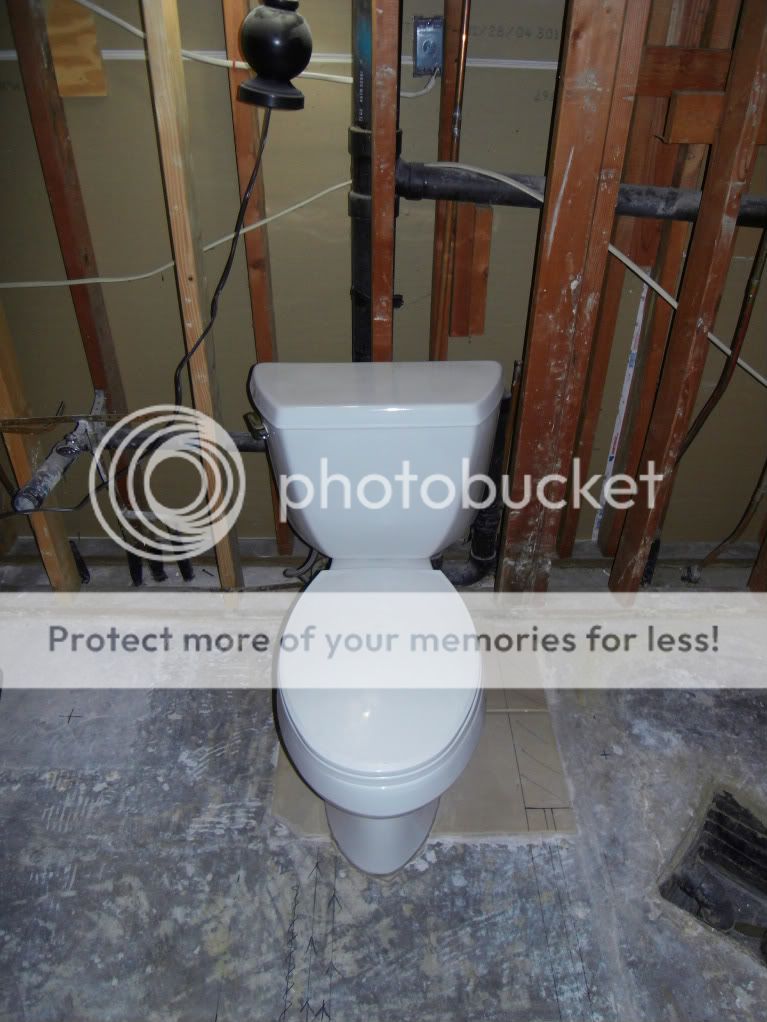
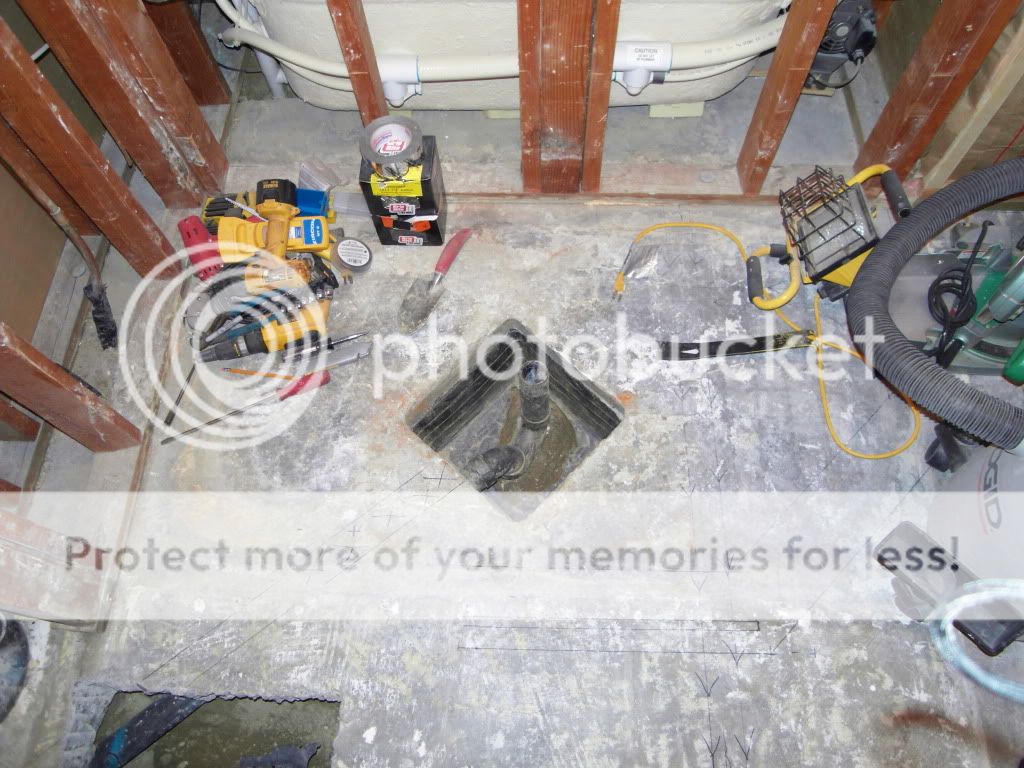
So, back to the toilet, what is your suggestion? Am I looking for problems putting the drain in at this angle and adding fittings? Please comment on the best way to achieve the best result. Oh, and what should I use to extend the closet bend to reach floor level? Just a piece of pipe or is there an extender?
Terry
09-20-2009, 11:27 AM
You can install pipe and fittings in many ways.
You are allowed 135 degrees of horizontal change on the trap arm.
That would be up to one 90 and one 45.
You could make that with 2- 45's or one 90
It doesn't look like you will be hitting your location with the single 45
And of course you can use varying lengths of pipe between fittings.
Sometimes in concrete, I will use a 4x3 90 and stub a 4" pipe for the water closet (toilet)
Then when the floor is finished, I will cut the pipe flush with the floor and use the closet flange like the one you have, but glue it inside the pipe.
I then use a rotohammer with a 1/4" bit to drill to secure the flange to the concrete.
I don't know what you are doing with the other fittings, but you can always cut some of what you have out, and raise or lower the tees as needed.
The washer standpipe looks low to me.
So........where is the new lav going?
I think I missed that.
What you had was a pretty standard layout, the most common layout you can have.
piperca
09-20-2009, 11:38 AM
The new sink will be located against the same wall as the shower, at the end of the shower (diagonally across the room from the new toilet location).
Yes the washer drain is low, since I cut it a few years back when I remodeled our kitchen. Since my last post, I'm leaning towards using the washer drain and leaving the shower floor alone ... makes more sense, correct? Will leaving the water trap in the washer drain be an issue? I wouldn't think so, but thought I'd ask.
Thanks for all your help!
You can use a long sweep 90 to turn the drain sideways, and a 4x3 elbow for the toilet with a piece of 4" pipe for the riser. Use an outside the pipe flange. Using the shower drain for the sink, as you intended would be a very bad idea, and you would still need a vent for the sink drain. You cannot leave the washer trap in the line and still use it for the sink drain. In addition, it is so low that you would have to "jump up" for the trap connection and that will also require a vent. One question. You said the sink will be on the opposite side of the room. How to intend to get from there to the washer drain with the shower between the two points?
piperca
09-20-2009, 07:18 PM
I was hoping I could run the drain through the plumbing chase I was going to create behind the shower.
This picture shows the wall the shower and vanity will be on. The shower will be on the left and the vanity (approximately 40") will be on the right, where the new framing is:
http://i275.photobucket.com/albums/jj316/piperca/SDC10928.jpg
I placed a black line on the studs, approximately 18 inches from the floor, showing the top of the chase:
http://i275.photobucket.com/albums/jj316/piperca/SDC10929.jpg
If necessary, I was hoping to cut a vent into the existing plumbing vent, which you can see running horizontally in this picture:
http://i275.photobucket.com/albums/jj316/piperca/SDC10930.jpg
How close to the sink must the vent be? Can I loop up, through the attic and back down to connect to the vent pipe?
Here is a better picture of the washer drain. What must I do to it to make it work for the sink? Should I just cut it out and plumb in another fitting?
http://i275.photobucket.com/albums/jj316/piperca/SDC10927-1.jpg
The horizontal pipe to the left of the 3" vent is the drain for the old sink.
Thanks for all your help!
piperca
09-20-2009, 08:03 PM
Would something like this work? I could be wrong, but, in my opinion, the drain and vent line could run one on top of the other and be effective, as long as the vent is on top ... correct? Although, I'm sure there is a code that needs met.
http://i275.photobucket.com/albums/jj316/piperca/Plumbing.jpg
piperca
09-21-2009, 07:30 PM
Okay, I know I'm not the brightest bulb in the shop when it comes to plumbing, so I do apologize for, what you might find to be, stupid questions ... but here's another ... LOL!
What is the minimum height a sink drain can be cut into the 3"" stack?
I have decided to cut out the conglomeration of sanitary tees, shown in the last photograph above, and start from scratch.
I researched and found that the vent must extend 6" above the overflow (or rim) of a sink, but I couldn't find anything that says it must remain there. Would it be possible to do what is depicted in the following sketch? If so, that would allow me to keep the plumbing chase low, depending on what the minimum might be for the sink drain.
http://i275.photobucket.com/albums/jj316/piperca/Plumbingvent.jpg
The sketch shows the vent line extending up and looping back down to the plumbing chase level, then back up to meet the existing vent/stack ... similar to how an island vent system would work ... would this meet code?
Terry
09-21-2009, 07:56 PM
A true island vent is drained.
You pictured loop would not drain.
A vent can be flat, but not dipped.
A lav trap arm can be up to 42" long.
piperca
09-21-2009, 08:10 PM
A lav trap arm can be up to 42" long.
So, I can not have the sink eleven feet from the 3" stack? Am I understanding you correctly ... or 42" without a vent? Also, If I was to connect the vent and drain at the dip, would that work to drain the vent?
piperca
09-21-2009, 10:52 PM
Okay, maybe if someone takes a look at what I am doing, then you'll be able to better advise me. How would I go about adding this new vanity/sink area?
http://i275.photobucket.com/albums/jj316/piperca/Bathroom.jpg
frenchie
09-22-2009, 01:01 AM
Okay, I know I'm not the brightest bulb in the shop when it comes to plumbing, so I do apologize for, what you might find to be, stupid questions ... but here's another ... LOL!
What is the minimum height a sink drain can be cut into the 3"" stack?
I have decided to cut out the conglomeration of sanitary tees, shown in the last photograph above, and start from scratch.
I researched and found that the vent must extend 6" above the overflow (or rim) of a sink, but I couldn't find anything that says it must remain there. Would it be possible to do what is depicted in the following sketch? If so, that would allow me to keep the plumbing chase low, depending on what the minimum might be for the sink drain.
http://i275.photobucket.com/albums/jj316/piperca/Plumbingvent.jpg
A true island vent is drained.
You pictured loop would not drain.
A vent can be flat, but not dipped.
A lav trap arm can be up to 42" long.
Like this:
piperca
09-22-2009, 10:57 AM
Okay, I looked into it and found that loop venting is ONLY allowable in an island application ... looks like I'll have to plumb a vent up into the attic and over to the stack.
So, other than the vent, is there anything else I need to worry about? How about the water lines (hot and cold); should I run these through the attic or would running them with the drain in the plumbing chase be acceptable?
I wish there was a chat function on this site, it would make this a little easier ... LOL!
I won't be getting around to finishing up the plumbing until next week anyway. I leave for Chicago on Thursday to see my son graduate from Navy boot camp ... good boy!
From your postings I get the impression you are going to have a kludge by the time you get done. If the chase is going behind the shower will it not have to be as high as the shower or all the way to the ceiling? The vent should be 42" above the floor to be in compliance with most codes, since they specify, "6 inches above the sink, OR 42 inches above the floor, whichever is HIGHER."
piperca
09-23-2009, 12:28 PM
From your postings I get the impression you are going to have a kludge by the time you get done."
Too funny, but I agree that is how it is looking.
The problem is that I've vaulted the ceiling in the bathroom on that side and I'd have to drill through three 2x4s on flat and two 2x6s on edge to run the vent pipe into the attic. As I said before, my wife wanted a ledge built into the shower for shampoo/conditioner bottles, etc, so I thought incorporating the chase into where I put the ledge was killing two birds with one stone.
42" is fine, I can do that. I had intended on running the hot/cold lines and the drain in there anyway, so raising the chase to accommodate the vent will be fine.
Can you see any other issues, before I stumble blindly into the swamp!
piperca
10-03-2009, 04:50 PM
Okay, my son graduated from Navy boot camp, so I'm back at the project!
How does this look ... okay?
http://i275.photobucket.com/albums/jj316/piperca/SDC11161.jpg?t=1254610399
The original pipe had 3/4" fall per foot, so I kept the same with the new pipe ... is that okay? The only issue I see is that the closet flange is off the level, but I hope I can finagle that when I'm attaching it to the pipe and floor ... any suggestions on this?
Next will be the drain and vent, but I'd like to get the okay before moving on ... thanks!
Put a "spacer" around the toilet riser before you pour the concrete, so you can use an "outside/over the pipe" flange. But you are wrong about the loop/yoke vent ONLY being for islands. I use them anytime I do not have a route from the sink to the roof, such as a sink with all windows over it and lally columns or posts at either end of the windows.
piperca
10-04-2009, 09:12 AM
Unfortunately, I can't get an over the pipe flange to work. The closet elbow is so close to the level of the floor that, when I use a coupler, I only have approximately 1 1/4" of pipe to connect to. I guess I could cut the flange shorter to make it fit ... is that allowable?
http://i275.photobucket.com/albums/jj316/piperca/SDC11162.jpg?t=1254669484
So you're saying a loop vent would work fine for my sink? If so, what size should the vent pipe be? I'm also putting a second sink on the same line, which will be within 12" of the main stack; will this be a problem?
piperca
10-04-2009, 02:02 PM
I poured the concrete. I used that quick drying stuff and it's pretty dry when mixed to the manufacturers specs ... didn't like it! Anyway, it's done! I left a space for an over the pipe closet flange ... just in case.
Also, I replaced the fittings on the stack to delete the washer trap and turned the sanitary tee to run the drain. It's 1-1/2", so I hope that'll be sufficient for the drain.
http://i275.photobucket.com/albums/jj316/piperca/SDC11163.jpg?t=1254686511
piperca
10-04-2009, 06:41 PM
Okay, someone please give me their opinion on this, so I can glue it together and be done with my dilemma ... thanks!
http://i275.photobucket.com/albums/jj316/piperca/SDC11165.jpg?t=1254703371
This is the stub out for the second sink trap that's next to the stack ... is this okay? I'm trying to keep the stub out as low as possible, since the line is already at 19" on center.
http://i275.photobucket.com/albums/jj316/piperca/SDC11167.jpg?t=1254703640
The only thing that I am concerned about is the 2" vent that I cut into. It services the sink, toilet and shower in the adjoining bathroom and also the kitchen sink. I have run a 1-1/2" vent from the new sink to the 2" existing. I have read that 2" can service 8 fixtures; is my layout okay?
Lakee911
10-05-2009, 07:39 AM
Should that 2" (maybe 1.5") pipe into the 4" stack be connected with a wye and not a tee?
Jason
piperca
10-05-2009, 11:40 AM
I don't know; I replaced exactly what was there and it was a sanitary tee. If you go to post #19, you'll see the original fitting; all I did was replace it with the same and turn it around. Other than that, will this suffice?
iminaquagmire
10-05-2009, 01:11 PM
It should be a sanitary tee. Does anything drain into the stack from above? That will tell you if your vent is OK or not.
piperca
10-05-2009, 01:19 PM
It should be a sanitary tee. Does anything drain into the stack from above? That will tell you if your vent is OK or not.
Nothing drains from above; it's a single story residence.
iminaquagmire
10-05-2009, 05:37 PM
http://i275.photobucket.com/albums/jj316/piperca/SDC11165.jpg?t=1254703371
This is okay except for the first drain off the stack. It doesn't have to turn up like that. Doing so will make it an s trap. I'm not sure what you mean about cutting into a 2" vent though.
piperca
10-05-2009, 06:39 PM
Let me explain. The attached picture shows the existing 2" vent highlighted in red, the new 1-1/2" vent in blue and the new 1-1/2" drain in green. The house is single story. The stack is 3". There is an adjoining bathroom to the right, which you can see in the photograph. The adjoining bathroom has a toilet, sink and bath. In that bathroom, there is a short stack (3" vent) that rises from behind that toilet for approximately 3', which terminates at the top with some type of cap that the 2" vent pipe runs to (the one highlighted in red). That 3" vent has the toilet, sink, bathtub and kitchen sink draining into it. Since this 3" vent does not go through the ceiling, the 2" vent (highlighted in red) connects it to the main stack in the bathroom I am remodeling. Does this make sense? If so, will what I've done work?
Also, I can drop the sanitary tee down a bit to lower the drain line. At the new sink location, it is sitting at 22" on center; is this too high?
So, what you're saying is I can terminate that first drain horizontally, too?
http://i275.photobucket.com/albums/jj316/piperca/SDC11165-1.jpg?t=1254789397
iminaquagmire
10-05-2009, 10:57 PM
Terminate the first drain horizontally. Your venting is fine.
dcelite
10-05-2009, 11:58 PM
The new vent for the sink needs to be no more than 42" from the p-trap and must travel vertically until it is 6" above the sink. Then you can run horizontally. Though you may need to run up to the ceiling and then over to tie into the existing 3" vent.
DC
Elite Plumbing
dcelite
10-06-2009, 12:15 AM
The san tee for the first sink (closest to the 3") actually uses the other sink drain as a vent and is flat (not legal). Instead of a san tee you could use a wye with a spigot san tee in the branch and then connect the vent from the top of the san tee to the existing 2" above it. All that being said, you should only have 1-fixture unit on a 1 1/2" horizontal drain.
piperca
10-06-2009, 08:02 PM
Thank you, sir!
The first drain is sitting at 19" on center and the second at 22" on center. I am thinking I should drop the first drain to 15", so that the second is at 18", what do you think, is it necessary? I just think 22" is a bit high.
I'll be running the copper for the sink just below the drain line and the shower valve I will be placing in between the vent and the new drain line on the back wall, so it can be adjusted before stepping below the shower head. Here is what I propose to do. The green outline is where the shower is going ... roughly.
http://i275.photobucket.com/albums/jj316/piperca/bathroom2.jpg?t=1254881198
dcelite
10-07-2009, 12:11 AM
Depending on the heighth of the vanities the 22" may be cutting it a little close. If you're using pedestal sinks then you should be allright. I usually set the sink drains at 19" off the subfloor (for vanities) and we have a few inches to spare on our tail pieces from the sink. There is no problem with the shower valve configuration. We set them at 48" off the subfloor but it's not a code issue.
DC
Elite Plumbing
The height of the drain openings depends on the countertop elevation, the type and depths of the sinks, and the type of drain fittings. IF that "thing" next to the stack connection is a sink drain opening it CANNOT be rolled upward the way you show it. And as a practical matter, since the other sink's drainage is flowing past it, it is effectively unvented, regardless of how close it is to the main vent. I would have run the horizontal line even lower, then used a combo at the first sink with a vertical vent and a sanitary tee at the same elevation for both sinks. What you have is a good design for a single sink at the far location, but not for two sinks at any location.
piperca
10-07-2009, 11:34 AM
I would have run the horizontal line even lower, then used a combo at the first sink with a vertical vent and a sanitary tee at the same elevation for both sinks.
I'm not sure I clearly understand what you're saying, sorry. If I drop the sanitary tee on the stack and run to the first drain, I would need to vent vertically from there, then tee off the vent (wet vent) to the other drain? Is this right?
The san tee for the first sink (closest to the 3") actually uses the other sink drain as a vent and is flat (not legal). Instead of a san tee you could use a wye with a spigot san tee in the branch and then connect the vent from the top of the san tee to the existing 2" above it. All that being said, you should only have 1-fixture unit on a 1 1/2" horizontal drain.
Okay, I'm going to up everything to 2"; vent and drain. Now what I think both of you guys are saying is, I can run from the stack to the first drain, venting off vertically at that drain, then leaving the rest of the existing configuration as-is ... is this correct?
piperca
10-07-2009, 10:02 PM
Okay, it might take me a while, but I finally get it. Is this what you're talking about:
http://i275.photobucket.com/albums/jj316/piperca/Drain.jpg?t=1254974801
Please comment ASAP, so I can end this nightmare ... LOL!
dcelite
10-07-2009, 11:26 PM
Now you've got it. Also, if you need that first sink to be a couple inches lower with a similar configuration, then use a wye in place of the combo and put your san tee right on the wye (it will laying at a 45 degree), then put a 45 on the top of the san tee to go straight up to the vent. Hope you can picture that. It will just drop the sink stub out a couple inches if you still need that.
DC
dcelite
10-07-2009, 11:32 PM
Also, the two inch drain is proper but another thing to get the first sink lower will be to use a 2"x1 1/2" wye and a 1 1/2" san tee.
piperca
10-08-2009, 09:11 AM
I think I get the picture. A combo is the wye with the bend to give you 90* and a wye would leave you at 45* ... is that correct?
I don't think I'll have a problem with height, since I'm going to drop the 3" sanitary tee down on the stack. Do they make a sanitary tee that's a cleanout, also? That would get rid of that 3" fitting that's below the sanitary tee right now.
If I drop the sanitary tee on the stack and run to the first drain, I would need to vent vertically from there,
so far so good. The first sink would tee into that vent at the desired height.
then tee off the vent (wet vent) to the other drain? Is this right?
Now you have gone astray. The pipe would continue from the combo fitting you used for the first "vent", to the second sink and there you would also install a vertical vent with a tee for the second sink. How that tee faced would depend on whether you ran the pipe to the sink location or just "near" it.
piperca
10-08-2009, 11:36 AM
I understand completely, thanks very much for the input. Looks like I can get her finished this weekend. I'll post a photo before I close her up, just to make sure there are no issues.
One last question: Can I install the cleanout above the sanitary tee? Right now, the bottom fitting on the stack is the cleanout. For me to get the drain to work the way it is supposed to, I'll have to switch the cleanout with the sanitary tee; in otherwords, make the sanitary tee the lowest fitting ... it's that or I find a sanitary tee that has a cleanout built into it. Where would I find such a thing?
dcelite
10-09-2009, 12:27 AM
No problem with putting the clean out tee above the san tee for the sinks drain.
DC
piperca
10-09-2009, 10:29 PM
Well, I finished for the day and feel like I accomplished something. Everything is 2", except for the vertical vent/drain for the first sink, which is 1-1/2", and I reduced the drain to 1-1/2" after the vent for the second sink. I cut out some of the copper and started running it for the shower valve. I don't have the valve yet, so I can't do much more until I get it. What do you think?
http://i275.photobucket.com/albums/jj316/piperca/SDC11168.jpg?t=1255149076
http://i275.photobucket.com/albums/jj316/piperca/SDC11169.jpg?t=1255149128
http://i275.photobucket.com/albums/jj316/piperca/SDC11170.jpg?t=1255149173
piperca
10-19-2009, 01:47 PM
Well, I got the plumbing pretty much finished. Here are a couple of pics ... any comments before I forge forward?
http://i275.photobucket.com/albums/jj316/piperca/SDC11174.jpg?t=1255981491
http://i275.photobucket.com/albums/jj316/piperca/SDC11171.jpg?t=1255981540
http://i275.photobucket.com/albums/jj316/piperca/SDC11173.jpg?t=1255981653
It might not be the prettiest, but I used as much of the old malleable copper as I could and purchased some more to keep some of the transitions smooth. One thing I did, that I'm not sure is the best idea; I ran the supply lines for the new sink from the shower lines. In the second photograph you can see the tees in the lines above the floor. The sink will rarely be used, if ever, when the shower is being used, so I don't think that'll be too big a problem ... plus, the shower valve is thermostatic.
Comment, please!
iminaquagmire
10-19-2009, 02:36 PM
1) I think you might have issues with all that old copper not being secured. Why not just buy new copper and use that instead of sweating all those shorter pieces in? I'd find a way to secure it before closing it up.
2) You should really have some nail plates over those pipes to protect them. You may have to come up with some on your own since the gaps in the framing are so big.
3) When it comes time to sheetrock, you're going to have problems with the inside corners since there is no framing to screw into.
4) Never tile over PT lumber. It will warp as it dries out wrecking your tile. Wood in general directly over slab is a bad idea, especially in a shower curb. I'd cut that out and thinset some bricks down when you do the shower.
5) Its hard to tell, but I see what looks like 14/2 mixed in with the 12/2. Bathrooms should have a 20 amp GFCI protected circuit (20 amps = 12ga wire). It can service other bathrooms so long as it doesn't have lighting on it. If it has lights on it, it cannot leave the bathroom.
6) How are you going to attach a trap to the lavatory drain if its halfway into the shower wall?
Also, while the walls are open, think about adding any framing for future grab bars, any towel bars, pedestal sinks, etc. Even if you don't put them in now, its good to do it while the walls are open.
piperca
10-19-2009, 03:39 PM
1) I think you might have issues with all that old copper not being secured. Why not just buy new copper and use that instead of sweating all those shorter pieces in? I'd find a way to secure it before closing it up .
All that old copper is secured behind the 2x4s. I didn't sweat a bunch of shorter pieces together, the joints were already in the pieces ... why waste perfectly good copper that will never be seen ... doesn't have to be pretty!
2) You should really have some nail plates over those pipes to protect them. You may have to come up with some on your own since the gaps in the framing are so big.
Those pipes in the wall will never be exposed to a nail or screw. I will be enclosing the face with plywood and waterproofing the wall with Schluter Kerdi. I can see no reason for why I would ever penetrate that wall.
3) When it comes time to sheetrock, you're going to have problems with the inside corners since there is no framing to screw into.
I was asking for critique on the plumbing; I know the framing isn't complete.
4) Never tile over PT lumber. It will warp as it dries out wrecking your tile. Wood in general directly over slab is a bad idea, especially in a shower curb. I'd cut that out and thinset some bricks down when you do the shower.
I've never heard of this, but I'll look into it.
5) Its hard to tell, but I see what looks like 14/2 mixed in with the 12/2. Bathrooms should have a 20 amp GFCI protected circuit (20 amps = 12ga wire). It can service other bathrooms so long as it doesn't have lighting on it. If it has lights on it, it cannot leave the bathroom.
What you see is the existing 12/2 (white/1976), with new 12/2 (yellow) run for the new GFCI. This is a GFCI circuit only and will not be servicing anything else. You can also see wires running for the vanity lights, etc, which are on a completely different circuit.
6) How are you going to attach a trap to the lavatory drain if its halfway into the shower wall?
I have a 45 degree fitting that is going to turn the drain out from the corner. I will be adding a reducer to drop it down to 1-1/4" to accomodate a polished chrome exposed trap/drain.
Also, while the walls are open, think about adding any framing for future grab bars, any towel bars, pedestal sinks, etc. Even if you don't put them in now, its good to do it while the walls are open.
Already thought of that, but thanks for mentioning it. As I said, the framing isn't completely finished. I have yet to run round the shower stall with screws to secure everything for the Schluter Kerdi install ... nails don't quite cut it!
Thanks for your input!
iminaquagmire
10-19-2009, 03:59 PM
I'm not trying to bust you down, so if you get that impression I'm sorry. I'm just trying to help you out.
1) Good on the securing. I just didn't see it.
2) Plywood is not a dimensionally stable material. If you attach kerdi, all you've done is waterproof the plywood. Its not an acceptable method for Schluter or installing tile for that matter. I understand what you're saying about not intending to puncture anything, I'm just telling you what the code says. Take that as you wish.
5) Is it a 15 amp or 20 amp circuit? Bathrooms should be 20 amp for high power hair dryers and whatnot. Again its just what the code says and you can take that as you wish. As for being code approved in 1976, codes change. When you expose it, you bring it up to current code. And lots of people think that just because their house was inspected when it was built, everything is fine. When in reality, inspectors miss things for any number of reasons. There are plenty of examples on this site alone of things that were inspected yet were completely wrong.
piperca
10-19-2009, 04:08 PM
No offense taken, I know where you are coming from and I appreciate the input.
Thanks for the tip on the plywood/Kerdi combo. I guess I'll have to get something to protect the pipes and drywall over them.
The GFCI is 20 amp and I corrected the 1976 comment. Upon closer inspection, the original wire is 12/2, only white in color.
As for the pressure treated lumber; if it's wrapped in Kerdi, will it work? Really don't want to tear the shower walls out!
iminaquagmire
10-19-2009, 04:25 PM
I see. I have all sorts of wire in my hose from the original owner. There is outdoor wire and indoor wire of all different colors.
I'm sure you can find some nail plates that are long enough in either the lumber, plumbing, or electrical sections of any big box.
Kerdi over PT would be even worse than the plywood. Just sawzall the curb section out and use some patio pavers in its place. You can Kerdi directly to that. The rest of the PT is done correctly. I don't know if you're a member of the John Bridge Tile Forum or not but its a great resource for anything tile related. There are a lot of Schluter pros there. John Bridges Kerdi E-Book is also a great resource.
piperca
10-19-2009, 04:40 PM
I don't know if you're a member of the John Bridge Tile Forum or not but its a great resource for anything tile related. There are a lot of Schluter pros there. John Bridges Kerdi E-Book is also a great resource.
Funny you should mention that ... yes, I did join that forum in preparation for what is to come ... and I'll be buying the book, too.
As for the pressure treated and Kerdi; I was planning drywalling over the pressure treated before applying the Kerdi ... same as the plan I had with the plywood. This still wouldn't work?
iminaquagmire
10-19-2009, 05:18 PM
Still a bad idea.
piperca
10-19-2009, 07:05 PM
Point taken ... does this make you happy?
http://i275.photobucket.com/albums/jj316/piperca/SDC11183.jpg?t=1256001069
I'll put it back together tomorrow ... thanks for your input!
jadnashua
10-19-2009, 07:26 PM
On a concrete slab, direct contact with wood isn't that great. Pressure treated is especially problematic when you are dealing with tile, though. Unless you can find AKAT Kiln dried after treatment stuff. The standard stuff is literally dripping with the treatment liquids, and will twist into a pretzel after it dries. Much better to do this is either bricks or cement pavers (often cheaper), or a foam kerb. The Schluter one is fairly wide, and doesn't fit in everywhere, but is quick and easy. I put one of those in and once you set it into the thinset, even while wet, it doesn't want to budge. I tiled the sides and put a marble threshold on the top...solid as a rock. Be careful with pvc primer or glue, though!
If you want to use wood, use regular stud material and put some plastic or roofing felt underneath. It won't get wet from the shower, but if there's any moisture from the slab, it could still swell and mess up things. Best on a slab is all masonary materials or the foam.
piperca
10-23-2009, 08:40 PM
Okay, it's fixed ... not to mention, I spent a little more time on framing in the plumbing. I poured a curb out of concrete, which I think is going to work out for the best. Tomorrow; finish the wiring and other minor loose ends, then it's on to the drywall ... finally!
http://i275.photobucket.com/albums/jj316/piperca/SDC11192.jpg?t=1256352419
http://i275.photobucket.com/albums/jj316/piperca/SDC11193.jpg?t=1256352460
iminaquagmire
10-23-2009, 10:00 PM
Much better. Did you tie the curb to the slab with some sort of pins or is it just poured on top of it?
piperca
10-23-2009, 11:15 PM
I secured it to the partitions on both sides. I drove 4 x 16d nails into each side and left them sticking out half way; I thought that would be sufficient ... don't you think?
iminaquagmire
10-24-2009, 12:05 PM
I think that will be okay. It'll all be tied together with kerdi and tile too. I would have pinned it to the floor with some rebar or some bolts dropped in some holes but again I think you'll be fine.
piperca
10-24-2009, 02:09 PM
Glad to hear I don't have to tear that out, LOL!
johnfrwhipple
10-25-2009, 10:18 AM
Are those pony walls stopping at that height?
Everything looks nice and tidy. My two bits;
Add in more blocking at the bottom and top of your studs to keep them from twisiting. Add in 2"x10" blocking mid span where one day a grab bar migght be installed.
Put in diagonal bridging on the pony walls like one would support a gate and then glad with 1/2" ply glued and screwed. This will stiffen those walls up a lot.
Good Luck.
Looks great.
piperca
10-25-2009, 11:17 AM
John, yes, the walls terminate at 76"; I'm trying to keep the room open feeling. What you can't see from the photograph is I have opened up the ceiling and vaulted it to 14'. I will be adding a venting skylight to finish the look.
I will add additional blocking to the walls, but I'm not sure it needs the 1/2" ply. The small wall is under 24" and the other is only 41". I think the blocking will be more than sufficient ... it's very sturdy as it is, since it is screwed to death! After framing, I made sure I ran around it with 3" screws to make sure there was not going to be any movement for the Kerdi ... and I can assure you there's not!
piperca
10-27-2009, 09:38 PM
Finally ready for drywall ... I've got three 3" round electrical boxes (oxymoron :D) to mount for the vanity lights, but I'm going to use the type that mount in the drywall, so I can place them after the drywall is up.
http://i275.photobucket.com/albums/jj316/piperca/SDC11228.jpg?t=1256701121
http://i275.photobucket.com/albums/jj316/piperca/SDC11220.jpg?t=1256701247
http://i275.photobucket.com/albums/jj316/piperca/SDC11224.jpg?t=1256701287