Unscrewing Anode on Bradford White Water Heater-- only threads exposed

Users who are viewing this thread

Brandeis Marquette

New Member
Messages
7
Reaction score
1
Points
3
Location
San Diego
Hi All,

Trying to replace nipple type anode on a Bradford White Water heater. I have unscrewed the hot water connector from the anode nipple and was about to unscrew the anode rod from the water heater using a pipe wrench but noticed only the pipe thread was visible. I am hesitant to use a pipe wrench because it may damage the pipe threads. There is no "smooth" portion of the anode rod pipe for the pipe wrench to grip. See attached picture.

My question:

1. Is it OK to use the pipe wrench on the threaded part or will that damage the threads making them useless?

2. Is there some other type of tool to use that won't damage the threads? Looks like I cannot use internal pipe wrench because of that horizontal bar inside the pipe. Strap wrench?
 

Attachments

  • IMG_4105.jpg
    IMG_4105.jpg
    58.6 KB · Views: 3,571

Reach4

Well-Known Member
Messages
38,858
Reaction score
4,428
Points
113
Location
IL
I am not a plumber. I have not had success with internal pipe wrenches myself.

However that heat trap may just lift out when grabbed by a long nose pliers.
 

Brandeis Marquette

New Member
Messages
7
Reaction score
1
Points
3
Location
San Diego
I am not a plumber. I have not had success with internal pipe wrenches myself.

However that heat trap may just lift out when grabbed by a long nose pliers.

The part you see in the picture is screwed into the water heater. It won't lift out. I want to unscrew the nipple without damaging the nipple threads that the hot water outlet pipe screws into. In case I can't unscrew the nipple and anode from the water heater I want to be able to screw back on the hot water supply to the nipple.
 

Reach4

Well-Known Member
Messages
38,858
Reaction score
4,428
Points
113
Location
IL
The white plastic inside that nipple for your combo nipple-anode is a heat trap.
 

Brandeis Marquette

New Member
Messages
7
Reaction score
1
Points
3
Location
San Diego
The white plastic inside that nipple for your combo nipple-anode is a heat trap.

Ok-- I follow now. So one possibility is to remove that white plastic so that an internal pipe wrench can fit inside the pipe and be used.

Before I try that any advice if it would be ok to just use a regular pipe wrench or will that irrevocably damage the exterior threads? I wish the water heater manufacturer made it easier to remove these by providing sufficient non-threaded gripping surface.
 

Reach4

Well-Known Member
Messages
38,858
Reaction score
4,428
Points
113
Location
IL
If you click inbox, above, I sent a link to a site that suggests sticking a 5/8 bolt into the nipple to fight crushing, and using a pipe wrench. Of course that buggers up the threads.

It would be nicer if the maker had a classic separate hole for the anode, so that you could use an impact wrench.

The great majority of people never pull the anode.
 

Brandeis Marquette

New Member
Messages
7
Reaction score
1
Points
3
Location
San Diego
Thx for the link. Guess trying to replace the anode puts me in the minority.

I'll try the 5/8" bolt idea to prevent crushing the nipple and use the pipe wrench on the threads. I just hope I don't fail to replace the anode while also buggering up the threads preventing me from reconnecting the hot water supply. Wife will not be happy.

Any other suggestions for removing the anode from Bradford White appreciated. Did you have to apply a ton of force to unscrew it? Tips for not buggering the threads with the pipe wrench? Use a pipe wrench with wider jaws or narrower jaws?

Thanks
 
Last edited:

Michael Young

In the Trades
Messages
508
Reaction score
101
Points
28
Location
North Carolina
Hi All,

Trying to replace nipple type anode on a Bradford White Water heater. I have unscrewed the hot water connector from the anode nipple and was about to unscrew the anode rod from the water heater using a pipe wrench but noticed only the pipe thread was visible. I am hesitant to use a pipe wrench because it may damage the pipe threads. There is no "smooth" portion of the anode rod pipe for the pipe wrench to grip. See attached picture.

My question:

1. Is it OK to use the pipe wrench on the threaded part or will that damage the threads making them useless?

2. Is there some other type of tool to use that won't damage the threads? Looks like I cannot use internal pipe wrench because of that horizontal bar inside the pipe. Strap wrench?

yeah. just lay into it with a big pipe wrench. If you jack up the threads it doesn't matter. The new anode will include the new nip.

21jatTglF6L.jpg
 

Treeman

Active Member
Messages
235
Reaction score
34
Points
28
Location
Michigan
A pipe wrench WILL bugger up the threads. I understand the reluctance to attempt the procedure. While I have zero experience with the BW's, I know that the hex head rods sometimes seem like they are welded in. If you bugger up the threads and cannot get the rod to break loose, then you have compounded your problems.

One huge challenge is to stabilize the heater so it does not turn while you are using a cheater pipe to attempt to break the rod free. If the entire thread portion breaks off, there are techniques to extract the remaining broken male threads within the tank. Here is one thread that discusses this dilemma: http://www.thetankatwaterheaterrescue.com/forums/forum3/3127.html

Good luck and please follow up with the results. I, too, have a BW water heater. DIYer here.

I've never seen a rod come out this "easy"
 
Last edited:

Brandeis Marquette

New Member
Messages
7
Reaction score
1
Points
3
Location
San Diego
I bought 18” pipe wrench and 5/8” carriage bolt to put inside the nipple to keep it from being deformed. Am debating to take a shot at trying to remove the anode. Probably wait and do it early morning on a weekday so I can call in a plumber if it proves to tough.

Anyone out their have experience removing BW anode nipples? Are they typically as “stuck” as other manufacturer water heaters? My unit is 6 years old.
 

Brandeis Marquette

New Member
Messages
7
Reaction score
1
Points
3
Location
San Diego
Update:

All,

Finally got around to removing the anode. Here is how it played out.

I followed advice of putting 5/8 inch bolt into the anode nipple to prevent it from being crushed. Also applied some WD-40 to the threads to help loosen the threads. I actually found that the smaller 8-12" pipe wrench worked better than a big 18" pipe wrench because the teeth were not as wide and I could turn the wrench easier without the teeth butting against the gas exhaust pipe. With just a little bit of torque the anode unscrewed from the 6 year old Bradford-White. Because the water heater was mostly full did not have to secure the heater to keep it from turning when I unscrewed the anode. The old anode was definitely corroded and had layer of calcium deposit. Was on its last legs.

Here is where I made my first mistake. The replacement "numchuck" stype bradford white anode nipple piece was not long enough so when it was screwed in the hot water connection threads did not protrude beyond the top of the water heater. Being a Saturday I rushed back to the plumbing store to see if they had a bradford white anode with a longer nipple. Low and behold plumbing store was closed. First lesson do plumbing work early morning on a weekday when plumbing stores are open. Not wanting to be in the doghouse with the wife with no hot water for the weekend I tried to screw back in the old anode. Thankfully the old anode hot water connector threads were not too buggered up by the pipe wrench so I was able to screw it back on with ample use of teflon tape.

Come Monday I went back to the plumbing store. Apparently there are two styles of bradford white anodes, one has a longer nipple. I was able to then install the anode with the longer nipple with no issues.

Well worth the effort given plumber wanted $300 to put in a new anode. In all without the screw up with the wrong anode model took me about 20 minutes. That equates to about $850 per hour at the plumber's rate if you subtract the anode cost-- sounds like highway robbery to me. Well worth it to DIY.

One other tidbit is when I turned the water back on and turned on the sink faucet in the utility room the hot water water came out fast then slowed to a trickle. Turns out the faucet aerator had become clogged with some deposits. Cleaning the aerator solved the issue. Moral would be after you replace anode turn on hot water at a tub or something without an aerator until the water is flushed.

Thanks all for the advice!
 

Reach4

Well-Known Member
Messages
38,858
Reaction score
4,428
Points
113
Location
IL
Well worth the effort given plumber wanted $300 to put in a new anode. In all without the screw up with the wrong anode model took me about 20 minutes. That equates to about $850 per hour at the plumber's rate if you subtract the anode cost-- sounds like highway robbery to me. Well worth it to DIY.
With the screw ups and transit time, what was the hourly rate? ;)

You might want to flush the WH now too. While you had the anode out, you could have sprayed a hose, or even a small pressure washer, into the WH.

The anode thread is normally 3/4 NPT.
 

Brandeis Marquette

New Member
Messages
7
Reaction score
1
Points
3
Location
San Diego
With the screw ups and transit time, what was the hourly rate? ;)

You might want to flush the WH now too. While you had the anode out, you could have sprayed a hose, or even a small pressure washer, into the WH.

The anode thread is normally 3/4 NPT.

I was able to flush it when the anode was off just without pressure washer. Good idea about the pressure washer though. With my screw ups hourly rate would be equivalent to brain surgeon vs. Bill Gates level. Still highway robbery though what plumber wanted to replace the rod.
 

Jadnashua

Retired Defense Industry Engineer xxx
Messages
32,770
Reaction score
1,190
Points
113
Location
New England
The plumber will use working time to get to your house and then on to the next, have insurance, bonding, a truck with a sizeable inventory, and lots of (hopefully!) experience to do it right the first time.

I have nothing against DIY...I am one myself, but I do defer to a pro sometimes, and respect their costs and liability.

FWIW, don't attempt this type of repair on a weekend unless you're assured of having an adequate supply of parts. If you do mess up, you'll pay even more for that plumber to come out to save your bacon.
 

Mliu

Active Member
Messages
580
Reaction score
81
Points
28
Location
Colorado
Some comments/advice (although a bit late at this point)...

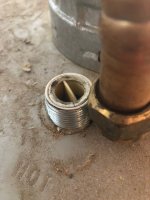
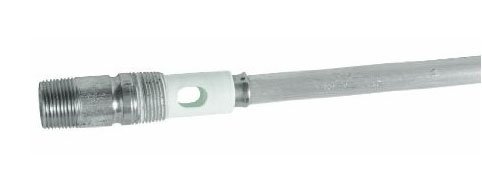
1. Who's the idiot engineer and/or bean-counter who thought it would be a good idea to combine the anode with the inlet nipple? And then made the nipple so short that you have to put a wrench on the nipple threads. I'm glad I now know of this design so I will be on the lookout to AVOID these types of water heaters when shopping for one in the future.

2. An anode rod that has been in service for any length of time will have pitting and corrosion. That's not a measure of its remaining life. Also, the white deposits on it are mostly the oxide deposits that form as the anode does its job. Again, it's normal. What you need to inspect for is how much of the anode metal is remaining. But in this case, the point is academic as you can't reuse these stupid combination anode/nipples.

3. Just to be clear, the tapered threads on water pipe (together with appropriate sealant) are what create the watertight seal that keeps the water inside the pipe. Two problems with wrenching on the threads: (1) You WILL damage those threads. (2) You risk warping the nipple (especially at the threads as that is where the pipe walls are the thinnest). Even if you do not visibly crush the nipple, if the pipe is just slightly out-of-round at the threads, you will not have a good seal. Even applying copious amounts of Teflon tape or pipe dope will not be a long-term solution (although you can get away with a short-term emergency fix, as you discovered). In summary, I would never put a nipple or pipe back into permanent service once a wrench has been used on the threads.

4. You really should have cleaned your work are before you started this job. Not only is your supply pipe sitting in that mess of dust and construction debris on the top of your heater, but I'm certain some of that crap got knocked into your heater after the nipple was removed. In America, we tend to take clean potable water for granted because it's ubiquitous in our civilized society. But we should be diligent to keep it that way. Not only is it nasty to drink water contaminated with dirt, sawdust, gypsum, etc., but a water heater can provide an excellent environment for growing bacteria. Dusting off the top of the heater would have taken less than a minute, and wiping it down with a sanitizing solution (like a Clorox wet wipe) would have been even better.

5. For the same reason, it was a bad idea to spray WD-40, or any other toxic solvents, onto your nipple. A pipe nipple achieves its seal by compressing the tapered male threads into the tapered female threaded socket. The force required to break them free is the torque needed to overcome that metal-on-metal compression (plus any bonding effect that may be present from the possible application of setting thread sealants). Penetrating oil will never get down deep enough into the threads to help. (Think about it: the threads are designed to make a seal against even the smallest fluid leakage, so they will seal against the penetrating oil on the outside of the pipe as effectively as they do against the water on the inside of the pipe.) And unlike straight threads (like on a bolt), once you break the seal on the nipple, it comes out easily because the threads are tapered and the clearance between the male and female threads increases with each degree of rotation. So the only thing you're doing by applying penetrating oil to your nipple is risking the contamination of your potable water. Note: If your nipple threads are rusted together, then that means they were never properly sealed in the first place and the male and female threads are now corroded JUNK and both will need replacement.

6. There is a drain at the bottom of your water heater. You should put a hose on it and flush out your heater every 6 to 12 months. But especially after doing any work on the heater (or upstream piping). Don't try to flush out your heater by opening a faucet or even a bathtub spigot. In fact, most of the crap that fell into your heater during your anode replacement is still sitting in the bottom of your heater. So go put that drain to good use. But be cautious: many heaters these days have cheap plastic hose spigots for drains and you do not want to put too much force on them when opening/closing and you definitely do not want to pull on the hose when it's attached.
 
Top
Hey, wait a minute.

This is awkward, but...

It looks like you're using an ad blocker. We get it, but (1) terrylove.com can't live without ads, and (2) ad blockers can cause issues with videos and comments. If you'd like to support the site, please allow ads.

If any particular ad is your REASON for blocking ads, please let us know. We might be able to do something about it. Thanks.
I've Disabled AdBlock    No Thanks