VolcanoGirlDIY
New Member
Hi,
I'm doing a DIY remodel of my guest bathroom and learning about plumbing for the first time on this project. It's been fun and exciting. I am switching from a regular toilet (i.e. floor mounted) to a wall hung toilet. I have been searching everywhere and cannot seem to find the answer nor a demonstration video on how to connect the vertical outflow/drain from the wall hung toilet assembly kit to the main stack/drain pipes already in my house. All videos and instruction books just show the toilet manufacturer's 3" or 4" drain pipe descending into a hole in the floor, and my question is - what does that connection point look like under the floor? All my pipes are 3" diameter ABS, and the toilet drain provided is 3" ABS. Can someone on this forum help me? Assume I know nothing about plumbing other than everything needs to be vented properly... and the manufacturer's drain that is provided doesn't seem to allow for venting. What am I missing?
Context: Some other information incase it helps.
- I am on post and pier foundation.
- this project started as a way to replace water damage under the tub/toilet area in the subfloor from the previous owner.
- I have the subfloor currently ripped out (new one cut to size) and the pipes are currently easily accessible.
- I plan to build a faux decorative wall that the wall hung toilet will sit in that is 4 or 6 inches deep in front of the main wall for three reasons: added architectural interest to the room, helps me avoid having to reroute the vent stack in the wall, allows for deeper built in shelves above the toilet.
Question: How do I connect these two parts to ensure that the toilet will flush properly/effectively, not cause myself unnecessary clogs, and follow national plumbing code?
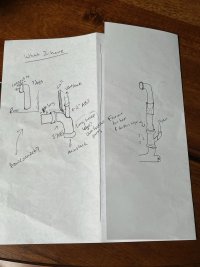
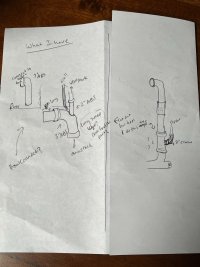
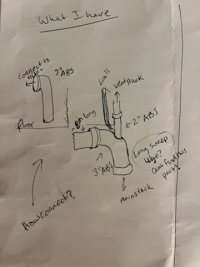
Attached is a sketch and some photos of what I have now: a *horizontal* connection angle into the existing main stack from the former toilet (closet flange has been cutoff) and a *vertical* (or could be 45 deg offset) drain out of the toilet that is a part provided by the manufacture Swiss Madison.
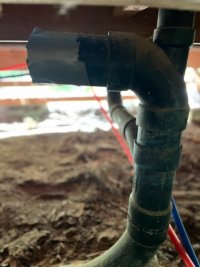
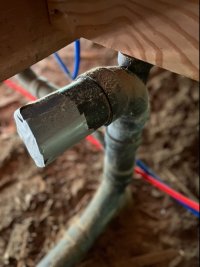
Also attached are 2 options how I can see to connect the pipes - and I'm wondering if one is better/preffered over the other. Specifically the short sweep 90 makes the most sense to me - but is there any regulation on whether than can connect to the wye (san tee?) directly? Every thing I've read has a pipe run (up to 6 ft for 3" ABS) between the 90 and the wye (san tee?)... but is there any reason I can't just connect the two directly together? Note that in the photo I am just holding the pipe "in place" in the perspective of the photo - I have not tried to attach yet. The joist is behind my hand and the pipe in the photo, and the 2x4 in front of the vent piping on the right side is blocking to support the new subfloor - that can be moved/adjusted if needed.
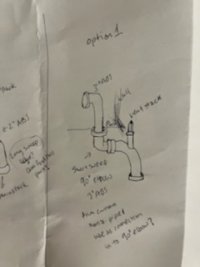
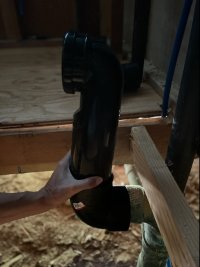
I prefer the 90 elbow directly in the the Wye (san Tee?) currently installed in my house as that will be easiest to install, and requires no major cutting of my current house pipes nor the vent stack. But the other option is to use the manufacturer's 45 deg offset on the toilet which will allow me to connect to the main stack (and loose the faux wall that I want) as well as the vent stack. This would involve cutting out the current Wye (san tee?) and the Lower part of the vent stack, and connecting as shown. I'll need one more 45 deg 2 in pipe not pictured to connect the vertical vent stack to the pipe layout in the photo.
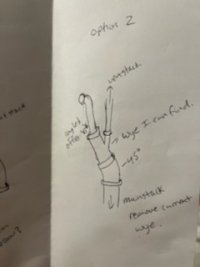
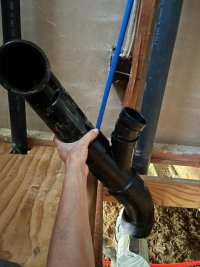
Any guidance is enormously appreciated. Thank you in advance!
I'm doing a DIY remodel of my guest bathroom and learning about plumbing for the first time on this project. It's been fun and exciting. I am switching from a regular toilet (i.e. floor mounted) to a wall hung toilet. I have been searching everywhere and cannot seem to find the answer nor a demonstration video on how to connect the vertical outflow/drain from the wall hung toilet assembly kit to the main stack/drain pipes already in my house. All videos and instruction books just show the toilet manufacturer's 3" or 4" drain pipe descending into a hole in the floor, and my question is - what does that connection point look like under the floor? All my pipes are 3" diameter ABS, and the toilet drain provided is 3" ABS. Can someone on this forum help me? Assume I know nothing about plumbing other than everything needs to be vented properly... and the manufacturer's drain that is provided doesn't seem to allow for venting. What am I missing?
Context: Some other information incase it helps.
- I am on post and pier foundation.
- this project started as a way to replace water damage under the tub/toilet area in the subfloor from the previous owner.
- I have the subfloor currently ripped out (new one cut to size) and the pipes are currently easily accessible.
- I plan to build a faux decorative wall that the wall hung toilet will sit in that is 4 or 6 inches deep in front of the main wall for three reasons: added architectural interest to the room, helps me avoid having to reroute the vent stack in the wall, allows for deeper built in shelves above the toilet.
Question: How do I connect these two parts to ensure that the toilet will flush properly/effectively, not cause myself unnecessary clogs, and follow national plumbing code?
Attached is a sketch and some photos of what I have now: a *horizontal* connection angle into the existing main stack from the former toilet (closet flange has been cutoff) and a *vertical* (or could be 45 deg offset) drain out of the toilet that is a part provided by the manufacture Swiss Madison.


Also attached are 2 options how I can see to connect the pipes - and I'm wondering if one is better/preffered over the other. Specifically the short sweep 90 makes the most sense to me - but is there any regulation on whether than can connect to the wye (san tee?) directly? Every thing I've read has a pipe run (up to 6 ft for 3" ABS) between the 90 and the wye (san tee?)... but is there any reason I can't just connect the two directly together? Note that in the photo I am just holding the pipe "in place" in the perspective of the photo - I have not tried to attach yet. The joist is behind my hand and the pipe in the photo, and the 2x4 in front of the vent piping on the right side is blocking to support the new subfloor - that can be moved/adjusted if needed.


I prefer the 90 elbow directly in the the Wye (san Tee?) currently installed in my house as that will be easiest to install, and requires no major cutting of my current house pipes nor the vent stack. But the other option is to use the manufacturer's 45 deg offset on the toilet which will allow me to connect to the main stack (and loose the faux wall that I want) as well as the vent stack. This would involve cutting out the current Wye (san tee?) and the Lower part of the vent stack, and connecting as shown. I'll need one more 45 deg 2 in pipe not pictured to connect the vertical vent stack to the pipe layout in the photo.


Any guidance is enormously appreciated. Thank you in advance!

