Crane Walsan finally developed a leak ...Vintage

Users who are viewing this thread

Don in Ohio

New Member
Messages
15
Reaction score
0
Points
1
Location
Ohio
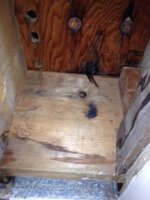
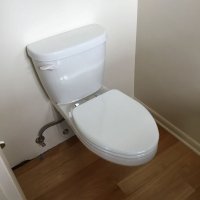
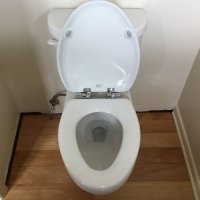
Well, after faithfully working for more than 57 years, our 1959 wall-mounted Crane Walsan toilet in our powder room started leaking. The first clue was that the red birch floor under the bowl started cupping slightly. We searched for a leak, including behind the tank cover, and in the basement utility room's ceiling area below the powder room. Nothing seemed damp so we assumed (bad thing!) that it was just something that was a one-time problem. We even had the floor company that installed the floor stop by to give us a repair estimate (very $$$ for less than 10 square feet). We decided to wait and see if the boards would go back to normal after drying out totally.

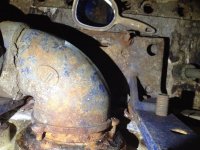
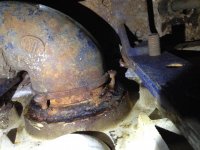
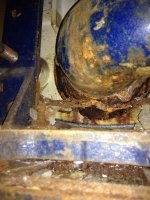
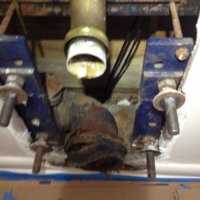
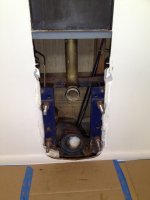
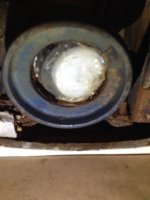
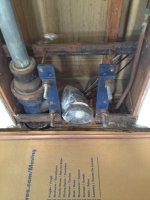
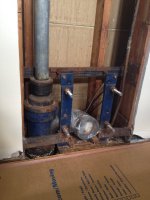
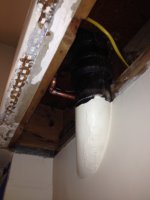
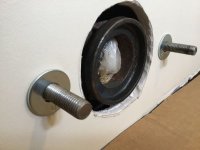
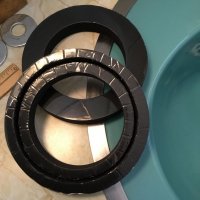
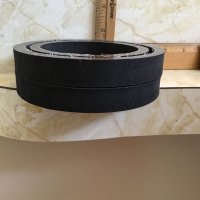
A few weeks later, we discovered that the number of boards cupping was growing. We pulled the tank cover off, and after sticking my hand inside the tank cavity, I could feel a little water on the bottom of the bowl's outlet coupling to the 4" wall carrier (a Zurn-stamped ell that ties into a cast iron pipe junction with a cleanout plug and vent pipe connection). It appears that there is some rusty looking metal at the bottom of the ell, and when pulling up on the tank's flapper, there is water coming out of the area (though most goes down the drain). So it appears the leak occurs only when the toilet is flushed. This toilet is in a powder room that is seldom used (luckily), but the wife cleans and then flushes the toilet at least once per week. I have now shut off the water supply, drained the tank and bowl and have sealed the bowl with plastic sheeting and taped around the tank cover to minimize sewer gas.

At this point, our plumber (a master plumber who's done good work for us in the past) has taken a quick look at the toilet, and verified the leak occurs only when flushed. He's pretty busy at the moment, and we have 2 other working Crane Walsan units, so the powder room fix isn't an emergency situation. We discussed the options, one of which is to remove the Walsan bowl and see what the condition of the in-wall carrier is, and if the Walsan can simply be reused. He's not familiar with the Walsan so is concerned about disassembling the bowl's water inlet side, as these parts haven't been apart for more than 50 years, and replacement parts are not likely available. If the Walsan breaks beyond repair during the removal process, we would consider replacing it with the Gerber Maxwell.

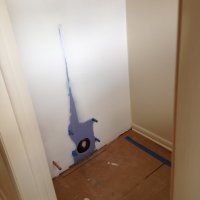
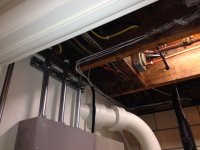
Because of the small size of the powder room, and the fact that its door swings into the room, we want to retain a wall mounted toilet. The Gerber Maxwell would probably fit okay, although the door would open about 4" less than it currently does. It is reasonably priced and would suffice for use in our seldom-used powder room. I should also mention that there is no clearance to install a floor-mounted toilet in this room, as there is a floor joist directly below the powder room, and there are electrical lines, an electrical breaker box and an alarm control panel directly below as well.

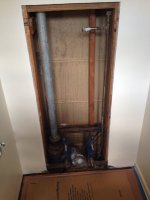
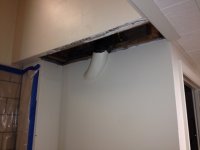
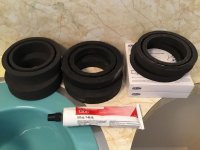
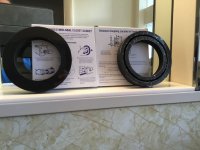
Our major concern is that from the pictures I took (and have attached here), it looks like the existing Zurn ell may possibly be too rusted out to be reused for either the Walsan or a Gerber Maxwell. If we're faced with having to replace the wall carrier with a new one, I think we would prefer to undertake installing a Geberit in-wall carrier, and a new wall-mounted bowl to work with it. (This is the wife's 1st choice!) This will require mining out the old cast iron stack, redoing the steel vent pipe, relocating the water supply and of course, all the associated cement board, plaster, painting work. I don't take any of this lightly, but I only want to tackle this project once (I'm retired and am tired of being tied up with endless household projects!).

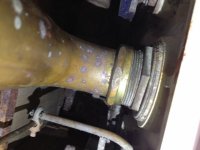
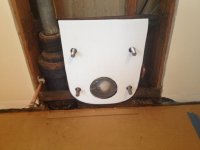
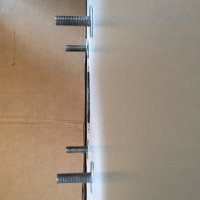
All that said, the pictures attached should help illustrate the situation. I'd like to start taking things apart, but have a few questions. Should I spray the existing brass nuts on the Walsan water inlet connection with something like PB Blaster and let it soak in for a few days, to help ensure I can loosen these parts up more easily? Once the bowl inlet pipe is removed (or at least the brass nuts are loosened), and the flush handle linkage is disconnected, will removing the 4 large cap nuts on the Walsan bowl be sufficient to loosening up the bowl from the sealing rings on the wall carrier (both the inlet and outlet sides)? I suspect the bowl will not be lightweight. Is pulling it away from the wall a two-person job? I don't need a hernia at this point in my life, nor would I want to experience it dropping onto my foot!

I sincerely appreciate the sage advice from the plumbing experts on this forum. Thanks for helping me make this project a successful one! I'll post the "after" pictures when it's finished!
 

Attachments

  • Ell Top.jpg
    Ell Top.jpg
    105.1 KB · Views: 883
  • Ell Top 2.jpg
    Ell Top 2.jpg
    101.8 KB · Views: 900
  • Ell Leak.jpg
    Ell Leak.jpg
    99.4 KB · Views: 898
  • Walsan Inlet.jpg
    Walsan Inlet.jpg
    58.6 KB · Views: 959
  • Walsan Inlet 2.jpg
    Walsan Inlet 2.jpg
    76.8 KB · Views: 895

Don in Ohio

New Member
Messages
15
Reaction score
0
Points
1
Location
Ohio
Okay, here's an update. It was a rainy Sunday here in Ohio, so I decided to take the Walsan toilet off the carrier. I tried using a strap wrench to get the big nut off the water inlet to the toilet (from the tank), but couldn't get a good enough grip on the nut. So I used the largest channel lock pliers I had, which fit just fine, and was able to loosen the nut with some effort. I backed it all the way off which in hindsight may have been a mistake since it put a small dent in the brass water inlet tube. I'm concerned that the inlet tube's strength may have been compromised with the dent, as the wall thickness isn't that much to begin with.

At any rate, I move on to disconnecting the flush handle and its linkage, and then the four 15/16ths (as I recall) mounting nuts. I was surprised that they didn't seem more than slightly more than finger tight. I cut the caulking around the back of the toilet's perimeter where it met the wall, and wiggled it away from the wall. It was fairly easy to pull it all the way off, and wasn't too heavy for me to handle on my own. I carried it outside and dumped out a small amount of water that was still somewhere in the the labyrinth of internal bends.

With the toilet out of the way, I took a closer look at the toilets seal, which was still attached to the wall carrier. It looked fairly intact, although partly shredded from having the toilet pulled off the wall. I really couldn't discern that the seal had failed, although after fully removing it, I noticed that the "horn" where the seal sits had some some hardened material on the lower side. I used a small screwdriver to scape all all the seal residue from the circumference of the horn. The area from about 4 o'clock to 7 o'clock on the ring had some really hard material that I had to carefully knock off with a hammer and small chisel. It resembled hardened plumber's putty, and chipped off in large chunks.

Once cleaned off, the resulting surface looked to be in excellent shape, in fact, the original Zurn factory blue paint was still visible. When I first learned of the leak, an attempt to view the source of the it using a flashlight and hand mirror revealed what appeared to be from some very rusty metal on the bottom side of the horn. As it turned out, once the toilet was off the wall, I learned that the rusty metal was simply metal wire mesh used for the plastering on the wall behind and underneath the toilet. It was a relief to know that the wall carrier and horn were in really good shape, and can be reused.

At this point, the next step is to get my plumber here to have a look at what I've completed, and to plan a path forward. Because the Walsan is 57 years old, I really don't want to reuse it by simply putting a new seal on the flange. I don't trust the wall thickness of the fill tube or the inlet tube (that I managed to put a dent in). The wife would love a new euro-style toilet with a Geberit in-wall carrier, but I don't want to go through the expense and effort of mining out all the old cast iron plumbing, since it all appears to be in good condition. I'll let the plumber convince her of the wisdom of reusing most of the in-wall piping (the water supply will need to be relocated however, but that's relatively minor).

I'm fairly convinced that the most sensible solution is to install a brand new Gerber Maxwell (model 20-021), using the existing carrier. I'll have to cut the old Walsan tank frame out of the wall, and once the water supply line is relocated/roughed in, will install new drywall (cement board), which will make for a nice clean surface behind the new toilet. After looking at the Gerber website, it appears this toilet does not include a few things, specifically a seat, the sealing ring to the wall carrier, and the nuts that hold the toilet to the wall carrier. I assume that I will just reuse the washers and cap nuts that were used for the Walsan (I'll polish them up so they look pretty!).

I'd welcome recommendations for a high quality seat that will fit this toilet. Are there any soft-closing ones that work well, or are non-self-closing ones better quality-wise? Also, I've read that neoprene gaskets are appropriate for this wall-mount toilet. Any advice for a specific brand and part number that will provide leak-free sealing?

Thanks in advance for the support. I've attached a few pics from today's progress (sorry for the poor quality phone pics!).
 

Attachments

  • IMG_4744.jpg
    IMG_4744.jpg
    91.2 KB · Views: 906
  • IMG_4746.jpg
    IMG_4746.jpg
    53.5 KB · Views: 963
  • IMG_4749.jpg
    IMG_4749.jpg
    47.2 KB · Views: 891
Last edited:

WJcandee

Wise One
Messages
3,181
Reaction score
170
Points
63
Location
New York, NY
Sorry you are getting rid of the Walsan; it's a classic. 57 years and still basically going strong!

If you are used to the wall-mounted commode, that Geberit (or Toto) tank matched with the Toto Aquia wall-mount bowl is a real winner. We have three in our beach house, and the Toto bowls have proven superior in every respect to the Duravit bowls (appearance, workmanship, function). I'm not sure that I see how the amount of work necessary to do the Geberit/Toto install is that much greater than replumbing the water supply so you can hook up a Maxwell, removing the Walsan tank, and closing up the wall. But admittedly all this isn't something that I do.

If you go with the Maxwell, here are your answers: (1) Any good quality neoprene seal should be fine. Zurn makes one. And HD and Lowe's have decent ones. No need to get too concerned about the brand.

(2) Any standard elongated seat will fit on that Maxwell bowl. The world is your oyster!
I know that Terry knows some schwankier seats, but we have been partial to the Mayfair slow-close wooden seats with the easy-clean-and-remove hinges. Available anywhere, including online. If you prefer a plastic seat, which has a bit more give and seems softer, the solid plastic Mayfair seats are also nice. I like the easy-remove hinges because they actually provide a more-secure installation: the seat NEVER moves. You put the bolt into the hole and secure it in place and it stays there, nice and solid. You then mount the seat onto the bolt top and slide a little clip to hold it solidly to the bolt. In the most-used toilets in our house, where the old seats would have to be tightened constantly, the Mayfairs just don't slide around. If you want to pull up the seat to clean under it, just slide the clips to the left and Voila!, the seat comes right off and you can clean. Nothing to unscrew. Bemis and Mayfair are the same manufacturer, so the seats are similar under both brands, with the Mayfair maybe being the higher-grade line; I'm not sure.
 

Don in Ohio

New Member
Messages
15
Reaction score
0
Points
1
Location
Ohio
Thanks for your reply and suggestions! After a consultation with our plumber, we decided it was time to bid farewell to the Walsan. It was a quality-made unit and served us well for decades (we're in my wife's childhood home). The retrofit of the behind-the-wall and under-floor cast iron piping required to install a Geberit carrier would have been very expensive. Since the existing carrier is in excellent condition, we feel the Gerber Maxwell 20-021 toilet is the most sensible choice.

I removed the old tank and carrier and cut back the drywall to the 2x6 studs. The plumber will relocate the water supply line to the appropriate new location per the Maxwell's rough-in specs early next week. Once that's complete, our drywall guy will install the new backing with the necessary openings for the 4 bolts, the drain and water supply connections. Once the drywall work is installed and I've painted the wall, we'll get the Maxwell mounted up and connected. Then it's just a matter of reinstalling the baseboard and shoe molding to complete the installation.

We've got the Maxwell on order (hopefully it will be here in the next week or two (or three!). We looked at a number of seats at a local plumbing showroom yesterday and have decided on a Church (same as Bemis) high-density molded wood seat, model 18170CHSL. It features "whisper-close", easy-clean & change chrome hinges, with the "stay-tight" seat fastening system. We think it will look nice and function well in our mid-century home's decor.

I've attached a few recent pics showing the old Walsan tank and its mounting frame removed, and the wall cut back to the 2x6 studs. Looking forward to making more progress in the next week or two.

Don
 

Attachments

  • IMG_4835.jpg
    IMG_4835.jpg
    53.3 KB · Views: 869
  • IMG_4836.jpg
    IMG_4836.jpg
    75 KB · Views: 843
  • IMG_4837.jpg
    IMG_4837.jpg
    77.2 KB · Views: 868

Don in Ohio

New Member
Messages
15
Reaction score
0
Points
1
Location
Ohio
Thanks for the confirmation wmcandee. The new seat has arrived (thanks UPS) and it's a Bemis model 19170, identical to the Church 18170 (they're the same company). The plumber was here this morning to relocate the water supply line from the top right side of wall opening, to the lower left side, in anticipation of the new Gerber Maxwell 20-021 going in.

Our drywall guy stopped by this afternoon to measure for the 5/8" green board patch and to figure out what thickness of shims will be needed. The existing wall is a layer of rock lath with a layer of plaster over it, and ranges from a bit over 3/4" to 1" thick (my late father-in-law built a good solid house). I made a template of the back side of the toilet using some plastic sign board, to get a feel for what needs to be cut out of the green board (less the new water supply line). Hopefully the wall patch will be finished, sanded and painted by the end of the week and be ready for mounting the toilet and replacing the baseboard and shoe molding.

A couple of pics showing progress are attached.
 

Attachments

  • IMG_4867.jpg
    IMG_4867.jpg
    79.6 KB · Views: 898
  • IMG_4868.jpg
    IMG_4868.jpg
    59 KB · Views: 864

Don in Ohio

New Member
Messages
15
Reaction score
0
Points
1
Location
Ohio
So we've made more progress on the Walsan replacement project. The wallboard is in and our dry wall guy has one more skim coat to apply tomorrow. One problem discovered this morning was water dripping into the basement laundry room. I ended up ripping out some plaster to gain access to the joist space where the supply line plumbing is in the wall, and where the cast iron stack is located. Long story short, our plumber found that the a portion of the old reused supply line that routed through the floor had some corrosion on it and developed a pinhole leak, at the portion that was between the floor and the joist space. So at 57 years old, it decided to finally fail (perhaps due to some jarring when the dry wall guy was putting in backer blocks to support the new blue board). He managed to remove all vestiges of the old copper, and ran all new copper from the basement shutoff valve, through a wall, up into the joist space and connected to the new supply line that he installed the other day. It was a challenge to solder the connections due to the limited working space, but he did a great job and it's got to be good for another 5 or 6 decades.

I'm going to cover the area I opened up for access to the plumbing work with a removable board, so it can be opened for future inspections. That'll be added to the list of stuff to get done to finish off the powder room toilet upgrade. A few more pics are attached. The last one that shows the shutoff valve in the basement illustrates why I couldn't replace the old wall mount toilet with a new floor mounted toilet. There's just to much wiring, electrical and alarm panels, and joists in the way, preventing drilling a hole in the floor for that style of toilet. Hoping that the next update will show the wall painted, the toilet mounted and plumbed, and baseboards and shoe molding installed!
 

Attachments

  • IMG_4884.jpg
    IMG_4884.jpg
    53.7 KB · Views: 853
  • IMG_4887.jpg
    IMG_4887.jpg
    52.4 KB · Views: 837
  • IMG_4888.jpg
    IMG_4888.jpg
    52.2 KB · Views: 838
  • IMG_4890.jpg
    IMG_4890.jpg
    67.3 KB · Views: 809
  • IMG_4891.jpg
    IMG_4891.jpg
    46.3 KB · Views: 807
  • IMG_4892.jpg
    IMG_4892.jpg
    72.4 KB · Views: 823

Don in Ohio

New Member
Messages
15
Reaction score
0
Points
1
Location
Ohio
Hi guys (and gals!) - it's time for another quick update!

Our drywall guy finished the patch, and did a beautiful job. You can't tell that the big hole in the wall for the internal tank was ever there. I've already primed and painted the wall, as well as the baseboard and shoe molding that will be reinstalled once the toilet is mounted and supply line is connected. A pic of the "toilet ready" wall is attached below. The little blue tape arrows indicate where the 2x6 studs are for pin nailing the baseboard to the wall.

IMG_4944.jpg


At his last visit, the plumber mentioned that he was pretty sure he had the correct gasket for the wall-mounted flange to toilet connection on his truck. He's an excellent plumber and I don't doubt he'll use the correct seal. I did look for neoprene seals at the local Lowes and Home Depot stores, but the only waxless seals they had seemed to be for use on floor-mounted toilets with holes for mounting bolts in them.

Looking at Zurn seals on-line, I found this one:
Zurn® Neo Seal Tank To Wall Gasket For Wall Hung Toilets ... Z1210-57
Zurn® Neo Seal Gasket Kit - Neoprene Resists Chemicals - For Wall Hung Toilets - Adhesive Already Applied To Product - Remove Plastic To Expose Adhesive & Install - Exceptional Resiliency To Rotting

Packaging Dimensions
Depth 5.5 in
Height 1.1 in
Weight 0.105 lb
Width 5.55 in

41H972_AS01.jpg


Here is the PDF for this Z1201-57 gasket from the Zurn website. An except from this document states: "
Gasket features dual sided peel and stick adhesive backing for clean and efficient installation." Sounds like it's got to be installed correctly the first time, i.e., once the toilet is moved against the wall, you can't pull it back off because each side of the gasket will be adhered (one side to the horn, the other side to the toilet). Hmmm, I just noticed that the Grainger website shows that this product has been discontinued! That said, several other sites show it available for between $15 and $23. Also, there are some other Zurn neoprene seals for wall-mounted toilets, that include a tube of glue, instead of the peel and stick style above.

So while on a grocery run up to Cleveland this afternoon, I stopped in a plumbing supply store that I've been to before, and picked up a Zurn Z1200 neoprene gasket. It has the peel and stick adhesive, and is 3/4" thick. Looking more closely at it, and placing it on the outlet on the new toilet (without actually sticking it on the toilet), it appears that about 1/8" of the gasket will extend beyond the back plane of the toilet. The rim of the horn in the wall extends beyond the new wall surface by between 1/16" (at the bottom) and 1/8" (at the top), so the horn's surface ring is not perfectly parallel with the wall's surface (and cannot be moved).

I think there's enough extension of the horn to compress the entire surface of the gasket at installation, but not a whole lot. I hope this doesn't present problems with the installation, as I really can't deal with any more leaks! I wish the gasket was 7/8" thick, instead of 3/4", as there'd be more compression going on. Meanwhile, I've attached several pics that show what I'm trying to convey in words!

IMG_4947.jpg
IMG_4948.jpg
IMG_4950.jpg
IMG_4952.jpg
IMG_4953.jpg


****************************************************************************************
****************************************************************************************
EDITING FOR YET ANOTHER UPDATE ...
Okay, so now I'm getting worried, as I just read this 2013 vintage post here about a wall hung toilet gasket issue where the guy was having a problem where the flange of a wall-mounted carrier "only protruded from the wall 1/8" and the Zurn 3/4" gasket he was trying to use was not thick enough. Terry responded saying that '1/8" from the wall is too short.' and that the Glenwall instructions said to adjust the horn to project 5/16" from the wall.

So I appear to be in the same situation, as I cannot adjust the horn to project further from the wall than it currently is. So I'm faced with the same dilemma that original poster in that thread had. Can I use a 1-1/4" Zurn neoprene seal and dremel an appropriately deep groove in it to fit the lip around the outer circumference if the horn, then glue it when installing? Or should I consider the option that Terry suggested in that thread of using an Oatey wall-mount rated wax ring?

AND ALSO THIS MINOR FLUB BY ME: I was reading through some additional wall-mounted toilet posts here at terry love.com this morning and discovered yet another problem with what I've done so far! When the drywall patch was being installed, I told the drywaller I needed to have ~2-1/8" of thread exposed on the outside of the wall. As this was being done, the moveable nuts and fender washers were adjusted so that the washers contacted the drywall, but they're all located on the inside of the finished wall, rather than on the outside of the finished wall. Oops!

From a post by "HJ": "There should be nuts on the two bottom bolts and the upper left one flush with the wall surface. Then plain washers against the nuts and wall. Install the toilet and tighten just those three acorn nuts snug. Finally install the upper right acorn nut but just contact the toilet with it and a slight bit more. DO NOT tighten it."

So I can fix the issue of adding new nuts on the bolts that will sit flush with the wall surface and add new plain washers against the nuts and finished walls. Doing this will ensure that the weight of the new toilet and anyone sitting on it will all be borne by the carrier, and not the drywall. Once question, shouldn't there also be a nut and washer on the upper right bolt? (I know the acorn nut on this one is only hand tightened.)

This still leaves the issue of the the seal between the toilet and the lip of the horn, as mentioned above. Hopefully someone can advise of a viable solution.

Thanks as always for your consideration and support!

 
Last edited:

Don in Ohio

New Member
Messages
15
Reaction score
0
Points
1
Location
Ohio
Thursday 6-7-16 Update!

Okay, I have now resolved the problem with the missing nuts and washers on the finish wall. I used an exacto knife and cut around the carrier bolts enough to install new nuts, that are turned in enough to be flush with the finish wall. I then put new fender washers on each of the carrier bolts. Here are a couple of pics for this fix:

IMG_4955.jpg IMG_4958.jpg

I also cut the drywall opening around the drain flange to make it a 6" opening. It was originally about 4-3/4", close to the outer diameter of the drain flange. When it was brand new (in 1959), it was apparently adjustable (there are 3 screws on the back side of the flange. But decades later, everything seems to be rusted tight and therefore no longer adjustable.

Looking at the flange, it's offset towards the lower left carrier bolt by about 1/4", instead of being centered exactly between the lower bolts. I don't think that should have a negative affect on the installation (it worked fine for 57 years). However, as I mentioned in my previous post, the flange only extends into the room by ~1/8" on the top of the flange, and is nearly flush with the wall on the lower side of the flange. The 3/4" thick Zurn neoprene gasket goes into the back of the toilet 5/8", so there's only 1/8" left to connect to the drain flange. With the 1/16" spacing introduced by the new washers on the wall, there's not nearly enough gasket thickness to compress against the flange.

I believe Zurn only makes the adhesive-faced neoprene gasket in 3/4" and 1-1/4" widths. It would seem that one is too thin and the other is too thick. There's a formula on the Zurn gasket box as follows:
C = A + B - 1/2"
Where:
A = Distance from Closet to Wall
B = Depth of Groove in Closet
C = Distance Extension Extends from Wall

My "A" dimension is 1/16" (fender washers)
My "B" dimension is 5/8"
Therefore "A" plus "B" = 11/16" minus 1/2" = 3/16"

If my measuring and math is right, I'm definitely to0 short on the top side of the flange by 1/16" and at the bottom by 3/16". One final question, if you look closely at the flange on my toilet, it's sort of cup shaped. the old gasket, which seemed to be a fabric with a sticky residue (felt with wax?) was (as near as I could tell), entirely on the inside of the flange's circumference. The new Zurn neoprene seal is a larger diameter than the flange, so the seal would be stuck only to the narrow rim/edge of the flange, rather than the larger surface that is found inside the flange's rim. I guess that's just the way it is supposed to be. That said, I'm seeking advice on what kind of gasket(s) can solve my problem, and welcome any suggestions! Thanks in advance!!!

IMG_4965.jpg
 

Don in Ohio

New Member
Messages
15
Reaction score
0
Points
1
Location
Ohio
Yahoo! Finally got the new Gerber Maxwell installed today. I did a lot thinking about the gaskets, and actually ordered a couple of the squishy rubber seals that are 1" thick, a couple of the Zurn 1-1/4" thick neoprene seals, and another of the 3/4" Zurn neoprene seals. The plumber considered the options, including some seals that he had. We ultimately decide to use 2 of the modified 3/4" Zurn Neo-Seal gaskets, stuck together, due to the fact that the waste horn was nearly flush with the finished wall, and there had to be 5/8" of gasket material in the toilet's recess.

He dry-fitted the toilet, and used a lump of modeling clay to determine the distance needed for proper compression of the gasket. I had carefully carved out a 1/8" wide groove in one of the Neo-Seal gaskets with an Exacto knife, which allowed it to fit snuggly over the 1/2" extended lip of the waste horn. We filled the groove with a bead of neoprene glue, and attached the seal to the horn. We took the 2nd Neo-Seal gasket and stuck it to the toilet (they have self-sticking adhesive on both sides of the gasket. Then we removed the protective film from the remaining mating surfaces of each gasket and installed the toilet, allowing the two gaskets to adhere strongly to each other.

He then tightened down the cap nuts, snugging down 3 of the 4 with a wrench and hand-tightening the 4th, observing that the toilet compressed the gaskets as he tightened them. We then poured several gallons of water down the toilet drain to ensure there were no leaks from the gasket. Then he installed the tank and seat and water supply connection and voila, we had our toilet back! We're going to leave the baseboard and shoe-molding off for a few days to verify that there are absolutely no leaks anywhere. We're also doing a lot of flushing of the toilet to exercise it, and because it's just fun to see how much difference there is between a 1.28 gallon flush and the old Crane Wilson's 4-5 gallons of usage per flush.

I've attached some pics that show the last part of the repair and the final product. Now the wife wants to consider doing the 2 Crane Walsan toilets that are on the 2nd floor. Hmmmm ... think we're going to hold off on replacing those 2 until they break! Fingers are crossed that won't happen for at least another decade of use!

IMG_0042.jpg IMG_0043.jpg
 

Attachments

  • IMG_0044.jpg
    IMG_0044.jpg
    64.6 KB · Views: 766
  • IMG_0045.jpg
    IMG_0045.jpg
    70.1 KB · Views: 762
  • IMG_0046.jpg
    IMG_0046.jpg
    71.6 KB · Views: 827
  • IMG_0047.jpg
    IMG_0047.jpg
    70.2 KB · Views: 754

Don in Ohio

New Member
Messages
15
Reaction score
0
Points
1
Location
Ohio
Here are more of the pics (there's a limit of 6 pics per post) ...
 

Attachments

  • IMG_0050.jpg
    IMG_0050.jpg
    53.4 KB · Views: 770
  • IMG_0051.jpg
    IMG_0051.jpg
    64.5 KB · Views: 760
  • IMG_0052.jpg
    IMG_0052.jpg
    82.2 KB · Views: 793
  • IMG_0053.jpg
    IMG_0053.jpg
    72.8 KB · Views: 810
  • IMG_0054.jpg
    IMG_0054.jpg
    44.1 KB · Views: 966
  • IMG_0057.jpg
    IMG_0057.jpg
    50.9 KB · Views: 848

Don in Ohio

New Member
Messages
15
Reaction score
0
Points
1
Location
Ohio
Woohoo! I am finally done with my wall-hung toilet replacement. The final step was accomplished this afternoon: my carpenter and I cut and installed the baseboard and shoe-molding, and I touched up the paint where the finishing nails were installed. We also created a removable "inspection cover" in the basement, so we can ensure we can look for any suspected leaks from the basement, rather than experience the red birch floorboards under the toilet start to cup from moisture that should never be there.

We've had fans running in the room and down below in the basement for at least a month and a half, and fortunately, the cupping in the floor has largely disappeared. It was great to wrap this project up at long last. I'm going to keep a close eye on the other two Crane Walsans in the house (both 57 years old, and currently trouble-free). One thing I forgot to mention is that when our plumber installed the new Gerber Maxwell on the wall, he covered the threaded bolts with short (~1.25") pieces of 3/4" PEX tubing. Doing this centered the bolts in the toilet's holes nicely, and also prevented the bolt threads from scratching the china.

Hopefully all the info I've included will be helpful to others who may be going through a similar exercise with replacing a wall-hung toilet. Here are a couple of pics of the finished project:

IMG_5044.jpg


IMG_5046.jpg
 
Top
Hey, wait a minute.

This is awkward, but...

It looks like you're using an ad blocker. We get it, but (1) terrylove.com can't live without ads, and (2) ad blockers can cause issues with videos and comments. If you'd like to support the site, please allow ads.

If any particular ad is your REASON for blocking ads, please let us know. We might be able to do something about it. Thanks.
I've Disabled AdBlock    No Thanks