I just dont get it! Please help!

Kid Quick

New Member
Messages
2
Reaction score
0
Points
0
Location
Alaska
Hello everyone! I'm so glad I found this forum.

OK, I just installed a new sink and now I'm trying to hook up the drain system underneath. Please see pictures below.

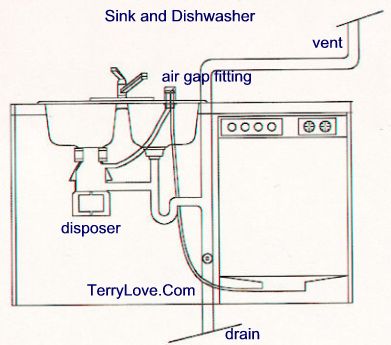
I have a double sink with a Badger 5 garbage disposal.

The problem I'm having is, I cannot figure out how to connect the drain piping (1) to the drain body (A).

So far, I'm tried different configurations but right now I've built what is seen in numbers 1, 2, 4 and 13.

The top end of 1 is where I'm having trouble figuring out what I can connect in order to also connect to (A)

Also, 6 came with the sink and it's also supposed to screw onto the bottom of (A).

I hope this is enough info. Let me know if I need to post another angle or anything.

Thanks in advance!

2011-10-08 12.27.33.jpg2011-10-08 12.28.14.jpg2011-10-08 12.28.46.jpg
 
You aren't really planning on using that accordion drain crap with a garbage disposal are you?

Do a google image search for kitchen sink drain, and don't use that accordion crap
 
OK. Thanks for the advice on that. I plan on changing it. By my real issue is how to connect a tail piece (12) to the Strainer Body (A). Do I need a washer? If so, what size? Here's what I thought I needed to do, but when I put the washer on, it doesnt leave me with enough thread to attach the tailpiece to the strainer body.

2011-10-08 14.33.59.jpg2011-10-08 14.35.00.jpg
 
The washer you need will either be a flat fiber washer or more likely a white plastic washer hat inserts into the tailstock
 
OH BOY. Lose that corrugated piece or you will regret it. You need a sink talipiece, end as shown in your bottom photo. The gasket for that will be flat, or T shaped on the profile.

Even a decent hardware store should be able to fix you up with a better set of fittings. Just because the box store stocks that flex stuff does not mean the homies should not be smart enough to give you better stuff. THose corrugations are a MAGNET for soap scum and food debris, and will be an odor and clog problem.
 
... Here's what I thought I needed to do, but when I put the washer on, it doesn't leave me with enough thread to attach the tailpiece to the strainer body.

It sometimes amazes me that the engineers or whoever it is that put some of those packages of parts together do not actually try them to see whether they will work.

The nut that came with the sink is likely designed/intended to hold a metal tailpiece with a thinner flange ... and I think you would do well to get a set of metal trap parts. Under the kitchen sink is a high-traffic area where plastic parts do not always stand up to being bumped by cleaning supplies and other stuff being stored there.
 
You do not give a good enough picture of the undersink area, but it appears that you could get a "Disposer continuous waste kit" and it would have everything you need except the trap. Remove the nut under the drain and REMOVE all that putty that squeezed through.

sink_dw.jpg
 
Last edited by a moderator:
Alright, if you're still reading this thread here's what you need.
1-Flanged tailpiece with tailpiece washer and slip joint nut.
1-2 part continuous waste.
1-P-trap.

Here's how it goes together.
Attach the flanged tailpiece to the bottom of the basket strainer making sure that the tailpiece washer is inserted in the top flange of the tailpiece. Before you start to tighten the nut to basket strainer put tiny dabs of putty inside the nut in three spots. This acts as a sealer. Hand tighten the slip joint nut at this point. Next attach the tee from the continuous waste to the disposer outlet pipe. Next size up the waste arm that comes from the side inlet of the waste tee to the tailpiece you already have in place. Measure for the proper length of the tailpiece and the waste arm and make two cuts. (Remember measure 5 or 6 times and cut once for each piece.) Assemble these parts again using putty on the slip joint nuts to prevent leaks. Finally, loosely attach the "J" bend of your trap to the tailpiece coming from the bottom of the tee. Now measure the length of the trap arm (That’s the "L" looking piece that came with your trap) and then measure for the height of your trap and where it needs to be on the bottom of the tee. A little putty under the slip joint nuts, go back and firmly tighten everything down. Fill both sides of your sink as full as possible and then remove the stoppers to test for leaks. Do this three times, the last two times with the disposer running to add a little vibration and pressure. If you put it together correctly it should drain well with no leaks.

Last. Take all of that other crap you have back to ACE or Home Despot or Lows and get your money back all whilst slapping the clown in the plumbing department for giving it to you. (Only kidding about the slapping part. Not really, but just don't do it!)
 
Back
Top