You are using an out of date browser. It may not display this or other websites correctly.
You should upgrade or use an alternative browser.
You should upgrade or use an alternative browser.
I'm moving my toilet to the right by a couple feet and have to cut ...
- Thread starter trinitony
- Start date


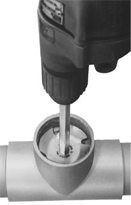
Pick up a Ram Bit to remove the pipe from inside the fitting.
http://www.pascospecialty.com/spotlight.php?pid=2&issue=12
http://www.pascospecialty.com/spotlight.php?pid=2&issue=12
Sponsor
Paid Advertisement
Jadnashua
Retired Defense Industry Engineer xxx
Is that a mix of pvc and abs piping? Generally, that is not good. There is a transition cement, but it is not approved for use everywhere, and it is much preferred to pick one type and stay with it. Maybe there should be some more dissassembly and rework done?
Jadnashua
Retired Defense Industry Engineer xxx
Was more worried about the pieces that appear to be black...
Gary Swart
In the Trades
I think Jim is right. They gray stuff is PVC conduit, but the black elbow sure looks like ABS.
Since then I've gotten several other suggestions....
1)
googled and found....
http://www.askme********.com/plumbin...pe-233272.html
2)
do a " Rube Goldberg" which would be to get a Rubber Fernco Fitting that would slide over the existing fitting hub and than just " make" into that new rubber fitting.
3)
got another answer from a buddy...he said use a coarse new hacksaw blade, and remove a small chunk on the top, and on the bottom. Then use a flat screwdriver and hammer, and gently tap remaining pipet out. Said it should take but a couple minutes....
I think I'll try the hand held hacksaw blade method, and if that fails I'll source the bit mentioned earlier.
If you choose to chip it out, I normally make the two cuts about an inch a part, and then use a flat screw driver flat to seperate the pipe from the hub, just work your way around the hub. Or if you have the Ram Bit handy, that works too. hj sometimes mentions putting a hoseclamp around the hub to keep it from breaking out when using the screwdriver method.
Last edited:
If you choose to chip it out, I normally make the two cuts about an inch a part, and then use a flat screw screw driver flat to seperate the pipe from the hub, just work your way around the hub. Or if you have the Ram Bit handy, that works too. hj sometimes mentions putting a hoseclamp around the hub to keep it from breaking out when using the screwdriver method.
Thanks for the hoseclamp tip, it makes a lot of sense. Maybe I should post my entire project on here - this site is certainly a wealth of information.
")
hj
Master Plumber
- Messages
- 33,613
- Reaction score
- 1,057
- Points
- 113
- Location
- Cave Creek, Arizona
- Website
- www.terrylove.com
I heat the tip of a screwdriver and melt a slot in the side of the pipe up to the inside of the fitting. Then I tighten a hose clamp around the fitting's hub. Finally, I use a sharp screwdriver and hammer to "peel" the pipe out, starting at the slot I made.
another question for you guys...
I was showing this photo to a friend of mine and he was saying there is no way I would be able to turn the toilet with fittings from HD. He recommends I cut the stack and replace with new one pointed in the direction of the new toilet. It will be less work etc, just drywall repair .lol..like I don't have enough work already. So before I cut-n-replace, do you guys think it's possible using connections?
Thanks!
Attachments

If you have a 2x10 floor joist, you will have to leave 2" on the bottom and 2" on the top.
You may also want to consider running the line for the toilet below the floor joist and boxing the ceiling.
Id you move the toilet using fittings, it would be a 90 and a 45 to make up the 135 degree of change needed.
Or you can replace the plumbing and come up in the same joist location as the new toilet.
If you have a 2x10 floor joist, you will have to leave 2" on the bottom and 2" on the top.
You may also want to consider running the line for the toilet below the floor joist and boxing the ceiling.
Id you move the toilet using fittings, it would be a 90 and a 45 to make up the 135 degree of change needed.
Or you can replace the plumbing and come up in the same joist location as the new toilet.
Terry boxing in is not an option as my family room (center) is directly below it.
I would source out a 90 and 45 and do a dry run. Let's say I was able to turn it? would the turn restrict flow in anyway?
Thanks!
Last edited:
You can have 135 degree of change.
It's a 3" line for just a few feet before it drops.
I'm more concerned with the integrity of your structure.
You could also open up the wall below and move the pipe in-line with what you have above, "maybe".
You can't notch the bottom of a floor joist. The floor will collapse.
It's a 3" line for just a few feet before it drops.
I'm more concerned with the integrity of your structure.
You could also open up the wall below and move the pipe in-line with what you have above, "maybe".
You can't notch the bottom of a floor joist. The floor will collapse.
You can have 135 degree of change.
It's a 3" line for just a few feet before it drops.
I'm more concerned with the integrity of your structure.
You could also open up the wall below and move the pipe in-line with what you have above, "maybe".
You can't notch the bottom of a floor joist. The floor will collapse.
The house exterior is all brick. As far as the support walls, they're not in the immediate vicinity. Ok, so I won't notch the bottom of the joist, I will do the turns as you suggested. I do believe the joist are thick enough to allow the minimum 2" required. I could move the pipe in-line over (if the turns don't work), but it's a lot of work, since I will have to turn it back left to meet the continuined pipe that leads to a basement which I finished not too long ago.

You can have 135 degree of change.
It's a 3" line for just a few feet before it drops.
I'm more concerned with the integrity of your structure.
You could also open up the wall below and move the pipe in-line with what you have above, "maybe".
You can't notch the bottom of a floor joist. The floor will collapse.
^^^ Going in from below tomorrow, started from on top tonight then said to myself, you know it's much easier to fix drywall than to cut through joist while trying to line things up.
") I'm taking your advice.lol..
I'm taking your advice.lol..finally moved...
bought all different angles so won't have to be running back to the store...
bought all different angles so won't have to be running back to the store...
Attachments


Similar threads
- Replies
- 8
- Views
- 547
- Replies
- 0
- Views
- 629
- Replies
- 0
- Views
- 620
- Replies
- 7
- Views
- 701