You are using an out of date browser. It may not display this or other websites correctly.
You should upgrade or use an alternative browser.
You should upgrade or use an alternative browser.
How to install tee
- Thread starter p-61
- Start date

You need to use a slip coupling and install a short nipple on one side of the T. You cut the pipe slide the t on 1 side and measure the other where the nipple stops and cut the pipe there. Slide the slip coupling all the way on the copper pipe, install the T, slide the coupling 1/2 way up the nipple, aim the T where you want it, and solder it up or continue running your copper and then solder.
Be sure to clean and flux all pipe and fittings to be soldered.
Be sure to clean and flux all pipe and fittings to be soldered.
Sponsor
Paid Advertisement
Jadnashua
Retired Defense Industry Engineer xxx
A slip coupling is basically a straight coupler without the normal stop in the middle that centers the two pieces of pipe. This allows it to slide entirely over the pipe. It's not a bad idea to mark or measure the pipe so that when you slide it back over the cut portion, you've got about 1/2 of it over each cut portion.
There is no rule that says you have to run this straight.
If you buy three 90 els and a tee, you can offset the pipe and add the tee without a slip coupling.
If you buy three 90 els and a tee, you can offset the pipe and add the tee without a slip coupling.

Bob NH
In the Trades
When I see a situation like that I always wonder if it will be possible to get all the water out of the lower pipe and shut it off completely. If there is a trickle of water or the water can't be removed, it will be impossible to solder. If there is NO water from the lower pipe, and the valve above doesn't leak, then the water can be displaced from the lower one and the joint can be soldered.
Bob NH
In the Trades
Just For Copper
I'm looking forward to reading the comments from the pros on this site. I notice that none of the testimonials on the Just for Copper site are from pros.
http://www.justforcopper.com/Products.htm
I'm looking forward to reading the comments from the pros on this site. I notice that none of the testimonials on the Just for Copper site are from pros.
http://www.justforcopper.com/Products.htm
TonyBagadonutz
Electrician
p-61@msn.com said:I thought of using a product called Just For Copper. Have any used it or know anything about it?
I don't know anything about it....BUT...I read their spec sheet ( Technical Specifications )...and to say the least: I am not impressed
Expiration Time:
One year if it is maintained between 18ºC and 24ºC
18ºC = 64.4ºF
24ºC = 75.2ºF
F= (C*1.8)+32
That's not too impressive of a spread - 10.6ºF....and that wall appears to be an exterior wall (pipe to a hose bibb?). Are you certain that area will remain within the parameters indicated? For more than a year?
I *might* consider it a band aid on a second home/rental property - just until I can return with some fittings and a torch.
Bob NH
In the Trades
That temperature range is in the bottle, after opening, before use. After installation the temp is -40 to +250F.
soldering
Just turn the water off and take the pressure off somewhere at a fixture that's low in tour house, like the basement laundry tub.
Shine that pipe with sand cloth.
Cut 3/4" out of the pipe at the point that your putting the tee. If you need to dry out the pipe, use the torch. You can boil the water out of that lower part.
Solder the tee and a short piece of pipe, then solder on a valve.
I think you will find that its not difficult.......
Gary Swart
In the Trades
Not a very fancy solution for water in a short length of pipe like this, but with a short length of tubing you can suck the water out.
Gary Swart
In the Trades
Then this is really simple. The stopless coupler is a simple answer. What is the point of using some "just as good as" product when sweating with a torch is so simple, so sure, and so time proven?
TonyBagadonutz
Electrician
p-61@msn.com said:this is inside of my basement. The part going into the wall is going to the outside faucet.
Is your area prone to freezing?
Add a frost free bibb and the "tee" dilemma becomes a "non-issue".

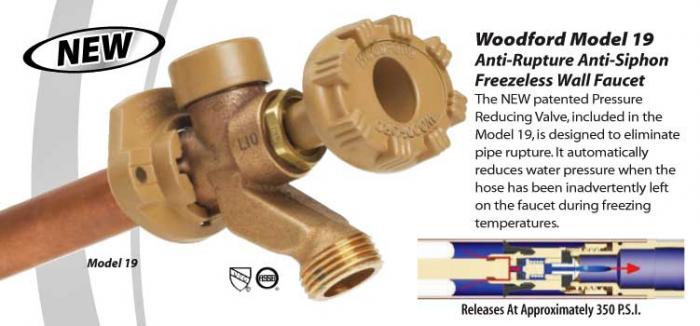
Woodford makes one that is supposed to be burst proof if the hose is left on for a few $$ more. It back feeds into the water line if the pressure exceeds 300 or 350#. The one above does not have / show an anti siphon vacume breaker on it which it should. Like this.
Last edited by a moderator:
Amopower
Member
If you are doing a CPVC slip coupler, how do you apply the cement to the slip coupling? Do you just apply a liberal amount to the area you are gluing to, slide the coupler into position, and hope there's enough glue to make a proper seal inside the coupler?
(and how long do you typically have to wait for the glue to be thoroughly dried before you turn the water on?)
(and how long do you typically have to wait for the glue to be thoroughly dried before you turn the water on?)
Last edited:
Similar threads
- Replies
- 0
- Views
- 292
- Replies
- 0
- Views
- 265
- Replies
- 0
- Views
- 314
- Replies
- 20
- Views
- 2K
- Replies
- 0
- Views
- 467