Replacing shower valve - what steps?

Users who are viewing this thread

Pmayer

Member
Messages
112
Reaction score
0
Points
16
Location
Minnesota
I have started to replace the valve on my shower. I would have preferred to find hardware that utilized the existing valve, because I didn't want to cut a hole in my wall, but the manufacturer of my old shower is out of business, so I have now cut the hole in my wall. First question is this: there is no shutoff going to this fixture, so I will have to turn off water into the entire home, which always puts the pressure on me while my wife and 2 kids wait anxiously for me to finish the project. I am not fast with projects, especially plumbing. Should I install shut-off valves? Or should I avoid putting shut-offs in an area where they will not be seen (behind an access panel)?

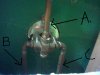
My other questions relate to what the best way to install this would be. The attached picture is my valve, shown from the rear through the new gaping hole in the wall of another bathroom. At this time my plan is to do the following:

1. Cut the pipes at each location marked below and remove old valve.
2. Attach new copper pipe, with appropriate elbows, to new valve
3. use copper connectors to connect to existing pipe

Is this the best approach, or should I heat the connections and remove the old valve that way, and just re-sweat the new valve in? I would think this would yield bad connections.

Also, any general tips would be appreciated. I have sweat a few pipes in the past, but I don't have a lot of experience.

Thanks a lot for any suggestions!

PM
 

Attachments

  • shower valve.jpg
    shower valve.jpg
    40 KB · Views: 18,374

Mikey

Aspiring Old Fart, EE, computer & networking geek
Messages
3,024
Reaction score
17
Points
38
Location
Hansville, Washington
I'm really anxious to hear what somebody who knows what he's doing has to say about this. A lot depends on the new valve -- how it matches up with the old, etc. I'm a big fan of individual shutoffs, so I'd cut somewhere in the supply lines and put shutoffs on them -- exact location depends on the new valve & how much wiggle room you need in the new risers. Then you could turn the water back on and work at your leisure. I don't think the shutoffs have to be visible -- just accessible -- but may be wrong.
 
Last edited:

Jimbo

Plumber
Messages
8,918
Reaction score
18
Points
0
Location
San Diego, CA
Since there is almost zero chance that a new valve would exactly line up with the piping, it is a lot easier to make some cuts to get the old one out. A few extra sweat couplings will not hurt the job. You have lots of room to work, so take your time.

Putting in a shutoff behind a wall to be closed in probably has more negatives than pluses. Don't start this job right before church Sunday morning! Start early Saturday, so that when you come up short a fitting or whatever, there will still be a store open to get it.

If you try to plan this out, and try to have all materials on hand, this is an easy 1/2 day DIY job. If the family would be stressed out by water being off that long, send them to the Mall!

By the way, your water will be OFF while you are appling a flamethrower to the studs!. Get a bucket of water drawn ahead of time, just in case.

If you have any specific questions about the process, prep, etc. please post with us again.
 

Pmayer

Member
Messages
112
Reaction score
0
Points
16
Location
Minnesota
Thanks for the great suggestions guys. I am planning to install an access panel, but hopefully I will never open it. I would be interested in additional thoughts on whether or not to install the shutoffs on the supply lines.

Also, how do I go about draining the line to get water away from my sweat joints? And how far from the joint does the water have to be? On a vertical joint, I suspect that a few inches below the joint would suffice?

Paul
 

Jadnashua

Retired Defense Industry Engineer xxx
Messages
32,770
Reaction score
1,190
Points
113
Location
New England
If the house is more than one story, it is easy (well, usually) to get the water out. The pipes are sort of like capped straws full of water. Once you remove the cap (cutting the pipe or opening a faucet), and you can open a valve below it, the water will flow out. Now, if there are any sags or downward sloped pipes going the wrong way, it will not all come out, but for your vertical pipes, no problem. After the water is shut off, open the lowest valve in the house. This might be a hose bib outside, or maybe the washing machine supply in the basement, or some such.

If you are going to have access, then it might not hurt to install shutoffs. Use 1/4 turn ball valves because they will not degrade like one with a typical stem and washer and they will allow the full amount of water to get past them while open, without restrictions. Once you get the input and a stub connected on the outlet, you can turn the water back on and finish at your leisure.

Note, it may not be necessary, but it wouldn't hurt to turn off the hot water tank while you have the water supply off.
 

Pmayer

Member
Messages
112
Reaction score
0
Points
16
Location
Minnesota
Thanks Josh,

Great advice. It is a 2-story home, and this shower is on second story. A couple more questions:

- Once I get the shut-off valve on, I can turn the water on, even before I sweat the pipe onto the other end of the shut-off valve? I assume this is ok since you said so, but just wanted to be sure. I just don't know how close water can be to the joint that I am sweating before it starts to be a problem.

- I have never sweat pipes in an enclosed area like this before. Can I use my regular old propane torch for doing so, or do I need one with a more focused flame?

- How tricky will it be to get solder all the way around to the back of the joint without being able to directly put a flame on it? I know this is common, but I have never done it before. Everything I have done has been open.

Thanks a bunch guys!:)

Paul
 

Jadnashua

Retired Defense Industry Engineer xxx
Messages
32,770
Reaction score
1,190
Points
113
Location
New England
If you reread what I wrote, I said after you attached the valve and a short stub to the other side. I would say about 4-6" on the outlet side would be enough to insulate the valve from the heat. You might be able to get by with less, but that would be easier.

Regarding soldering...you don't need to get the flame all around the pipe. Remember you want to heat up the fitting. Move the flame around to the parts you can get to, and when you think it is hot enough (check periodically), hold the flame on one side, and see if when you apply solder to the other side it melts. If it does, it will be pulled around the whole connection towards the heat. Dont' set your fiberglass on fire! It won't take a lot of heat to damage it. You might be able to put a piece of plywood or something between the pipe and the shower. You can remove the heat once you see it has flowed all around (and possibly beforehand).

The best thing to do is to buy a couple of extra fittings (and you'll probably have plenty of extra from a 10' piece of pipe) and make a few practice joints. The valves will be the hardest because they are more massive. It will take longer to get it hot enough to melt the solder than say an elbow or a junction.

If you get the fitting too hot, you will burn out all of the flux, and have to take it apart, clean everything up again, and start over.

While it is still hot, take a dry cloth and wipe the joint if you want it to look nicer. This will take off any excess solder and wipe away most of the flux. Make sure the cloth isn't a synthetic that will melt on contact with the hot pipe and fitting.
 

Pmayer

Member
Messages
112
Reaction score
0
Points
16
Location
Minnesota
Thanks for the additional info. I will give it a whirl and let y'all know how it turns out.

I greatly appreciate everyone's input on this.
 

George R

New Member
Messages
87
Reaction score
0
Points
0
Location
Central Illinois
I'll add a few things also, although I'm not a pro. Virtually all of your soldering can be done on the workbench. The only thing you will have to solder in the walls are the couplings. Use slip couplings for the final assembly (ie. no stop in the center of the coupling.)

You can take a bent piece of sheetmetal to protect your tub and your studs from the flame. They also sell an "asbestos" pad in most big box stores. Let us know how it goes.
 

Pmayer

Member
Messages
112
Reaction score
0
Points
16
Location
Minnesota
George,

Thanks for the great suggestion to use the slip coupling. I have never heard of such a thing, but it sounds like the perfect solution to make the final connection perfect.

Cheers,

Paul
 

Jadnashua

Retired Defense Industry Engineer xxx
Messages
32,770
Reaction score
1,190
Points
113
Location
New England
The slip coupling is basically a straight cylinder without the normal center stop. You need to measure where the actual connector needs to be and crimp it very slightly to keep it in place as you solder it. A "normal" connector might not work well if both ends of the assembly are anchored - you wouldn't be able to separate them enough to slide them together.
 

Dennis Spors

New Member
Messages
1
Reaction score
0
Points
0
Old Vavle

I may be interested in the old vavle. Do you have a photo? How old?
I am looking for a mixing vavle from the 18920'3 and 30's probably American Standard.

Contact me at vonspor@aol.com

Dennis Spors
 

Pmayer

Member
Messages
112
Reaction score
0
Points
16
Location
Minnesota
Success!

Guys,

With your guidence I was able to get the old valve out, and get the new valve in, within a few hours. There was just enough drama to remind me that I am not a professional. One of my sweat fittings was not perfect, and I was able to use the opportunity to teach my children a couple new words:mad:. Fortunately I was able to just heat it back up and melt a lot of solder into the joint, and not it is holding just fine.

Your assistance gave me the confidence to tackle this, and saved me $150. Thanks again for all your help. This is an awesome community.

Cheers,

Paul
 

Pmayer

Member
Messages
112
Reaction score
0
Points
16
Location
Minnesota
Dennis Spors said:
I may be interested in the old vavle. Do you have a photo? How old?
I am looking for a mixing vavle from the 18920'3 and 30's probably American Standard.

Contact me at vonspor@aol.com

Dennis Spors

Dennis,

Sorry, the valve is only about 20 years old.
 
Top
Hey, wait a minute.

This is awkward, but...

It looks like you're using an ad blocker. We get it, but (1) terrylove.com can't live without ads, and (2) ad blockers can cause issues with videos and comments. If you'd like to support the site, please allow ads.

If any particular ad is your REASON for blocking ads, please let us know. We might be able to do something about it. Thanks.
I've Disabled AdBlock    No Thanks