Removing Closet Flange Metal Collar

Users who are viewing this thread

JohnC

New Member
Messages
10
Reaction score
0
Points
0
:confused: I am going add either 3/8 or 1/2 ACX plywood and ditra over exisiting 5/8 plywood as I prepare to replace linoleum with 12x12 ceramic tile in an upstairs bathroom. I very much prefer to cut the ACX so it is within 1/4" to 3/8 of the 4" ABS drain pipe. I believe this will give me the best base for a new 3x4 closet flange that I plan to install within the drain pipe so it can be mounted on the top surface of the tile. I am also not fond of the existing plywood around the current closet flange. Its not rotted, but I can tell it has seen water once or twice. The hole around the flange was also cut with a circular saw and there are about 2" long partial cuts into the plywood at the four corners of the drain opening.

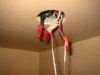
The 4" drain pipe has an external bonded ABS closet flange with metal collar that is screwed onto the existing 5/8 plywood. The metal collar prevents me from cutting the ACX close to the 4" drain pipe. If I can't cut the collar off without damaging the ABS drain pipe, I'm stuck using the existing closet flange which would be about 1 - 1 1/8" below the tile surface when finished.

I would appreciate any advice on the best techniques to cut away the existing metal collar. Its in decent condition (enamel paint is gone with only surface staining and a few miniscule corrosion dimples in one spot). Sturdy tin snips haven't been much help and I wonder if anyone tried a jig saw in this case.

I am also not thin skinned if someone tells me I'm wrong headed and should just mount the existing flange below tile surface. If this is a more sane approach, I'd probably sand off the collar and repaint to stop any early corrosion. I might also probably lay 2 layers of 1/4" ACX down with one forced underneath the exsiting closet flange, and all other areas outside of the flange having 2 layers of 1/4'" ACX. I'd probably also use a fernco waxless seal tube for the toilet rather than trust those ring extenders and a wax ring.

Please help.
 

hj

Master Plumber
Messages
33,603
Reaction score
1,042
Points
113
Location
Cave Creek, Arizona
Website
www.terrylove.com
flange

Cut it with a reciprocating saw, or anything else you have or can borrow. The new flange is going to seal to the inside of the pipe, so any cuts into the ABS, especially into the old flange plastic, will have absolutely no affect on the new flange's integrity.
 

JohnC

New Member
Messages
10
Reaction score
0
Points
0
Thanks much HJ. The metal collar is off and I'm now putting in an extra 1/2" plywood. It was a smidge precarious because the drain piping wanted to bounce as i cut it, and so I had to give it a good grip with one hand while cutting around the inner circumference of the metal collar. All's well though and I really appreciate your advice.
 

JohnC

New Member
Messages
10
Reaction score
0
Points
0
Electrical Question on near finished bathroom

I am just about finished with my bathroom, and I am struggling to replace the light fixture. I am a true novice with electricity, but I thought changing the light wouldn't be too bad until I looked at the wires connected to the existing light.

I very much hope someone could look at the attached photo and explain what are the different wires connected to my existing light. The light is on the same 20 amp circuit as a ventilation fan. A single switch operates both simultaneously. I am not really happy to have just one switch for both, but with my limited electrical skills I would settle just to have a new light operate in the same way.

JohnC
 

Attachments

  • IMG_1019.JPG
    IMG_1019.JPG
    32.5 KB · Views: 1,628
Last edited:

Abikerboy

DIY Senior Member
Messages
202
Reaction score
1
Points
0
Location
VA
JohnC said:
I am just about finished with my bathroom, and I am struggling to replace the light fixture. I am a true novice with electricity, but I thought changing the light wouldn't be too bad until I looked at the wires connected to the existing light.

I very much hope someone could look at the attached photo and explain what are the different wires connected to my existing light. The light is on the same 20 amp circuit as a ventilation fan. A single switch operates both simultaneously. I am not really happy to have just one switch for both, but with my limited electrical skills I would settle just to have a new light operate in the same way.

JohnC

If I am guessing correctly, the two wires hanging down go to your existing light fixture. Ignore the other wires in the box (unless there is a separeate ground, a bare wire), as they pass through to your switch, and in turn, probably to your vent and fan. Remove the existing two wires, connect your light fixture to the same two wires, follow the colors exactly. White to white. Black to black. If you have a seperate ground wire, either green, or uninsulated, connect them together. If there is no seperate ground wire, assuming your home is wired correctly, connect the uninsulated ground from your new fixture solidly to the metal electrical box. If anything is diff guys, let me know, as I am only familiar with virginia codes. Perhaps I should start hanging out in the electrical forum! Lol!
Rob
 

JohnC

New Member
Messages
10
Reaction score
0
Points
0
Much Thanks Rob

As much as I enjoy home projects, I've had too many jolts when doing basic electrical work. I appreciate your quick help.

As you cautioned me, there is no separate ground wire on the house side, so I'll tie off the light fixture ground wire to the junction box - and trying to keep it away from the other wires.

John C
 

Mikey

Aspiring Old Fart, EE, computer & networking geek
Messages
3,024
Reaction score
17
Points
38
Location
Hansville, Washington
I can't tell from your picture whether this is wired with NM (non-metallic sheathed) cable or if there are individual wires in conduit, but the red wire and lack of ground are weakly suggestive of the latter. If that's the case, it might not be difficult to switch the fan and light separately, following Jim's directions (below), and replacing your present single switch with a double (it'll fit in the same box, but the cover plate will look like a duplex receptacle cover plate).
 
Last edited:

Jadnashua

Retired Defense Industry Engineer xxx
Messages
32,770
Reaction score
1,190
Points
113
Location
New England
A red wire (when done correctly) is usually a switched hot. White is the neutral (return) line. So, it appears that power is always available in that box (pass-through) and then goes to the switch, and then back to that box. The three wires in the red bundle are probably: switched hot from the switch, to the lamp, and the other one goes to the fan. If when you take that wire nut off, if you leave out the one black one, the fan probably won't run. To switch it separately, you'd have to run a new wire from the switch back to this point. How easy that is, is hard to tell. Since you already have a constan hot available at the switch location for the lamp, you'd need to branch off on the black side to the second switch, then run the new wire from there back to the black one identified as the hot for the fan in the box in your picture.
 
Top
Hey, wait a minute.

This is awkward, but...

It looks like you're using an ad blocker. We get it, but (1) terrylove.com can't live without ads, and (2) ad blockers can cause issues with videos and comments. If you'd like to support the site, please allow ads.

If any particular ad is your REASON for blocking ads, please let us know. We might be able to do something about it. Thanks.
I've Disabled AdBlock    No Thanks