Desperately need info on Lukx Freestanding Tub Filler

Users who are viewing this thread

closer

New Member
Messages
53
Reaction score
0
Points
0
Location
Ontario
We are in the midst of our reno and have several problems now that we've torn out all the walls etc... naturally happens I suspect when you see what is under the drywall and flooring! Been able to solve most but have come up with a problem with one of our faucets we bought a year ago while we were stockpiling our wish list items.

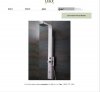
We have opened up our freestanding tub filler only to find there were no instructions for installing it (photo below)... most of the unit looks self explanatory except the way to attach it to the floor... anyone have any ideas as to who makes this unit? The only words on the side are LUKX... it has a solid feel to it, unlike some of the other ones we saw, thus the reason we chose it... unfortunately we bought it from a bath shop (at the same time as our Caml Tomlin Venetian tub over a year ago... alas the bath shop has now moved apparently...

tub_filler.JPG
 

JohnfrWhipple

BATHROOM DESIGN & BUILD
Messages
3,225
Reaction score
102
Points
48
Location
North Vancouver, BC
You best upload pictures of the base rough in. These are typically a bear to install and over the years I have learned a number of tricks for installing them.

Most times a filler like this is designed to be mounted over a large brass rough in. Typically this is embedded into a concrete slab. In wood framed construction you need to get creative and in about one out of five installs the rough in needs to be mounted over the subfloor and some kind of tiled box made to hide it.

You want to install the upper portion at rough in to check that the rough in is true. Any slight change out of level here is tellegraphed larger when the tall finished piece goes in. Get it right most times there is no minor adjustments allowed.
 

closer

New Member
Messages
53
Reaction score
0
Points
0
Location
Ontario
thanks for the quick reply John... right now we are looking at bare studs only... some ply over some areas but not yet where this install will be going... I can take a photo of what they have provided for the "base" if that is of any help?
 

closer

New Member
Messages
53
Reaction score
0
Points
0
Location
Ontario
Why don't you just contact them :)

that's odd... when I tried that site I didn't get all that... been looking for the contact info and coming up with nothing like what you just provided... so, many many thanks... might have been cuz I searched while on a mobile device... dunno! thanks again.
 

closer

New Member
Messages
53
Reaction score
0
Points
0
Location
Ontario
in the meantime here is what they provided for the base assembly... the three posts look like expansion sheathes over the bolt with two washers and a nut... and I thought maybe the expansion sheathe would slip through the tripod looking base assembly then expand (like a drywall hanger) but they don't fit through the tripod base so that can't be it,
lukx base.jpg
 

closer

New Member
Messages
53
Reaction score
0
Points
0
Location
Ontario
Those are "drop in concrete anchors". IF you have a wood floor, you need "lag screws" to anchor it, with backing under the floor.
thanks HJ... I've got an email in to the company... and a call on their answering machine... and am patiently waiting for a response... I suspect I can block up under this unit with joists blocks... would 2x6's be sufficient and then as John says "You want to install the upper portion at rough in to check that the rough in is true. Any slight change out of level here is tellegraphed larger when the tall finished piece goes in." or it will end up looking like the Leaning Tower of Pisa at tub top level... guess I'll be using my iPhone level App to make sure I get readings of dead-nuts level before proceeding...
anyone have a photo of what the sturdiest block would be for the under support?
 

closer

New Member
Messages
53
Reaction score
0
Points
0
Location
Ontario
Thanks HJ...
It's actually turning out to be a rally tight fit through the bottom of the post for the flexible piping supplied but with a couple of extension pipes it should turn out ok. I'm going to have to install all the new pipes and then secure the supplied pipes to these new supply pipes before taking on the tiling ... Then instal this bracket with your recommended lag bolts through both the tile, the ply and into the blocking.
Thanks again
Dan
 

closer

New Member
Messages
53
Reaction score
0
Points
0
Location
Ontario
Just a thought HJ... Should I install the bracket assembly before tiling? Will this be more secure, with less chance of breaking any tiles when tightening the bolts? The faucet base is about 5" square and would be more than large enough to cover the opening and can be slid to any level up the post... The post itself is screwed to the bracket.
 

closer

New Member
Messages
53
Reaction score
0
Points
0
Location
Ontario
probably a good idea as in hindsight (or could have been) bolting the bracket to the floor would take off ¾" of clearance for the spout at the top… and that could be crucial… it will mean however some careful drilling through tiles again…

btw… we have contacted LUKX several times and still have not received an installation manual or sheet from them… not impressed. The company we purchased it from has also said they are contacting them, but as they are both at the same address and we haven't heard back from them either and we are not holding our breath…

so, sorry about so many questions here for what probably seems like a simple task, but you guys have always been the best!:)
 
Top
Hey, wait a minute.

This is awkward, but...

It looks like you're using an ad blocker. We get it, but (1) terrylove.com can't live without ads, and (2) ad blockers can cause issues with videos and comments. If you'd like to support the site, please allow ads.

If any particular ad is your REASON for blocking ads, please let us know. We might be able to do something about it. Thanks.
I've Disabled AdBlock    No Thanks