New Vespin II Install and Troubleshooting

Users who are viewing this thread

tb151

New Member
Messages
4
Reaction score
0
Points
0
Location
Windham, NH
Hi everyone, I have been reading this forum since I was completely sold on a Toto when actually just shopping for a Vanity. I had asked for a Vanity with storage underneath where I can put my plunger, and the saleswoman said oh, sir, you simply have the wrong toilet.

My wife and I re-did our half bathroom downstairs and I took the "plunge" ;) and installed the toilet myself. Keep in mind this is my first toilet install ever, first tiling job, first time cutting and installing molding etc etc. As far as the ToTo is concerned, it was a breeze!

The adapter being attached:

vespin-pb-02.jpg


The next day I went to install another piece of baseboard molding and saw a big crack, that was lots of fun. I took it back and got a new one that day.

vespin-pb-03.jpg


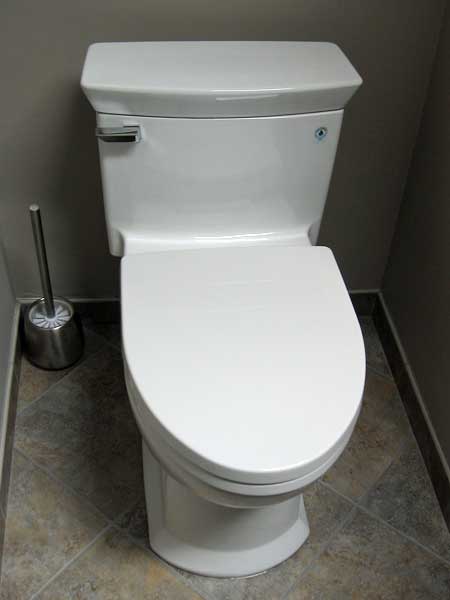
Here are some semi finished pics of the final product. We still have to paint the wall molding, install the bathroom hardware and this pic also doesn't show the new Levelor Shade we put in. We were really happy with the outcome since we did every single thing ourselves, with no prior experience.

vespin-pb-04.jpg


TroubleShooting:

So I also wanted to add in that i had to figure out the answer to another problem which I hadn't seen on here yet. I'm sure I just missed it. We have been in a major heatwave and have been running sprinklers more than usual to try and save some new grass. We ran the well pretty low and as a result we pulled in some sediment. The ToTo started running and I couldn't figure out why. We have the Cyclone fill valve and I hadn't seen a lot written about it. I finally stumbled upon this link http://www.bayplumbingsupply.com/images/documents/voretolavallefillvalveinstructions-rev06-1.pdf
which showed me how to service it. I took off the supply line and pulled out the filter. Wouldn't you know, out was totally clogged up. I rinsed it out and scrubbed it lightly with a tooth brush, then re-installed. Everything works perfectly now!

Thanks everyone and I hope this was helpful
 
Last edited by a moderator:

SteveW

DIY Senior Member
Messages
1,282
Reaction score
22
Points
38
Location
Omaha, NE
Congratulations on a fine job! Looks great.
Thanks for passing on the fill valve info as well - I downloaded it as a PDF for future reference as I hadn't seen it before.
 

tb151

New Member
Messages
4
Reaction score
0
Points
0
Location
Windham, NH
Thanks! It might also be worth mentioning that I purchased the toilet Online. I didn't open the boxes for about 30 days since I wasn't ready to install it. The tank they delivered was completely shattered and they refused to do anything about it. Because of that I went to a local store which I found, and bought it there. That's the tank that was cracked in the pics above and had to be returned. Out of the blue I got an email from the online seller saying that they decided to ship me a new tank and it was already on it's way. So now I have an additional new tank! I guess I will have to buy the bowl and change out another toilet in the house!
 
Last edited by a moderator:

SteveW

DIY Senior Member
Messages
1,282
Reaction score
22
Points
38
Location
Omaha, NE
Glad that worked out. Terry and others on this site have commented on how they don't recommend buying shipped toilets since it is so easy for them to get broken in transit.

FYI - in addition to all the other benefits of your new Toto toilet (like good flushing, freedom from clogs, etc.), the UniFit system that yours comes with has another nice advantage. If you ever need to pull the toilet (say, to repaint behind it), you just unbolt and lift up. No messy wax rings to deal with.
 

Gary Swart

In the Trades
Messages
8,101
Reaction score
84
Points
48
Location
Yakima, WA
Just a couple of days ago, some one posted that they were quoted $600 to install a Toto with a Unifit adapter! I don't know if the plumber was just trying to avoid messing with something he had no experience with and couldn't follow instructions, or if he was just interested in new construction, but whatever the reason, this experience shows that it really isn't that hard. Maybe a bit more than the standard install, but not that much more. Anytime you buy something mail order, on line or catalog, you should always inspect the product immediately upon receipt. Make sure it's not broken and that it is what you ordered. Nice job on the install!
 

tb151

New Member
Messages
4
Reaction score
0
Points
0
Location
Windham, NH
Steve, you're totally right about removing the toilet being a benefit. You should have seen the various colors I could see on the wall after removing the old one and our house is only 10 years old!

Gary, lesson learned on that one, the hard way. Everything gets opened asap from now on. $600 for an install is absurd and that kind of gouging / persuasion techniques by contractors is why I'm taking the time to learn all of this stuff myself. The unfit adapter was awesome to install. The only nerve wracking thing was using a diamond bit to drill into the new Travertine I had just laid. I had nightmares about cracking it but as long as you keep the bit a little wet, it's easy. I've also heard horror stories about wax rings in general and this adapter makes it all absurdly easy. It couldn't have taken me more than 2 hours to install, and that was measuring, getting my nerves up, and reading instructions at least 3 times over to make sure it was done right. I even used the plastic door shims everyone mentioned on here to get it sitting perfectly, they worked like a charm!

David, thanks for the kind words! It's amazing what can be learned via youtube and good forums like this.
 

WJcandee

Wise One
Messages
3,181
Reaction score
170
Points
63
Location
New York, NY
Your project really looks NICE! Congratulations!!

I hadn't seen that piece from Toto, which is well-done, so thanks for that!

Speaking of youtube, Korky, which makes the Type B valve, has a video on how to service their valve. In addition to cleaning, it also covers replacing the diaphragm cap with the Korky R528 replacement kit, which only costs a couple of bucks. The video is on youtube here:

 
Last edited by a moderator:

Jadnashua

Retired Defense Industry Engineer xxx
Messages
32,770
Reaction score
1,190
Points
113
Location
New England
FWIW, if I had to guess, I'd guess the average plumber does not carry a diamond bit to drill tile, thus their reluctance to touch the Unifit adapter. With the right tools, it may only add 15-minutes to the entire job...without them, maybe hours of frustration! Some tile is REALLY hard, and the diamond bit is required; some, you can drill easily with a carbide bit - even a glass bit might work on some, but using the wrong one can be very frustrating and time-consuming.
 

waterpony

New Member
Messages
1
Reaction score
0
Points
0
Location
Colorado
Really nice job tb151!

As for the drilling, I have found (somewhere on this forum I believe) a great tip: make a little circle out of the plumber's putty, put it around the place you need to drill, popur some water in it and drill away. I just installed new Toto Soiree in my master bathroom using this tip while drilling into the tiile - I started at 45 degrees angle and gradually straightened the drill bit. Very easy install overall. I did it all by myself and I am a woman :)

doan_soiree.jpg
 
Last edited by a moderator:
Top
Hey, wait a minute.

This is awkward, but...

It looks like you're using an ad blocker. We get it, but (1) terrylove.com can't live without ads, and (2) ad blockers can cause issues with videos and comments. If you'd like to support the site, please allow ads.

If any particular ad is your REASON for blocking ads, please let us know. We might be able to do something about it. Thanks.
I've Disabled AdBlock    No Thanks