Hole in Galvanized waste pipe :(

Users who are viewing this thread

K9mlxj

Member
Messages
151
Reaction score
0
Points
16
Location
Bay Area CA
I had a slow water problem today in the shower. I put in some drain cleaner.

Afterward, I discovered a hole on a short galvnized pipe joining two CI pipe joints. :(

Hole in pipe - Close View:

galavinzed pipe hole.jpg


Another view (from the other side):

galvanized hole - large view.jpg


(1) From shower drain

*(2) Hole in the short galvanized pipe

(3) Connects to roof surface

The pipe going upward is one that goes up and thru' an opening in the roof.


(4) From Tub drain

(5) Goes down to main drain pipe


Is that going to be major repair? What other pipes need to be changed out to make room to replace this galvanized pipe?


The drain cleaner states it's safe on pipes. Looks like it's not. :(


*BTW, does the rusty (reddish brown) exterior-look of the CI pipe indicate any condition of the pipe that needs to be replaced?


Also, what'd be an alternative safe way to remove hard water mineral buildup along CI drain pipes?


Thx much for help... .
 
Last edited:

Gary Swart

In the Trades
Messages
8,101
Reaction score
84
Points
48
Location
Yakima, WA
Chemical drain cleaner should never be used, they are hard on pipes. Unless you have be treating your drains with the caustic cleaner frequently for a long period of time, I doubt if that is the cause of the problem, but it is a bad practice. As I look at you pictures, it looks to me like you would be time and money ahead to give this over to a professional. The number of joints make this a pretty complex job for DIY.
 

K9mlxj

Member
Messages
151
Reaction score
0
Points
16
Location
Bay Area CA
Perhaps it's time to replace some old pipes... . It's 55 years pipes.

Just want to get an idea what would be involved (which pipes to work on/disconnect), even though I might end up getting a good plumber on this one,

so would know which is a good plumber I can trust to get this fixed, as this one seems important--definitely want it fixed well.


The main thing seems to be

- to disconnect the rusted galvanized pipe from the upper joint that connects one pipe that goes to the roof
- to disconnect the rusted galvanized pipe from the lower joint that goes to the main drain

- need to disconnect any other pipes...?

Not fun at all... .


BTW, is there any other pipe that's better than galvanized that'd work w/ CI pipes? Galvanized seems to rust out always (even though it takes a while for that to happen)... .

Also,

** would the plumber attempt to replace some of the pipes to plastic? What would you folks do?

What would be best option as you see now for this?
 
Last edited:

hj

Master Plumber
Messages
33,603
Reaction score
1,042
Points
113
Location
Cave Creek, Arizona
Website
www.terrylove.com
That pipe nipple rusted from the outside in, NOT because of the drain cleaner. It was a "close" nipple which has just threads exposed and since they are bare steel they will rust on the OUTSIDE when exposed to water. But if it were a galvanized nipple the inside would not have, so this could have been a "black" nipple with rusts on the inside and outside. There is NO easy way to do this repair. It will require that alot of the piping be removed and replaced. In fact, if I am extrapolating proper, the lower fitting goes to a trap which is installed in such a way that it created an "S" trap which would also need revision.
 

Cacher_Chick

Test, Don't Guess!
Messages
5,458
Reaction score
213
Points
63
Location
Land of Cheese
The vertical runs always tend to last longer than the horizontal, so I have to agree with HJ.
No easy fix there. Many would cut it all out and start over with PVC or ABS.
 

K9mlxj

Member
Messages
151
Reaction score
0
Points
16
Location
Bay Area CA
Thx much for explaining, it's really helpful.


Two questions I have:

- so, it'd be just natural 'aging' that nipple rusts out? I just wonder what caused the nipple to rust out like this.

- if a plumber would possibly come and replace all the sections in that area w/ plastic,

I wonder about the long galvanized piece that goes to the roof -- would that also be changed out to plastic, or it can stay and be connected to a plastic joint.

* I wonder if that long galvanized piece going up to the roof would be too heavy for any plastic joint below -- and so needs to be changed out to plastic also.


That means all the pipes that branches out from the main drain pipe on that section above galvanized nipple (5) (see 2nd pic in post #1) would be changed out to plastic, and transitioned w/ a Fernco?


Thx much for help... .


PS: I have updated the 2nd picture to add a line for the tub drain from the right (4) in my #1 post.
 
Last edited:

LLigetfa

DIYer, not in the trades
Messages
7,507
Reaction score
581
Points
113
Location
NW Ontario, Canada
Frankly, I would just clean up the rust on it, nead up some epoxy putty, and then follow it up with a Fernco that I slitted to fit over the works. The fix would probably last longer than the rest of the plumbing.
 

Cacher_Chick

Test, Don't Guess!
Messages
5,458
Reaction score
213
Points
63
Location
Land of Cheese
The stack can be supported from above with riser clamps, though it would be necessary to open up the wall to do it.

Though your crawlspace is nicer than many I have seen, if I were going to do it I would replace whatever necessary to make sure I would never have to crawl in there again.
 

K9mlxj

Member
Messages
151
Reaction score
0
Points
16
Location
Bay Area CA
The epoxy perhaps functions well as a patch and would last for a good while.


For the option of replacing pipes (with plastic),

The stack can be supported from above with riser clamps, though it would be necessary to open up the wall to do it.


* I wonder if normally for such a long steel pipe in the wall up thru' the roof, is there normally already a riser clamp or similar installed to hold the pipe to the closest support (like a stud/support piece) -- inside the wall?


** Trying to see if I can avoid tear-up of the wall... .

Or I can't really make that assumption -- and the wall needs to be opened up to examine?


** And then, the transition location from plastic to the steel pipe from the crawl space --

would that be at (3) (see 1st picture)?

* That seems to be a very tight spot... . Anyone would have an idea how to do the transition -- right there, or a position further up (that'd be in the wall above...?)


As after looking @ this in detail, it seems taking care of connecting to the vertical steel pipe would be the only part of the work that'd require opening up the wall (more tear-up) and perhaps a bit tricky transition.


The rest of the work would mainly be replacing the two branches above (5) (see 2nd picture):

- to the tub drain (to the right) and
- to the shower drain (further away).

- make the transition at (5) back to the main drain pipe


which seem to me they're doable?


I've done some sprinkler work before and replaced a tub drain w/ plastic. So this is mainly using the large pipe sizes, and solvent weld them together. Mainly need to have accurate positioning/length/sloping(?)/measurement... .


I've been down at the crawl space a dozen times recently (doing the tub drain). I've laid plastic sheets over the dirt around that area already. So putting out more plastic sheets would make the job easier... .
 
Last edited:

hj

Master Plumber
Messages
33,603
Reaction score
1,042
Points
113
Location
Cave Creek, Arizona
Website
www.terrylove.com
Yep, it is an "S" trap, and the elbow that turns down is NOT the correct one either. The pipe going to the roof should be supported by "branch vents" connecting to it. As far as how much has to be changed, that would depend on what is found when it is taken apart. Usually, everything would be done in the crawl space, without opening the walls, but you CANNOT just duplicate what you have now since it was done incorrectly by the first installers.
 

K9mlxj

Member
Messages
151
Reaction score
0
Points
16
Location
Bay Area CA
See the pipes from this different angle. Perhaps this helps a bit more:

pipe hole - angle 2.jpg

I realize now that there're two vent pipes going up.


1 + 2: from tub drain
V1 : vent for this trap

3 + 4: from shower drain
V2: vent for this trap

Red dot: hole in nipple

Now would the trap from the tub drain (1 + 2) still have the problem you described? If so which would be the right way to do it?

Should there be completely 2 separate branches from the main pipe? And then 2 branch vents from each independent branch?

* Can V1 be not removed to fix the hole along V2? Or both need to be removed?


Pls explain--really want to know if/what's wrong here (and how to fix this--specifics),

so if I do need to hire someone that person is not going to repeat the same wrong install... .


Thx... .
 
Last edited:

Terry

The Plumbing Wizard
Staff member
Messages
29,942
Reaction score
3,459
Points
113
Location
Bothell, Washington
Website
terrylove.com
I also see two vents there.

You may want to cut the vents above the fittings, use two more proflex couplings and work your way down with new pipe.
The shower can now be run with 2" pipe and where the two join together, you should have 2" pipe.

If you look farther downstream, there "should" be a 2" hub fitting. I would look first and locate it though. You don't want to increase the pipe size if you can't fit it into the larger size.
 

K9mlxj

Member
Messages
151
Reaction score
0
Points
16
Location
Bay Area CA
This really helps a lot. Now I know I can start from the 2 vents w/ 2 proflex couplings and go downward from there.


Want to know--Are the existing flows for the 2 (shower and tub) drains to the branch both ok now -- that I can duplicate?

* Or there is still a concern of an S trap that I need to correct (is that from the tub drain?).


One thing specific that I want to know -- the current shower drain (see the blue female drain hub on the far left) it's female threaded so to connect to the galvanized pipe.


If I change out the pipes to plastic I'd need to

- First un-thread the galvanized pipe from the female threaded shower drain hub
-- is that possible, or it was like glued (solvent welded) and can not be un-threaded as that'd damage the shower drain?

- If ok to un-thread, place a male adapter at the new plastic pipe end and thread that into the shower drain bottom. And use teflon tape?

Would teflon tape be a good enough seal to prevent any water leak? Or there's a better way to seal well (solvent weld--permanent?)


OR
- possibly remove that female threaded drain? Or that's not a good idea, as it'd be damaging the shower tile floor (it's a tile shower floor w/ hot mop when installed)


Thx much for all the help.
 
Last edited:

Terry

The Plumbing Wizard
Staff member
Messages
29,942
Reaction score
3,459
Points
113
Location
Bothell, Washington
Website
terrylove.com
I would saw the pipe above the threads.
You can't thread a fitting near a floor joist like that.

You can keep the same configeration that you have, or if you use just one of the vents, then a fixture cross.
The fixture cross would need to be a 2"
If it were me, I would do it like it was, but upsize as you go downstream from the tees.
The shower tee would be 2x1.5x2 and the tub would be 2x1.5x1.5
 

K9mlxj

Member
Messages
151
Reaction score
0
Points
16
Location
Bay Area CA
Thx so much Terry -- really appreciate the info. I'm not a pro, so sometimes unless folks spell out the specifics, I'm still in the 'cloud'... .


Two more and I think I'm all clear and ready to dive in... :

Shower Drain (Up-close view) -> galvanized pipe (to P-trap)
Shower Drain.JPG

I was referring to this connection a bit ago. So to put in new plastic pipe to connect to the shower drain, I can just unthread the vertical galvanized pipe to remove from the blue shower drain (should be no problem -- won't cause any problem to the tile floor around the top of the shower drain )?

Up size to 2" w/ new plastics:

It'd still be 1.5" first -- to thread to the shower drain, and then expand/upside to 2" pipe and going down to a new 2" diameter P-trap?

Or have I completely missed anything?


Connecting back to branch in main:
branch.jpg

It looks to me this galvanized piece is 1.5". Wonder if there is an adapter inside the 2" CI hup?


So, to get that ready for the upsized 2" plastic pipe coming down, would I

- remove the 1.5" galvanized pipe (unthread it--should be able to do that?)
- remove the 1.5"->2" adapter inside the CI hub?

-- but I wonder how to remove it?


Or do I miss something?


Thx so much for all the help... .
 
Last edited:

K9mlxj

Member
Messages
151
Reaction score
0
Points
16
Location
Bay Area CA
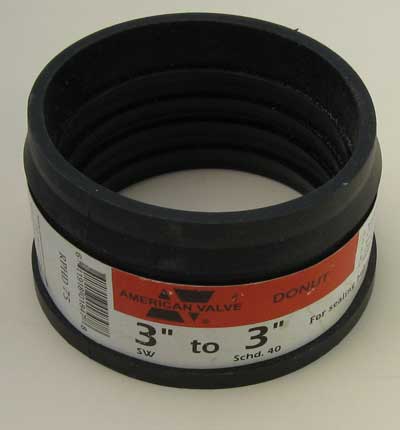
This is definitely new to me -- the first time I see a donut like this. :)


Would I need to cut out the galvanized pipe flush to the CI hub first -- so it'd be easier to chisel out the lead around that pipe in the CI hub? Or just start drilling small holes on the lead around and the galvanized pipe would be loosened up?


So, I insert the donut over the new upsized 2" plastic pip end, and --

do I insert the other end of the donut into the CI hub ( not over)?


Would I need some kind of lubricant (between the donut and the pipe?)--and what'd be a good choice (like silicone grease)?


I wonder if a donut would work better (more reliable seal), or a flex seal that goes over both ends would work better (seal)?


--

Forgot to ask about sloping --

Is there code requiring some kind of sloping for the 2 horizontal drain lines after the p-traps from the tub/shower (and what'd it be -- like 1/4" slope per foot)? Or slope is only required for waste drains?


---

You didn't say anything about the steps I mentioned for the galvanized pipe below the shower drain changing out to plastics and upsizing to 2" going downward -- I assume that meant those steps I thought of would work ok then?


Thx again... .
 
Last edited:

plafrance

New Member
Messages
3
Reaction score
0
Points
0
Location
Avondale Pa
You have 2" cast iron pipe. I wouldn't try removing nipple from shower drain unless you apply heat to blue flange first. A torch would be needed to get it hot enough to be effective.
Also it could be used to melt the lead out of the bell on the cast iron Y. 2nd option would be to fernco the two galv. nipples.

Pete
 

Jadnashua

Retired Defense Industry Engineer xxx
Messages
32,770
Reaction score
1,190
Points
113
Location
New England
Depending on the access, it's easier to leave the pipe in there so you have a long lever to help you pull the thing out once the lead is compromised. On a horizontal leaded connection, you can use a torch to melt the lead out, but you can't easily do that on a vertical one.

There isn't an exact standard on the 'cup' or bell of the cast iron, so they make a bunch of those donuts with slightly different size OD. It needs to be tight enough to seal without leaking, but loose enough to install. A little plumber's grease or dishwashing soap might help geting it together.
 
Last edited:

Cacher_Chick

Test, Don't Guess!
Messages
5,458
Reaction score
213
Points
63
Location
Land of Cheese
I wouldn't start cranking on that pipe coming out of the shower drain, as you risk damaging the shower pan. That would be a very costly and time-consuming mistake. If it did not come loose very easily (and I wouldn't expect it to), I would cut the pipe, leaving enough of a stub there to install another shielded coupling to connect the trap.

And you cannot install a coupling over the cast iron bell. You will need to clean out the inside of the bell and install the proper donut into it.
 
Top
Hey, wait a minute.

This is awkward, but...

It looks like you're using an ad blocker. We get it, but (1) terrylove.com can't live without ads, and (2) ad blockers can cause issues with videos and comments. If you'd like to support the site, please allow ads.

If any particular ad is your REASON for blocking ads, please let us know. We might be able to do something about it. Thanks.
I've Disabled AdBlock    No Thanks