My drain is rotted.

Users who are viewing this thread

Pmaru77

Member
Messages
73
Reaction score
2
Points
8
Location
California
toilet_seal.jpg


What is the protocal for dealing with this. There is no access to the underside unless I demo the upstairs floor.
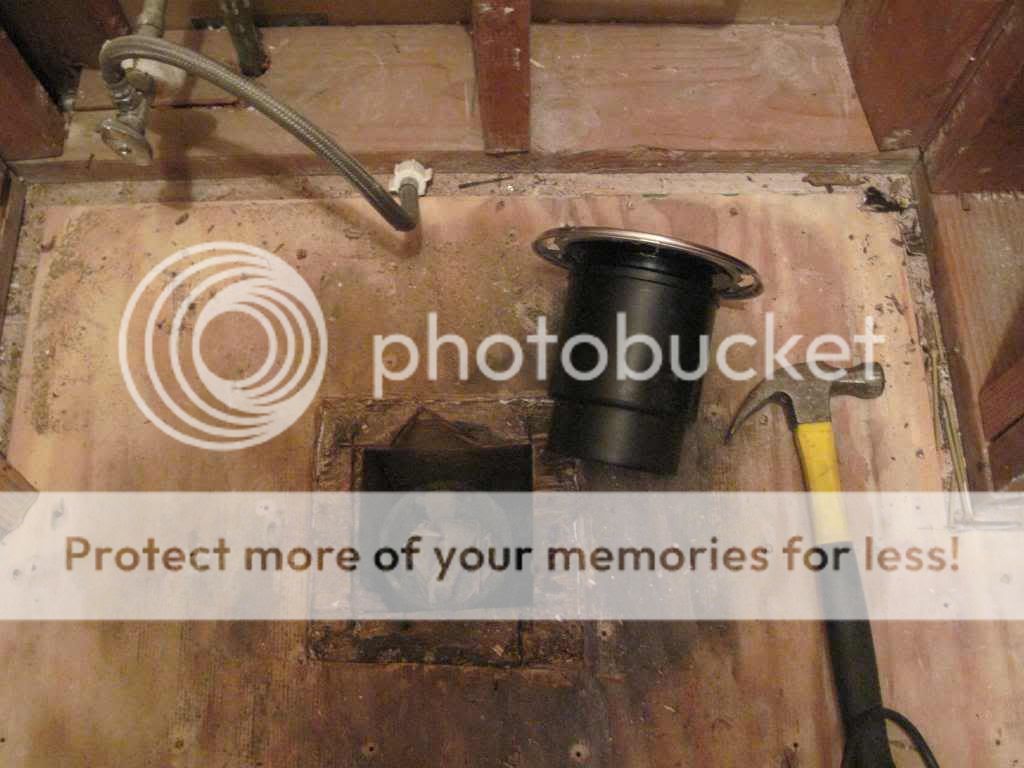
The metal part of the drain is partially rusted out....and there is no more hold-down for one side of the toilet.

Forget to mention, there was Hardy board and tile that I removed for a remodel of my bathroom. The innerds of the drain look ok but one of the anchors is rotted out as you can see in the photo.
My approach would be to clean out all the s loose stuff and epoxy on something....unless there is a better way besides ripping apart the floor.​
 
Last edited by a moderator:

JohnjH2o1

Plumbing Contractor for 49 years
Messages
1,188
Reaction score
13
Points
38
Location
Florida
You need to replace the flange but you didn't say what type pipe you have. Can't tell from the photo.

John
 

Pmaru77

Member
Messages
73
Reaction score
2
Points
8
Location
California
This is a second floor bathroom where all drainage piping is black ABS. I do have plumbers coming over to do some copper work that I choose not to do.
The slot (one of them) that holds the toilet down is rotted. By inspection, it can be verified I believe that the drain itself is ok. If the drain part is ok, there is no reason why the slot can be re-created with a resin or epoxy. In short, if the drain itself is in tact, the ring should be able to be reinforced. No?
 

JohnjH2o1

Plumbing Contractor for 49 years
Messages
1,188
Reaction score
13
Points
38
Location
Florida
The proper protocal is to replace the flange. We are trying to help but if you insist on doing a patch job then that is up to you. We are giving you advice on the way to make the proper repair. I don't think you would be to happy if a plumber used some sort of resin to make the repair and then stated he would not guarantee the job.

John
 
Last edited by a moderator:

Pmaru77

Member
Messages
73
Reaction score
2
Points
8
Location
California
Now that the protocal is to replace the flange, what is the process of doing this? And I have no plans on doing this myself once it gets this involved, because I need the energy to remodel the bathroom. My plumber is coming out tonight to do the copper work, and I'm curious on what his approach to the drain will be. What can I expect?
 

JohnjH2o1

Plumbing Contractor for 49 years
Messages
1,188
Reaction score
13
Points
38
Location
Florida
If there is enough pipe below the flange then a inside cutter would be used to cut the pipe install a coupling and a new flange.

John
 

Pmaru77

Member
Messages
73
Reaction score
2
Points
8
Location
California
If there is enough pipe below the flange then a inside cutter would be used to cut the pipe install a coupling and a new flange.

John

There is visibility through the shower drain, as there is a 1 ft x 1 ft hole at the shower drain. I think with a mirror and lighting we may be able to see over there. There ya go....an inside pipe cutter and the thing pops right out. That's the positive answer and attitude I was hoping for Thanks......You know....we were looking up from below last month fixing the leak. Toilets don't have a exterior trap because the trap is in the toilet. So iI think ther is a nice long run underneath.
 

Jadnashua

Retired Defense Industry Engineer xxx
Messages
32,770
Reaction score
1,190
Points
113
Location
New England
They make repair flange rings that would restore the ability to use the hold-down bolts. The better choice is to replace the flange. The proper location of the flange is to have the new one installed on top of the finished floor and anchored through it to the subflooring.

So, there are at least a couple of ways to resolve this. Another choice is to carefully cut off the steel ring and use a new SS hinged one. It clamps into a groove to hold the plastic part of the existing flange after removal of the metal part. Once you screw it down, it stays locked around the groove in the existing plastic.

It all depends on how much height you have as to whether it's easy to cut off enough to install a coupler, a section of straight pipe and the new flange. Often, there's an elbow under there and there's not enough room unless you cut off the elbow as well.
 

Gary Swart

In the Trades
Messages
8,101
Reaction score
84
Points
48
Location
Yakima, WA
Well pmaru77, I don't know what kind of forum you thought this was, but it is a DIY forum. It's purpose is to offer advice and tips to DIYers who have plumbing jobs or problems. There are a number professional, highly experienced plumbers that regularly comment as well as many of us that are DLYers with a certain amount of experience in some areas.
 

Pmaru77

Member
Messages
73
Reaction score
2
Points
8
Location
California
Looks like it's no big deal at all, and it seemed like,,,call a plumber, call a plumber.

Gezzz.......I got a friggin' plumber, and now I will hear his take......with knowledge of the situation, thanks to some of you.;)

If I had known that it did not involve chopping wood right off the bat we'de all be frinds.

I've got my hands full finishing off the remodel, if a plumber can whack this off with me doing other things then great, or I'll end up doing it myself.

Some day when I have a lot of time, I may just take the patience to learn how to sweat an nice copper fitting.......:eek: or maybe not.
 

Pmaru77

Member
Messages
73
Reaction score
2
Points
8
Location
California
Update:

I cut out the old flange, and it turns out that the piping (ABS) is 4 inch. There is marginal room to fit a coupling over the cut pipe because there is a joist right next to it. I picked up some parts to see if they would fit/work.

flange1.jpg


It is a reducer pipe of sorts that fits into the 4 inch pipe and accepts a 4 inch flange. the height looks right without too much hacking and is less parts than trying to squeeze in a outside coupling.

flange11.jpg


The reducer pipe will have some restriction because it is stepped on the inside. Is this an acceptable method or not? Should I make the outside coupling fit and eliminate the restriction?
 

Gary Swart

In the Trades
Messages
8,101
Reaction score
84
Points
48
Location
Yakima, WA
I hope you are just trying the flange for fit and that you do know the flange is supposed to set on top of the finished floor. With a 4" pipe, you can use the inside fitting flange. Should not do that on a 3" because it does restrict the flow too much. Nice flange.
 

Jadnashua

Retired Defense Industry Engineer xxx
Messages
32,770
Reaction score
1,190
Points
113
Location
New England
You can buy flanges that will fit inside a 4" pipe, or you can buy one that entirely slides down the outside of the pipe. The second would be maybe the easiest, as you could leave the pipe long, when the floor was finished, you slide the new flange down on the pipe (make sure to leave enough room around the pipe and, don't forget the cement!), then, you cut off the excess pipe sticking out of the middle...you'd also want to screw the flange down through the finished floor (leave slots where the holes would go so you don't have to drill through the tile) into the subflooring.
 

Pmaru77

Member
Messages
73
Reaction score
2
Points
8
Location
California
What? You don't like my finished floor.....au-natural...with stains included?
Naww.....that's a quick dry fit. It is sitting up about a 1/2 to 1 inch above the sub-floor. It is a 4" pipe, when I saw the size of the 4" coupling....holy mackeral.....it's huge. This is when I started digging into the fittings to see if there was an alternative. That is when I found the reducer in the picture. It fits into the 4" pipe and then the 4"flange slides into the other end ....perfect. If I were to use a regular 4" coupling, I'd have to cut the pipe again with the inside pipe cutter(HDepot has 'em) and then grind off some material off the 4" coupling to get it to fit up to the joist.


I hope you are just trying the flange for fit and that you do know the flange is supposed to set on top of the finished floor. With a 4" pipe, you can use the inside fitting flange. Should not do that on a 3" because it does restrict the flow too much. Nice flange.
 

Gary Swart

In the Trades
Messages
8,101
Reaction score
84
Points
48
Location
Yakima, WA
I thought it was just a trial fitting, but you'd be amazed at how many times people set their flanges on top of the subfloor and then wonder how to fix the problem. It looks like you're on the right track. As others noted, a couple of acceptable ways to make the connection. Another oft made mistake is trying to dry fit ABS and/or PVC. Again, you may already be aware of that, but just in case. This is a time for measure and glue each piece as you go.
 

Pmaru77

Member
Messages
73
Reaction score
2
Points
8
Location
California
I've been down the "forgot the glue" thing before. S**t happens, but as you know, there is no going back on this one, it's got to be right the first time. I don't want to use the inside pipe cutter again if possible....though probably easier the next time around. I hope I'm ok ...as I assume all the black stuff is ABS. Thanks for the input everyone.


I thought it was just a trial fitting, but you'd be amazed at how many times people set their flanges on top of the subfloor and then wonder how to fix the problem. It looks like you're on the right track. As others noted, a couple of acceptable ways to make the connection. Another oft made mistake is trying to dry fit ABS and/or PVC. Again, you may already be aware of that, but just in case. This is a time for measure and glue each piece as you go.
 

Gary Swart

In the Trades
Messages
8,101
Reaction score
84
Points
48
Location
Yakima, WA
What I was referring to is that plastic pipes have what they call an interference fit. Basically, this means you can not bottom pipe into the fitting when it is dry. When the glue is applied, the pieces slip together just fine, but there is a length difference of something like 1/4" per joint. So if a pipes are cut on the basics of the dry fit, at the elbows and/or end of the line, you will be off by 1/4" per joint. You have to measure before each cut allowing for the inside of the fitting on both ends. Again, this may well be old hat for you, but it is a common mistake. I find the surest way to fit pipes together is to start at the outlet end, glue the fitting on the existing pipe, and work forward one fitting at a time, cutting the pipe as I go to exact length.
 

Pmaru77

Member
Messages
73
Reaction score
2
Points
8
Location
California
I've been down that road also. It's hard enuf to pull the parts apart after a dry loose fit, let alone squeezing them in as far as possible. I usually measure to where the step is on a fitting and assume I will get there with the other piece.....if I'm lucky....or just short of it. Now that you mention it, PVC does bottom out when pushing together, and the ABS is an interference fit.....at least some of it is.

This leaker problem turned out to be a re-model for me. The leak was from the toilet wax ring along with a sticky water shutoff valve in the tank. Who ever tiled the floor left the flange at orig. position and put down 1/2 ply and then 1/4 hardi and then the tile. So the flange was about an inch lower than std. This finally lead to a continous leak onto the kitchen cieling. Funny thing though, the tile job was done with clean cuts and looked professional. I guess the lazy Faulker didn't want to change out the flange. This is why I like to do my own work, along with savings. It takes me too long, but I know what I got in the end.


What I was referring to is that plastic pipes have what they call an interference fit. Basically, this means you can not bottom pipe into the fitting when it is dry. When the glue is applied, the pieces slip together just fine, but there is a length difference of something like 1/4" per joint. So if a pipes are cut on the basics of the dry fit, at the elbows and/or end of the line, you will be off by 1/4" per joint. You have to measure before each cut allowing for the inside of the fitting on both ends. Again, this may well be old hat for you, but it is a common mistake. I find the surest way to fit pipes together is to start at the outlet end, glue the fitting on the existing pipe, and work forward one fitting at a time, cutting the pipe as I go to exact length.
 
Top
Hey, wait a minute.

This is awkward, but...

It looks like you're using an ad blocker. We get it, but (1) terrylove.com can't live without ads, and (2) ad blockers can cause issues with videos and comments. If you'd like to support the site, please allow ads.

If any particular ad is your REASON for blocking ads, please let us know. We might be able to do something about it. Thanks.
I've Disabled AdBlock    No Thanks