Shower drain not flushed with tiles

Users who are viewing this thread

Amjad

New Member
Messages
8
Reaction score
0
Points
0
Location
Toronto, Canada
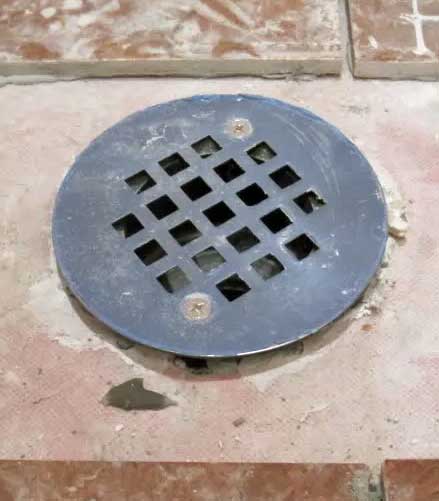
I have been working on a standing shower done with ceramic tiles all around. I have used kerdi to waterproof the whole thing. I slightly miscalculated the drain height and now the tile around the drain is sitting about 1/8th of an inch lower then the drain. I did use extra thin sit mortar all around to try to bring it to a level but I still ended up being 1/8th short. If I just tile it this was ill have water staying around the drain.
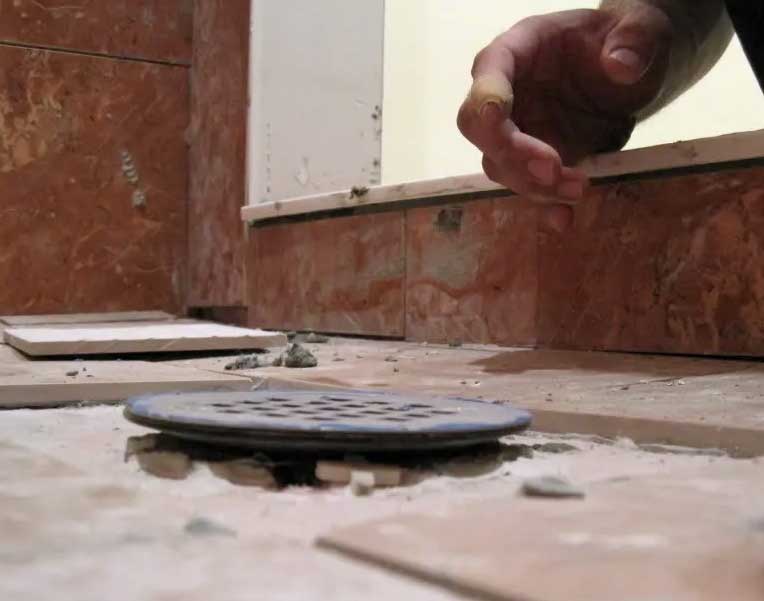
I was thinking to use a little extra mortar underneath the 2 tiles which will be cut around the drain but the problem is that it'll become higher then the ones surrounding it and the problem wont be solved.
If anyone has experience with this please help me out. I'd really appreciate that.
Thanks!

amjad-03.jpg
 
Last edited by a moderator:

hj

Master Plumber
Messages
33,603
Reaction score
1,042
Points
113
Location
Cave Creek, Arizona
Website
www.terrylove.com
IF the drain head is adjustable, and not all are, then you can remove the thinset from around it and screw it down. If it is not adjustable, you may have to remove the upper portion of the drain and find a compatible one which IS adjustable.
 

Jadnashua

Retired Defense Industry Engineer xxx
Messages
32,770
Reaction score
1,190
Points
113
Location
New England
Assuming you have the Kerdi drain, the center part that holds the grill just floats in the thinset. You may need to chip some out, but you can then reset it to whatever (increased) height you need. If it is down all the way, there's nothing you can do to lower it, but you can raise it a fair amount. No screws on this drain.

ss_schn_kerdidrain_webus_r_rdax_419x280_75.jpg
 
Last edited by a moderator:

Amjad

New Member
Messages
8
Reaction score
0
Points
0
Location
Toronto, Canada
Thank you so much guys for your response. I really appreciate it! I used a standard weep hole drain because the kerdi one was just too damn expensive! and I thought it was for no reason but it turns out I was wrong. this drain has a base flange with the weep holes and threaded drain cap. It can only go down so much and at its full depth its still 1/8 inch above the tile. I couldn't get the pictures today but ill try to get them tomorrow.
is there anything you think i can do? or am I stuck with water around my drain :S
 
Last edited by a moderator:

hj

Master Plumber
Messages
33,603
Reaction score
1,042
Points
113
Location
Cave Creek, Arizona
Website
www.terrylove.com
It depends on WHY it is still too high when screwed all the way down. If it is hitting the drain fitting, then you are stuck, but if not you may be able to cut the threads off a screw it down further. Where you really messed up was having the drain all the way down BEFORE you started tiling. That eliminated any possibility of adjusting it later. AND you should ALWAYS allow for later adjustment, whether up OR down.
 
Last edited:

Jadnashua

Retired Defense Industry Engineer xxx
Messages
32,770
Reaction score
1,190
Points
113
Location
New England
It's possible, but not recommended to try to seal Kerdi to a standard compression drain designed for a liner. And, since the Kerdi goes on top, how did you seal the weep holes? The whole benefit of the surface membrane is that no water ever gets beneath it, so no weep holes required. Schluter does make an adapter that fits in a drain like you have to convert it for proper membrane installation. The Kerdi system is just that, a system. Trying to patch it together with incompatible parts is asking for problems.

I think what John is alluding to is using a grinder to shorten the body so that the top part will screw down further...risky, but maybe possible.
 

Amjad

New Member
Messages
8
Reaction score
0
Points
0
Location
Toronto, Canada
alright guyz! so I've put the links to the pictures at the end.... just to explain a lil more... I sealed the kerdi around the base of the drain and cut the holes for the weep holes and its glued to the ring of the base flange in a way that water has no place to go but into weep holes.

the threaded drain cannot go down any further. its not stopping because of the thread but because the body of the drain and base flange is flushed. (no space to go down further, I'm sorry if I'm not expressing it correctly. i am having trouble describing it in words).

@ JOHN
Thanks for your interest and enthusiasm to help man! I really appreciate it... here are the answer to your questions.

When you installed the Kerdi to the compression drain did you use any Kerdi Fix?
A: I just used silicone to make a water proof seal around the drain with the kerdi (I've done that before once and it work pretty well)

Did you build up another mud layer on top of the Kerdi after it was installed?
A: No, tiles were put directly on top of kerdi. Kerdi was put over the dry pack.

Did you flood test this shower?
A: No, I did not not. The shower is being added in the basement so I there is no good way to check any leakages. Also, do let me know how do would I perform a flood test if the shower pan being on basement concrete.
This brings me to another question/problem. I packed the shower utrap under the concrete crunch and layered it with topping/thin layer rough-in concrete and then made the shower pan with a scratch coat mortar. So in this case I can hardly think of any adjustment that ill be able to make with the flange :S

Do you have a steady hand and a grinder?
I do have a grinder and yes I can handle the grinder well.

amjad-01.jpg


amjad-02.jpg


amjad-03.jpg
 
Last edited by a moderator:

Amjad

New Member
Messages
8
Reaction score
0
Points
0
Location
Toronto, Canada
No there is no other liner and the kerdi is not under the ring but over it and glued to it. How was I suppose to put it under. This is how I did it. I made the shower pan with the scratch coat mortar after putting the base of the compression drain in place to make the shower pan flushing with the base. Once it dried I put kerdi using the thin-set mortar and cut the hole carefully around it still being over the border of the drain base and put some white silicone under it and pressed it. Please let me know what did I do wrong here and what should have been done instead. This is my second shower and I'll be doing another soon, so I better stop learning from my mistakes and get stuck everytime, rather just ask an expert :) (even though how I did this was from looking at online tutorials and YouTube videos and stuff)

Thanks for the flood test technique. Once the drain problem is solved, I'll try that.

Now coming back to the problem, I think, I can grind the drain cap since its slightly tapered right at the base of the thread. If, I do not ruin the thread, I might able to get a little bit of more clearance and it'll go down a bit more.
 

Jadnashua

Retired Defense Industry Engineer xxx
Messages
32,770
Reaction score
1,190
Points
113
Location
New England
The preferred thing to attach Kerdi permanently (if you can't use thinset) is KerdiFix. Don't remember what it's made of, but it's not silicon. It's designed as a permanent adhesive. The better way to do this is to use the Kerdi drain, or the adapter to connect to a conventional drain. Way back before they came out with the Kerdi drain, they did have you use a compression drain...that was before I learned of the system, so I'm not up on the details.
 

Amjad

New Member
Messages
8
Reaction score
0
Points
0
Location
Toronto, Canada
@jadnashua
I'll try to look for the adapter. I tried looking for one at the home depot and they didn't seem to have a clue about it. In fact, where did you guys buy the Kerdi Fix from?? Coz they didn't have that either!

@John, I have already taken the tiles out from all around the drain so I have space to do the fix you've suggested. As for installing the kerdi drain, I am assuming that it'll require to brake the slab which would kinda hard for me to do in this particular case. So I think let try the fix thing with this one at least.

I'll try to do what you've suggested and update you how it goes... Just one quick question though... Wont I have to snug the kerdi overlapping patch under the existing laid kerdi to avoid seepage because of the slope. if it'll be under it it'll just drop on to the patch and drain towards the weep holes... Or do you think Kerdi Fix will create a strong waterproof seal?

John, you gotta come up with some way of installing Kerdi with standard compression drains man... Honestly, it just hurts me to pay 100 bucks more just for a drain. There's gotta be a way man....
 
Last edited by a moderator:

Jadnashua

Retired Defense Industry Engineer xxx
Messages
32,770
Reaction score
1,190
Points
113
Location
New England
Kerdi membrane is hydrophobic...it repels water. So, if you have it embedded properly in thinset, and overlap the seams at least 2", per the manufactuer's instructions, it won't leak, so no, it does not matter if you apply it like 'shingles' so it overlaps in one direction. I took a class on the stuff, given at the TCNA headquarters training facility. They had a cardboard box covered inside with Kerdi and thinset they used as a drink cooler. Every morning, they filled it with drinks and ice. By afternoon, the drinks were swimming in icewater. The box had been in constant use for about 6-months...never showed signs of seepage. the stuff works. If you take a square of the stuff, wrap it into a cone, and fill it with water, water won't escape out the pointed end if you have the cone reasonably tight. What you want is shown on this chart: http://www.schluter.com/print/8_2_kerdi_drain_3963.aspx The Residential floor drain adaptor kit with stainless steel integrated bonding flange. You may have to call them to find out where to buy it. this would screw into your clamping drain assembly, and provide a surface that will accept Kerdi directly via thinset.
 

Amjad

New Member
Messages
8
Reaction score
0
Points
0
Location
Toronto, Canada
Alright guys! Thank you everyone specially John and Jadnashua. So yeah this is what I basically did. I took out all the tiles (it wasn't that hard, they came off without a lot of hardwork). Then I cut a cricle around the drain in the kerdi and adjusted the compression ring by grinding it slightly. Then I cut a donut of Kerdi which went 2 inch under the existing Kerdi and sandwiched between the drain base with a Kerdi Fix and compression ring on the top. Tucking the donut of Kerdi under the existing kerdi with thin-set under and over it was tricky and required some time but i was able to pull it off.

@ John Thanks for sending the video clips. Principally, Nobel is very similar to Schluter's products and pretty much does the same thing the same way but hydro ban seems to be interesting. Do you think it'll work if I just apply that directly over the deck mud bed and the walls and use it around the base of the shower drain without the compression ring and then stick a Kerdi donut around the base and over it and then tighten the compression ring? It'll have to heavily applied so that it penetrates around the drain and the bed.

AND what's with the CONE? Why do you need a waterproof Kerdi cone? :S
 
Top
Hey, wait a minute.

This is awkward, but...

It looks like you're using an ad blocker. We get it, but (1) terrylove.com can't live without ads, and (2) ad blockers can cause issues with videos and comments. If you'd like to support the site, please allow ads.

If any particular ad is your REASON for blocking ads, please let us know. We might be able to do something about it. Thanks.
I've Disabled AdBlock    No Thanks