Leaking toilet after 2 flapper changes

Users who are viewing this thread

Robert Kosta

New Member
Messages
2
Reaction score
0
Points
0
Location
Washington
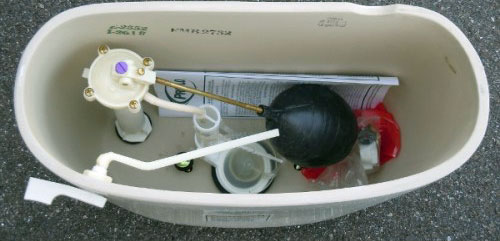
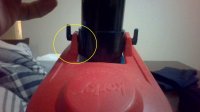
It's hard to know from your description. Forgive if I'm being redundant, but I would flush it, let it fill, turn off the water at the wall valve. Let it sit. See how low it goes. You say it drains halfway. If it drains halfway every single time to the same spot, I would check that overflow riser for a crack. Pinch it a little at the top and make sure it doesn't deform.

I would start with trying to fix it, though.

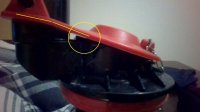
Thanks very much. At the moment I removed the Korky flapper since the problem did not go away. Previously I installed the Korky Easyfix, with new seat, but the problem persists. The water level falls to different levels below the halfway mark. I put dye in and noted the water does get to the bowl. I suspect the tank seal since black ink comes off when I touch it and was thinking about trying this next,

https://secure.lockeplumbing.com/detail.asp?c=Toilet Parts&s=Briggs&s2=&sku=BRI-5143&r1=WHE-USS25C&r2=GRU-595916&r3=FEI-NL9-LED

Would it be just as easy to replace the tank? It is a Briggs 4930. Not sure where to find one. It was installed in 1989.
 
Last edited by a moderator:

DonL

Jack of all trades Master of one
Messages
5,205
Reaction score
72
Points
48
Location
Houston, TX
I am not a pro, but it looks like that chain may be able to keep the flapper open, when the links catch on each other.

I hate when that happens.

Cutting off the un-used links, may help. Then they are less lucky to get caught on the others.


Good Luck.
 
Last edited:

WJcandee

Wise One
Messages
3,181
Reaction score
170
Points
63
Location
New York, NY
I was thinking the same thing about that chain. However, seems like the problem predated this flapper.

No need to buy a new tank since the porcelain seems fine. Next step is to change the flush valve. If porcelain isn't cracked on the tank, changing the flush valve will assuredly solve the problem, since the water is flowing through the flush valve into the bowl. This is a good one that I have installed in several toilets: http://korky.com/FlushValveKit4030PK.html Available at Lowe's and other fine retailers. http://www.lowes.com/pd_125469-868-...e&pl=1&currentURL=?Ntt=flush+valve&facetInfo= Here are the instructions so you can see what's involved: http://korky.com/PDF/4030.pdf If you're feeling adventurous and want to install a new fill valve at the same time, this Korky kit adds a fill valve: http://korky.com/FlushValveRepairKit4010PK.html Or you can just do that at a subsequent time, as it is a very simple job for which you don't need to pull the tank.

If you are nitpicky as I am, I would also go ahead and use better tank-to-bowl bolts than Korky is going to give you. Specifically, I would double-nut the installation. Meaning, you get a set of bolts that has two washers, nuts and rubber washers per bolt. Korky used to do this until handi-hacks kept screwing up the install or tossing the extra hardware because they didn't bother to read the instructions which were crystal-clear. So now they only give you one nut, metal washer and rubber washer per bolt. Something like this will keep your tank in place for another 30 years or more, although you don't need one this expensive. http://kscdirect.com/item/SIO+490-10500/SIOUX+CHIEF+MANUFACTURING_BOLT+DELUXE+TANK+BOLT+SET%0A But you get the idea. The order is: bolt head and rubber washer inside tank, metal washer and nut outside tank, THEN under the bowl, you use the rubber washer, metal washer and nut to hold the tank in place. If you have or can borrow a big set of channel locks, it will make removing the old flush valve nut easier, and make it easier to snug up the new one. When you reattach the tank, tighten down little by little, side to side, until you have the tank just about touching porcelain. No need for it to actually touch, indeed if it does you can crack it, but the thickness of say 3 sheets of paper is fine. That will give you a nice stable tank. Come back if you have any more questions.
 
Last edited:

Abouthadit

New Member
Messages
67
Reaction score
0
Points
0
Location
California
Old post but same problem , Briggs 4430 toilet (marked inside toilet tank) the flapper rubber chain broke off at top of flapper. Not thinking of looking on here and read up , I went to the local Ace hardware store and bought a universal flapper. Installed it and flushed a couple times .Now have a trickle of water inside bowl WTH ?
Turned the water off , drained tank , lifted up new flapper felt the base where the flapper seats , smooth nothing. Googled Briggs flapper and out came all the problems , needs to be a Briggs flapper. I couldn't find one in a search but found that Korky has one that fits the Briggs . I order it No. 65BP. Same thing tricckle of water inside bowl . I get on here and found this thread read it all the way through. Knowing its the flapper and not something else I tried korky.com/FlushValveRepairKit4010PK.html , but still did the same thing. Finally went with the Fluidmaster repair Kit and replaced the flush valve assembly etc.
Works great now !

briggs-4430-tank.jpg


Briggs 4430 tank

briggs-altima.jpg


https://briggsplumbing.com/sites/default/files/support/pdf/TwoPieceToilet.pdf
 
Last edited by a moderator:

WJcandee

Wise One
Messages
3,181
Reaction score
170
Points
63
Location
New York, NY
Old post but same problem , Briggs 4430 toilet (marked inside toilet tank) the flapper rubber chain broke off at top of flapper. Not thinking of looking on here and read up , I went to the local Ace hardware store and bought a universal flapper. Installed it and flushed a couple times .Now have a trickle of water inside bowl WTH ?
Turned the water off , drained tank , lifted up new flapper felt the base where the flapper seats , smooth nothing. Googled Briggs flapper and out came all the problems , needs to be a Briggs flapper. I couldn't find one in a search but found that Korky has one that fits the Briggs . I order it No. 65BP. Same thing tricckle of water inside bowl . I get on here and found this thread read it all the way through. Knowing its the flapper and not something else I tried korky.com/FlushValveRepairKit4010PK.html , but still did the same thing. Finally went with the Fluidmaster repair Kit and replaced the flush valve assembly etc.
Works great now !

Thanks for the report. I was going to say that if you were up to it, you probably wanted just to change out the flush valve, and that you didnt need to get the Briggs one. I have used this Korky one on several toilets, with good results. http://korky.com/FlushValveKit4030PK.html But if that Fluidmaster one worked for you, then there you go! Good job!
 

MzMolly65

New Member
Messages
5
Reaction score
0
Points
1
Location
Washington
Opening an old thread here. I have a similar problem; I have replaced the flapper before but the toilet still leaks, red dye in the bowl with refilling tank. This time I replaced all the parts instead of just the flapper. All new Korky parts, top to bottom; tank to bowl seal, washer and nut, new fill valve, flush valve, flapper, handle and lever .. the works. The refill tube is level with the top of the flush valve, the chain sits well and is not tangling, there are no leaks on the floor or under the tank anywhere.

I followed advice in previous posts and checked the tank, the edges are all smooth. Is this simply a matter of the finger tight nut not being tight enough? Should I take a wrench to it, lightly??

I would appreciate any advice, before buying a completely new toilet. Thank you.

WIN_20171206_02_37_52_Pro.jpg


With the Korky tank rebuild kit installed.
 
Last edited by a moderator:

Reach4

Well-Known Member
Messages
38,889
Reaction score
4,434
Points
113
Location
IL
I followed advice in previous posts and checked the tank, the edges are all smooth. Is this simply a matter of the finger tight nut not being tight enough? Should I take a wrench to it, lightly??
If you are talking about the big plastic nut, I don't know how tight to tighten it. Some silicone grease on the sealing surfaces at the tank would not hurt.

For the two metal nuts need a wrench, and I expect you will make many turns beyond finger tight.. You should tighten evenly until 3 points of contact almost touch. You should be able to put a piece of paper between the contact points if you press the tank away from the contact point, but maybe not a business card.

I can't tell from the photo. Is there some slack in the chain.
 
Last edited:

Terry

The Plumbing Wizard
Staff member
Messages
29,942
Reaction score
3,459
Points
113
Location
Bothell, Washington
Website
terrylove.com
The large nut needs pliers.
And finger tight on the fill valve depends on how strong you're feeling. I often can tighten things way beyond what the homeowner can with my fingers.
 

MzMolly65

New Member
Messages
5
Reaction score
0
Points
1
Location
Washington
Thank you both for your replies. I removed the tank and retightened the large nut, reseated the tank, leveling and tightening it as well. An hour later and the water in the bowl is still clear. I'll wait until morning before deciding to turn on the water and leave it on, but it does look promising. I really appreciate the advice and hopefully this is finally fixed.
 

MzMolly65

New Member
Messages
5
Reaction score
0
Points
1
Location
Washington
You should tighten evenly until 3 points of contact almost touch. You should be able to put a piece of paper between the contact points if you press the tank away from the contact point, but maybe not a business card.

I can't tell from the photo. Is there some slack in the chain.

Right, so ... did all this and what Terry recommended as well and as of last Thursday I thought I had it fixed but yesterday I thought the tank looked a bit lower than the previous day (even though I didn't hear any refill water running) so turned off the water supply this morning and went to work and sure enough the tank was empty when I got home.

So frustrated right now.
 

Reach4

Well-Known Member
Messages
38,889
Reaction score
4,434
Points
113
Location
IL
so turned off the water supply this morning and went to work and sure enough the tank was empty when I got home.
Did the water level fall all of the way to the bottom of the tank, or did the water stop dropping at the level of the seat?
 

MzMolly65

New Member
Messages
5
Reaction score
0
Points
1
Location
Washington
Sorry for the slow response.

Water level drops to level with the flapper but not below it. Red dye in the tank, once again shows up in the bowl.
 

MzMolly65

New Member
Messages
5
Reaction score
0
Points
1
Location
Washington
I *think* have finally figured out my problem. I have no idea what was wrong with the last flapper but at least with this new one.

I took it apart again and following someone else's suggested I added a bit of weight to the flapper; in my case I put a few coins inside the rubber cone.

In doing that I had a good look at the actual flapper and how it was working.

I noticed that the flapper in my other toilet that works just fine has rigid plastic sides. This one however has soft rubber sides. I *think* they are catching on the side of the tube and it causes them to flex, which then creates a small gap at the rim of the flap.

See photos. Not tight is when it's not rubbing and the subsequent no gap. The when it's tight to the pipe you can see the flex in the side and the subsequent gap.

So far, this is the only thing I can see that might be causing the leak.

Any thoughts on this?
 

Attachments

  • not_tight.jpg
    not_tight.jpg
    41.4 KB · Views: 1,563
  • no_gap.jpg
    no_gap.jpg
    45.2 KB · Views: 1,487
  • tight.jpg
    tight.jpg
    41.1 KB · Views: 1,463
  • gap.jpg
    gap.jpg
    41.6 KB · Views: 1,492

Morgan48

New Member
Messages
1
Reaction score
0
Points
1
Location
Kentucky
The refill tube is to far down into the overflow tube causing the water in the tank to siphon. The refill must be above the water level in the tank.

John

fm_fillvalve_siphon.jpg
John,
I could not figure out why my tank would fill up then leak the top inch of water into the bowl. I had put on two different new flapper valves and steel wooled the perfectly smooth seat. Finally, I did a Google search and found your refill line discussion and diagram. Sure enough, when I had put in a new Fluidmaster refill kit, I had shoved the refill hose too far down in the overflow tube. Easy fix after hours of frustration. Thanks.
— Morgan J. , Murray, KY
 

ChrisL2700

New Member
Messages
1
Reaction score
0
Points
1
Location
Chicago NW Suburbs
I know this is an old thread, but it's one of the 1st things that come up when googled. I have an aquasource one piece toilet, same problem. I've replaced flush valve assembly 3 times, with 3 different brands. I like the Lasco 04-2353, best (just personal preference). I checked the fill tube for cracks, and correct hose length. Finally, after 3 hours, and too many smokes, I got it. I ended up soaking the flapper in hot water, in my sink, for a few minutes, making sure that the whole flapper was filled with hot water. Removed it from water, leaving the hot water inside the flapper (for a little extra weight, hole is too small for anything to fit), and installed quickly. Let sit for a minute, before turning water on. So far, no problems. Once it seemed ok, I did drain water from inside flapper. If I still have a leak, after work tonight, I will update right away. Been trying different things for a week, it was 2am when I got aggravated, and I finally hit the point where I was gonna figure this out, and not move until I did. Guess it just needed a little help forming to the seat. Hope this helps someone.
 

Marc von Huene

New Member
Messages
1
Reaction score
0
Points
1
Location
Boise, ID
OK, like several before me I'm opening an old thread. I have an American Standard Champion 4 toilet that started leaking after 12 years. It's leaking into the bowl at a rate of about an inch of water level every 10 minutes. I replaced the flapper gasket, same problem. I replaced the whole flush assembly, same problem. I replaced the fill valve, same problem. If I turn off the fill water it will always drain down to about 1.5 inches from the tank bottom, which is well below the flapper seal. I pulled the tank off the toilet, put it upright on sawhorses in the back yard and filled it with water. It didn't leak at all for 24 hours. Put it back on the toilet bowl and immediately leaked at the same rate. Pulled it off and replaced the flush valve again, this time with silicone sealant completely covering the assembly at the 1.5 inch level where the leaking stopped (figured there might be a defect at that level). Same issue. This is getting old and my wife is not happy about turning the fill valve on to use the toilet and then off when she leaves. Heck, I'm not happy about it either! Does anyone have a guess as to what I can try next besides replacing the entire toilet?
 

Reach4

Well-Known Member
Messages
38,889
Reaction score
4,434
Points
113
Location
IL
If I turn off the fill water it will always drain down to about 1.5 inches from the tank bottom, which is well below the flapper seal.
Nice troubleshooting info.

As the water drops to an inch or so above the 1.5 inch level, try dropping a few drops of food color from a low level. See which way the water is moving.
 
Top
Hey, wait a minute.

This is awkward, but...

It looks like you're using an ad blocker. We get it, but (1) terrylove.com can't live without ads, and (2) ad blockers can cause issues with videos and comments. If you'd like to support the site, please allow ads.

If any particular ad is your REASON for blocking ads, please let us know. We might be able to do something about it. Thanks.
I've Disabled AdBlock    No Thanks