Need your input on relocating 4" vent/waste CI...

Users who are viewing this thread

Speede541

Member
Messages
164
Reaction score
2
Points
18
Location
Oakland
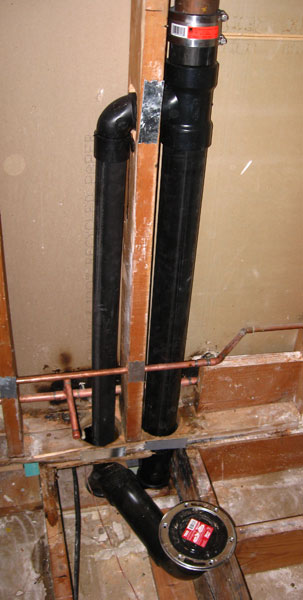
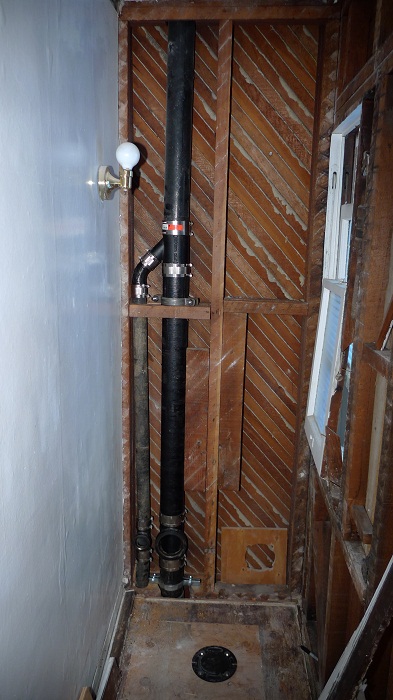
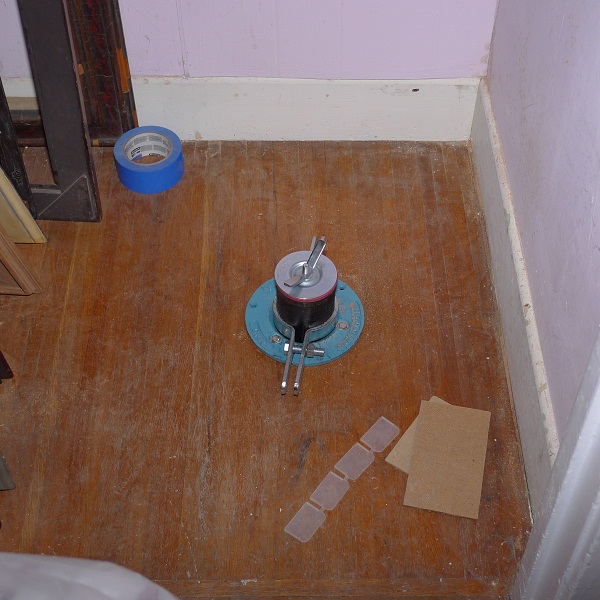
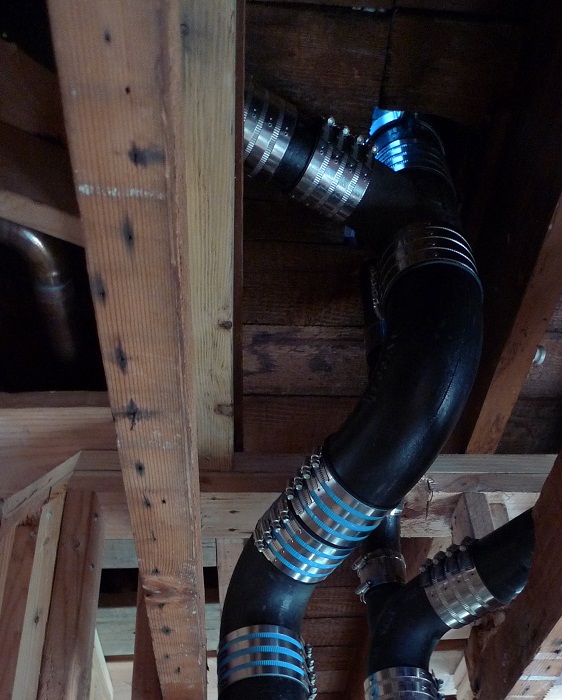
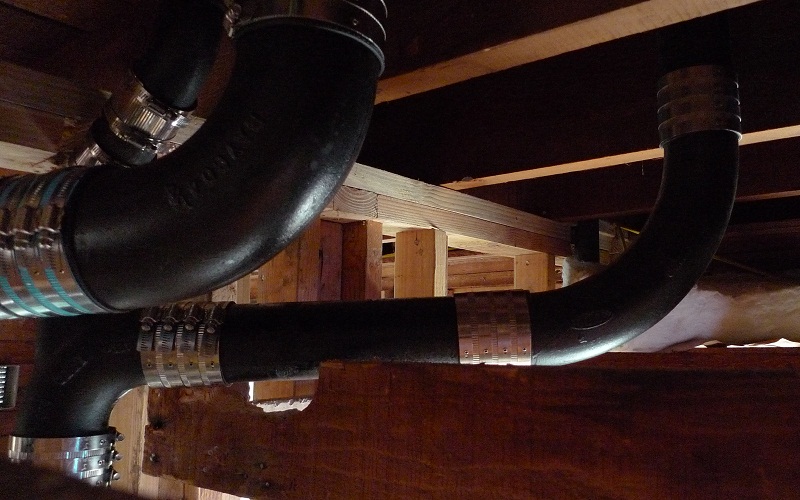
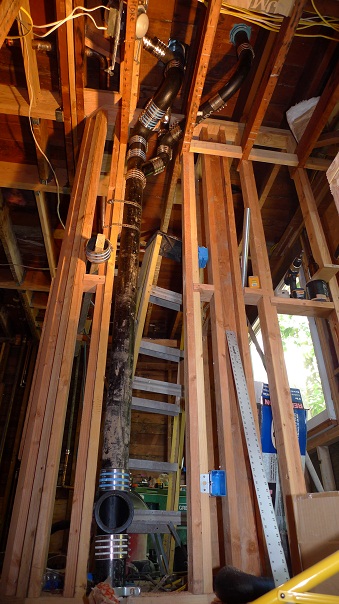
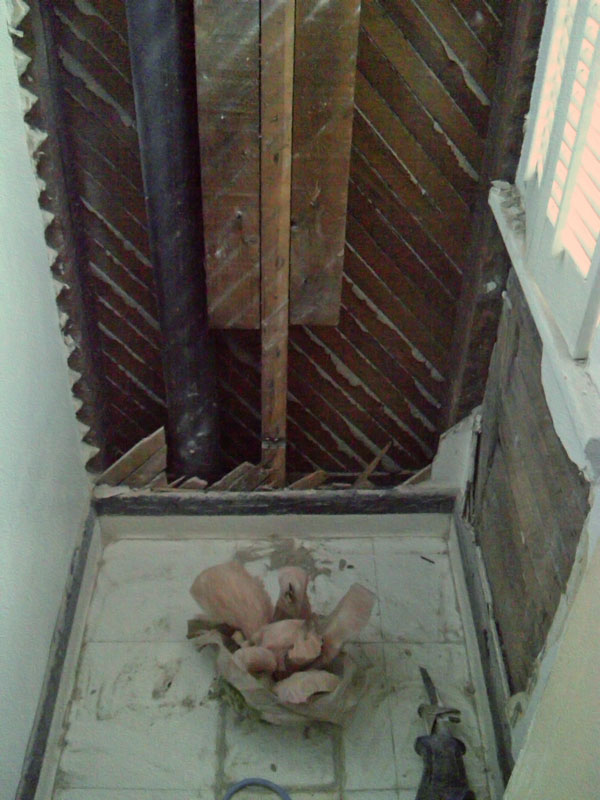
Re: the attached photo, there is a toilet centered in this room (bag of insulation plugging the flange opening). The vent pipe runs off-center. Below the floor, the toilet angles off and drains into this vent/waste line.

I want to install a toilet on the opposite side of this wall, in a narrow "closet" of identical width to the room in the photo.

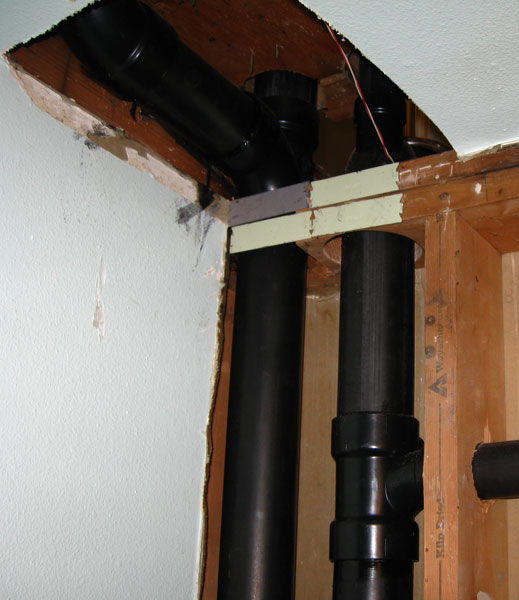
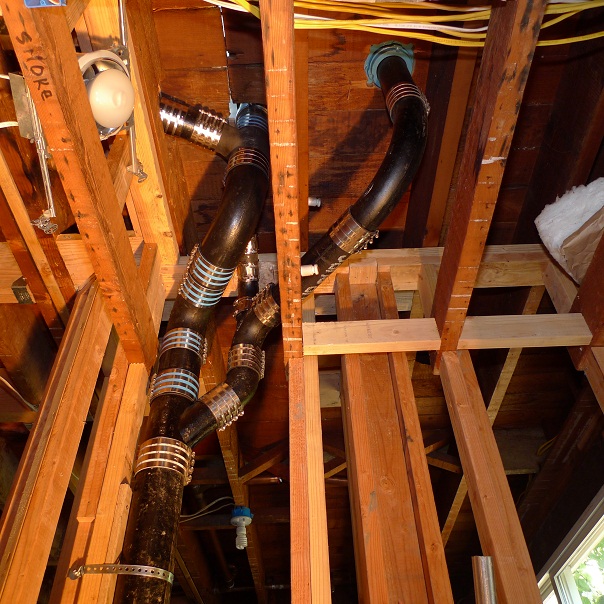
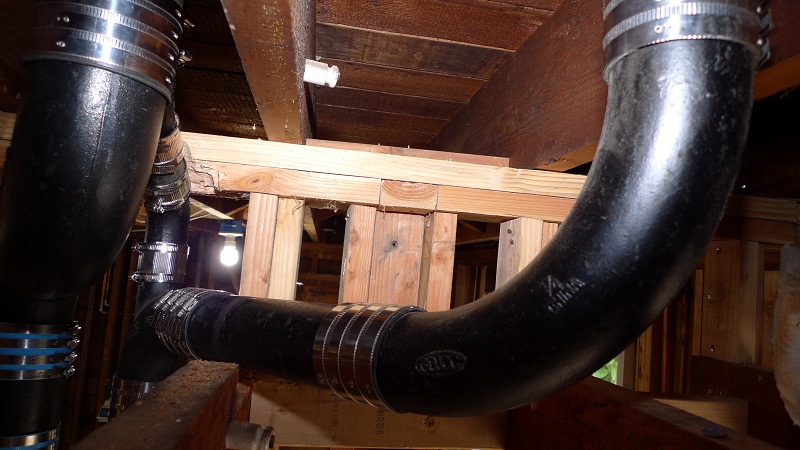
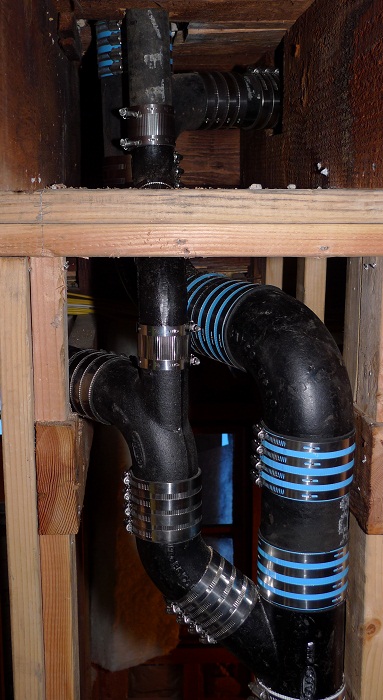
My plan was to cut the 4" cast iron vent line, angle it over and run it down centered on both toilets. However, the 2x6 stud is in the way (non-structural wall). To move a portion of this stud would do a number on the lath & plaster on the opposite wall. Also, I was planning on using this stud to support the cut vent line. If I cut the stud, I'm not sure what I'll attach to to keep the upper portion of the CI vent from pulling down.

(The wood on edge on either side of the stud aren't doing anything and can be removed.)

I've got about two feet of dead space under the floor, inside of a dropped ceiling for the room below.

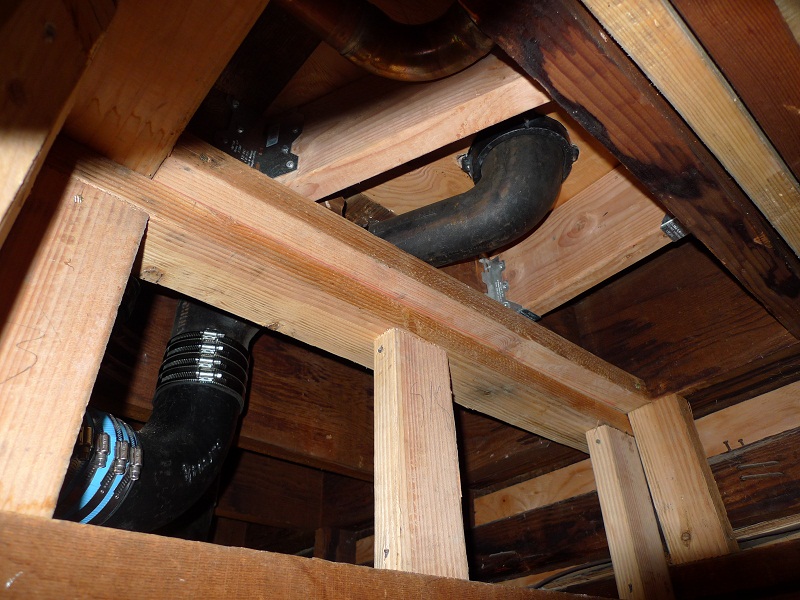
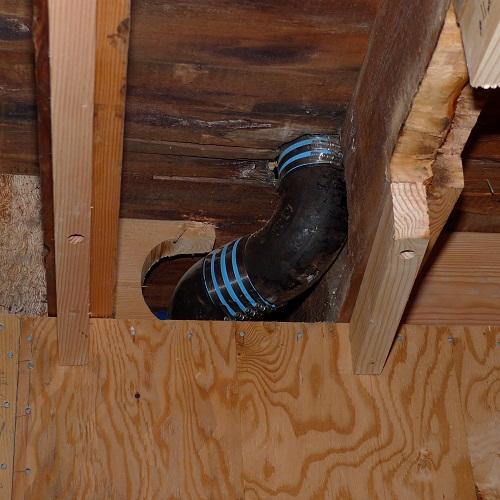
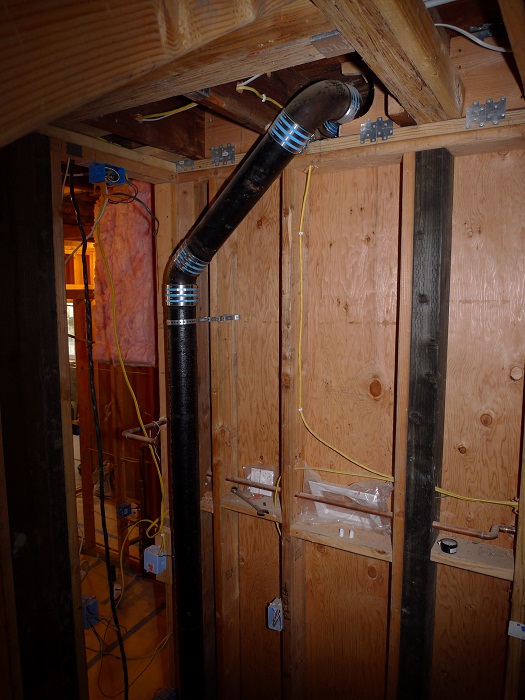
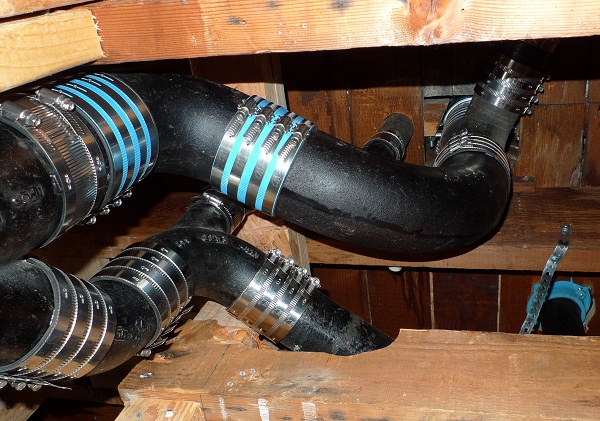
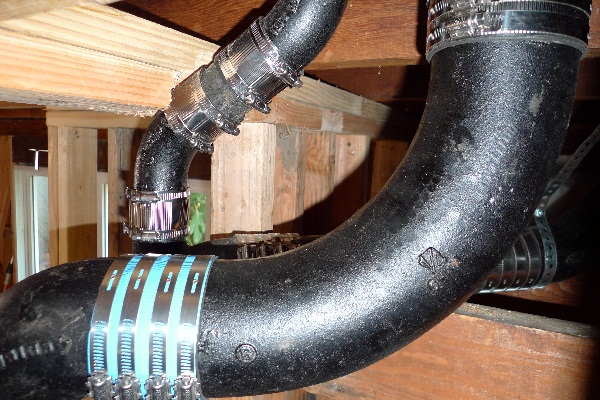
Below the floor, there's the Tee connecting to the toilet, then the waste pipe angles off to the left a couple of feet and returns to vertical inside of another wall.

What would any of you do, faced with this situation?

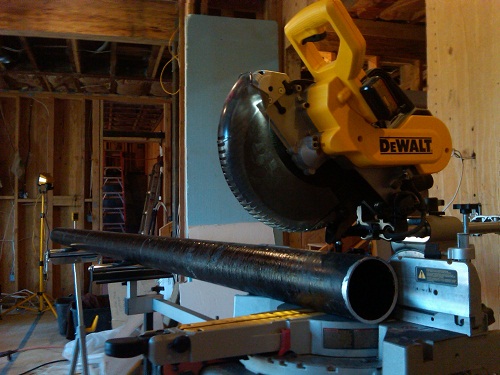
BTW, code requirement forces me to use CI. No PVC. Appreciate any and all advice!

upstairs_toilet.jpg
 

Terry

The Plumbing Wizard
Staff member
Messages
29,942
Reaction score
3,459
Points
113
Location
Bothell, Washington
Website
terrylove.com
I would cut in a wye below the tee, and bring up a second line for the second toilet.
You could then revent with a 2" line over to the 4" stack.

But that's only one way, if I were there I might find other ways too.

The pictures below are plastic, but cast could be used too.

glynn_5.jpg

Above, it looks like this, the one toilet is straight back from the stack,
the toilet in this room is offset and angled back to the previous location.

glynn_8.jpg


Replace with a Sanitary tee for one toilet,
And a Low heel Santee for the other toilet.
This way, both are vented, and the flush is forced down instead of across and toward the other bowl.
 
Last edited:

Speede541

Member
Messages
164
Reaction score
2
Points
18
Location
Oakland
Hey, yeah, that's near enough a spittin' image of what I'm working with, as viewed from the other side of the wall.

And it makes it even easier since I've got a leaky hub under the existing toilet -- I was prepared to hack that Tee out and anyway, and replacing with no-hub CI. The 2" re-vent means just a small hole through the 2x6 stud.

Whew! Thanks Terry! I'll follow up in a few days with some pics.
 

Speede541

Member
Messages
164
Reaction score
2
Points
18
Location
Oakland
Well, this took more than a few days, but I've been busy working my my tile guy outside so only got to this this past week.

Wally, you were right, this was a lot to bite off, but it was pretty damn fun. Thanks especially to Terry, HJ and Wally who helped me out in the various threads I've posted, all with ties back to this project.

Here's how it went.

What i thought was a leaky hub connection turned out to be a gnarly lead closet bend. It leaked during a fill-test earlier in the project, which is how I discovered it. It apparently seldom leaked under normal use. The need to fix this leak is what drove this whole project.
damaged-lead-pipe.jpg


Cutting the new iron pipe was messy but easy with my 10" saw with a cut-off disc attached. I did rent a snap cutter for the demolition of the old CI pipe, and intended to rent it again for cutting the new pipe, but the saw worked well enough that I stuck with it the whole way through. It did throw a lot of black dust around the walls and floor, and the sparks it generated destroyed the little rubber sawdust pick-up scoop positioned behind the blade, but that'll be cheap and easy to replace.
saw.jpg
 
Last edited:

Speede541

Member
Messages
164
Reaction score
2
Points
18
Location
Oakland
In the original 3rd floor toilet room (toilet 1), I replaced the floor and set a new flange, but kept the original 14" toilet offset. The toilet will initially face the camera, but in a year or two I'll redo the bathroom, move some walls, and will turn the toilet so the tank is under the window. I paid particular attention to the flange position so I can meet code requirements of 15" spacing from the wall in both toilet orientations.

In the wall, the old cast iron 4" vent (top section) meets up with a new no-hub Wye which branches off with a 2" vent to the new toilet (toilet 2). I placed cleanouts for both lines at floor level.
toilet-1-room.jpg


Behind the wall of toilet 1 is a closet in a bedroom that will eventually be converted into a bathroom. For now, I've got the flange for toilet 2 installed and plugged. I still need to cut the riser and will cover it with a false floor.
toilet-2-flange.jpg


Moving down to the second floor, this is what I've been referring to my growing "poop tree" in my Facebook posts. The light blue flange to the right belongs to toilet 2.
poop-tree.jpg
 
Last edited:

Speede541

Member
Messages
164
Reaction score
2
Points
18
Location
Oakland
The new toilet 1 closet bend. This is where the leaky lead pipe was tucked away, right where it passed through the joist.
toilet-1-bend.jpg


The toilet 1 closet bend (4x3) enters directly into the 4" stack, just before the stack jogs about 16" into an offset wall. I used a medium sweep 90 into a standard 90 for this transition, though I should have used a long sweep to eliminate the short 4" transition piece banded between the two 90's.
toilet-1-bend-into-stack.jpg


Meanwhile, toilet 2 dumps straight into a long-sweep 3" 90.
toilet-2-90-alternate-view.jpg


Here's another view of the toilet 2 flow from the long-sweep 90 into a heel fitting that connects back to the 2" vent seen in the wall upstairs.
toilet-2-90-into-stack.jpg
 

Speede541

Member
Messages
164
Reaction score
2
Points
18
Location
Oakland
Here are all of the connections coming together from the backside. Toilet 2 is the 3" line mid-way down coming in from the left; Toilet 1 is off to the right at the top of the frame. The 2" vent for toilet 2 jogs around the ceiling plate and enters the upstairs wall.
stack-connections-from-backside.jpg


My "poop tree" drops down through the floor to the 1st floor...
poop-tree-2.jpg


...does a fancy-pants jog over a sheer wall...
waste-into-lower-level.jpg


...then does a couple more turns and drops into the slab.
waste-into-slab.jpg


I hope this all is kosher (I know you'll let me know if I goofed up). I've still got to seal up all the cleanouts and do a fill test before calling in the inspector.

It was a bit of a daunting project for a noobie, but it was do-able and entirely satisfying, and much preferable to working with copper drain lines, which I've been doing elsewhere in this house.
 
Last edited:

Speede541

Member
Messages
164
Reaction score
2
Points
18
Location
Oakland
Ok, so I have this problem where I can't leave something well enough alone, so I went back and swapped in a long-sweep 90 to get rid of that short extra section in the stack's horizontal jog. I know, I know, you couldn't care a lick, but maybe now I can sleep in peace.

4-inch-long-sweep.jpg


4-inch-long-sweep-2.jpg
 

ML

New Member
Messages
5
Reaction score
0
Points
0
Location
CNY
Impressive work!

Hey Speede, Since you seem to have used different types of no hub couplings, can you clarify the reasons for each? I'm about to start a similar project, no relocating of fixtures but all new dwv and supply lines. The major difference is I'll be using PVC from the 4" CI in the basement up to the 2nd floor bathroom (also tying in the kitchen sink along the way). I bought a couple Mission No-Hub shielded (CP44) to have on hand but am wondering about the 4-strap ones you have. Who makes them? Are they shielded? Are they strictly for CI? I've seen them pictured elsewhere and would love to hear from someone who obviously knows how to use them, why the different couplings?

Thanks,
Mike
 

Speede541

Member
Messages
164
Reaction score
2
Points
18
Location
Oakland
I asked a bunch of questions on the forum while undertaking this project, these were some of them.

The 4-band hubs are "heavy duty" and the counter guy at my preferred supply store would inevitably question me to ensure I didn't want the less expensive 2-band couplings. I was just duplicating what my plumber used before me, and what I've seen elsewhere at work and at the grocery store (so don't assume I know what I'm doing!). But when I asked here on the forums, it seems that the 4-band are overkill, and a data sheet I found showed that they have greater resistance to flexing and slippage, but no indications of decreased rates of failure/leakage. At my supplier, the cost difference was $9 vs $1.70, so my choice did put a $100+ price premium on my project. That's covered at the end of this thread: https://terrylove.com/forums/showthread.php?37788-When-is-it-OK-to-run-flat-(consecutive-90-bends)

I asked my supply guy about the color difference on the 4-band (blue, silver, white) and he said it was simply a difference between brands. Most of the blue 4-band are USA made Mission. The silver 2-band are Chinese made and say "GAP" inside of an apple logo ("Gap band"? Ha ha!)

I did use the cheaper 2-band couplings on my 2" vent line, and to a couple of other places where the line runs dry / vent only. I also ran into two tight spots in my 4" line where I reverted to 2-band due to space constraints. The two-band couplings are 2¼" in width versus 3" for a 4-band.

The orange-labeled coupling in the bathroom photo is a TWC44 to connect to my old 1924 old iron, which apparently varies in outer diameter. That thread is here: https://terrylove.com/forums/showth...connection-to-old-Bell-Spigot-special-adapter.

Whether they are strictly for CI or can be used on PVC, you'll have to get an answer from others on this forum or search the web for a Mission product data sheet.
 

ML

New Member
Messages
5
Reaction score
0
Points
0
Location
CNY
According to Mission's website (and Fernco for their similar product) 4" CI to PVC would use the CP44 (TWC44 for Fernco). For my project, there is really only one important transition between the CI and PVC, so I wanted the best possible. The difference in price really doesn't matter since I'm only buying one, and I'll gladly spend the dough and risk overkill than cheap out and risk a nasty leak after I close the walls back up, etc.

For tying into the old vent line (laundry in basement appears to be galvanized, and I would change it to PVC as it moves vertically) I thought I would still use something shielded, but was thinking it wouldn't be as crucial since it's a dry vent.

I'll look on the Mission site to see if I can find those fancy 4-band ones you used. Just for peace of mind.
 
Top
Hey, wait a minute.

This is awkward, but...

It looks like you're using an ad blocker. We get it, but (1) terrylove.com can't live without ads, and (2) ad blockers can cause issues with videos and comments. If you'd like to support the site, please allow ads.

If any particular ad is your REASON for blocking ads, please let us know. We might be able to do something about it. Thanks.
I've Disabled AdBlock    No Thanks