Wally's Steam Shower Bathroom Remodel

Users who are viewing this thread

Wally3433

Member
Messages
44
Reaction score
0
Points
6
Location
Illinois
I am in the process of doing a complete remodel of my bathroom. Putting in a Steam Shower (Mr. Steam MS 400), with a Hansgrohe Shower System with a Thermobalance 111 control unit (Shower, Handheld Shower, and Three Jets. Along the way, I've got some basic plumbing questions.....

So Here goes - thanks in advance for you help.

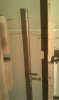
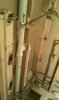
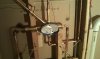
1. Water supply line extensions: Why do you see water supply lines with a copper "outlet" that runs above each supply line? It's extended up above the supply line and capped? I have to remove those that are existing and want to know why they are there and how tall they should be.

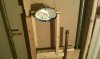
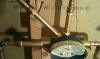
2. Shower Control: Just got my Hansgrohe Shower control - this thing is HEAVY - it has two inlets for hot and cold, and three outlets (shower, hand held shower and three jets). Why did this thing NOT come with a mounting bracket or at least some ears from which to screw this into a mounting bracket. Are you supposed to just "RIG" something like I have tried to do below? Seems like for the price I paid, there would be some sort of mounting bracket included. I tried a mounting bracket from HD but it was not strong enough to hold this heavier control unit.
 

Attachments

  • IMAGE_049..jpg
    IMAGE_049..jpg
    33.5 KB · Views: 859
  • IMAGE_050..jpg
    IMAGE_050..jpg
    29.4 KB · Views: 781

Jadnashua

Retired Defense Industry Engineer xxx
Messages
32,770
Reaction score
1,190
Points
113
Location
New England
Few valves comes with mounting brackets or screw holes or mounting tabs. You need to brace it as well as you can with strapping/blocking, etc. Those extensions above the valve are old school water hammer arresters that will work for maybe a month or so, then quit once the air is absorbed. Most valves do not need them, and if yours does specify a hammer arrestor, you should install 'real' ones. These are made up of either a bladder, bellows, or piston that separates the water from the air chamber. Recharging those you have is nearly impossible - think finger over the end of a straw...the water that will get in there just won't come out, and then they are useless.

A steam shower requires very specific construction details or you will have mold and other structural problems. So, if the details aren't already accounted for, you owe it to yourself to check out www.johnbridge.com to get some help. The TCNA guidelines list a few approved methods, and as long as you use one of them, you should be okay. Miss one detail, and you are likely to have problems. Try to wing it, and you will have problems down the road. My personal preference is a surface waterproofing system, and of those, Kerdi from www.schluter.com is my favorite. WIth a surface waterproofing system, you don't have the cbu walls to absorb moisture, and the whole thing will dry out much quicker. Vapor pressure will drive moisture through any crack or even most solid materials.
 

Wally3433

Member
Messages
44
Reaction score
0
Points
6
Location
Illinois
Jim - Thanks for the response.

My Hansgrohe manual makes not mention of any sort of arrestor. So, I should be able to just connect my water supply lines DIRECTLY to the valve, with no additional relief areas? See my proposed layout below.

I am on the john bridge forums, already have my Kerdi Shower kit, etc. Scared but prepared.
 

Attachments

  • Proposed Shower &#76.jpg
    Proposed Shower &#76.jpg
    21.9 KB · Views: 865

Jadnashua

Retired Defense Industry Engineer xxx
Messages
32,770
Reaction score
1,190
Points
113
Location
New England
Looks like it'll work to me! One thing you can do is put some cross-braces, then drill holes in them at the proper wall depth and run the pipes through to help anchor the valve. You can make it quite stable that way. The things with Kerdi that gets first-timers is not mixing the thinset properly, not testing for full coverage (pull it back up to check the first couple of times), and, when you are using cbu, not dampening it first (it will suck the moisture out and make it hard to embed the Kerdi. Don't try to wrap corners with big sheets, use the Kerdi band. You can put the band up first, or after; as long as you get the minimum of 2" overlap, you'll be fine. the stuff repels moisture, so it doesn't make any difference about the order of installation; it is not like shingles where you need water to flow over the lap on the way down.
 

hj

Master Plumber
Messages
33,603
Reaction score
1,042
Points
113
Location
Cave Creek, Arizona
Website
www.terrylove.com
In a system like yours, I usually install my handheld outlet down low near the control valve with a sliding rail for the head. There is no reason to have the hose hanging down from a high location, especially since the hand held will seldom be used in place of the regular one. Anchor the piping to the wall structure and the valve will be secure.
 

Wally3433

Member
Messages
44
Reaction score
0
Points
6
Location
Illinois
HJ - thanks for the advice. That's where I wanted to mount it, but I decided to bring it up a little higher, because I was running out of room, left to right where the main control unit was going to be.

I have to fit the main unit, the handheld outlet and the handlebar all within 32". I think it will work out.

Here is where I am at now. I've hooked up the hot/cold and the three outlets: Main Shower, Handheld and Jets.

Let me know if anyone sees anything wrong with my installation. I know it's not real "clean" but hopefully I didn't do anything stupid. Looking for some confirmation that I am ok before I close this up.

Thanks,

Wally
 

Attachments

  • Jets.jpg
    Jets.jpg
    35.5 KB · Views: 778
  • Thermo 3 connections.jpg
    Thermo 3 connections.jpg
    40.2 KB · Views: 763
  • Thermo 3 connections b.jpg
    Thermo 3 connections b.jpg
    40 KB · Views: 698

Wally3433

Member
Messages
44
Reaction score
0
Points
6
Location
Illinois
I used the brass nipples to get the soldered joints a little further away from the main shower unit. Is this ok?

The burn marks serve no purpose at all.
 

hj

Master Plumber
Messages
33,603
Reaction score
1,042
Points
113
Location
Cave Creek, Arizona
Website
www.terrylove.com
You shouldn't' install the threaded fitting and THEN solder to it, especially female threaded adapters. The easy, and proper, way would have been to solder the tubing into male adapters and THEN screw them into the valve. The way you did it creates extra threaded connections which could leak, and the expansion of the female threads from heating them could have also created leaks.
 

Wally3433

Member
Messages
44
Reaction score
0
Points
6
Location
Illinois
HJ - thanks for the input. I was thinking the threaded connections would be stronger than a sweated one, but I can see your point.

Do you think if after I test it, and it doesn't leak I am ok?

Or, should I re-do it, in the order you speak of.

At this point, I won't be much to re-do it.
 

Terry

The Plumbing Wizard
Staff member
Messages
29,942
Reaction score
3,459
Points
113
Location
Bothell, Washington
Website
terrylove.com
It's fine.
It looks funny to see the brass nipples, but it's also fine.
It works fine.
If they were galvanized, then I would say pull them.

And hj is right about sweating the FA on first, and then threading anything onto them.
Often, when you tape a joint, and the heat the joint, it does bad things to the tape.


Let us know how you like the setup when done.
I've installed a few of the HansGrohe like that, but not in my home.
 
Top
Hey, wait a minute.

This is awkward, but...

It looks like you're using an ad blocker. We get it, but (1) terrylove.com can't live without ads, and (2) ad blockers can cause issues with videos and comments. If you'd like to support the site, please allow ads.

If any particular ad is your REASON for blocking ads, please let us know. We might be able to do something about it. Thanks.
I've Disabled AdBlock    No Thanks