ADA Shower Remodel

Users who are viewing this thread

Pitownpi

New Member
Messages
4
Reaction score
0
Points
0
Location
Pioneertown
Hi,
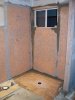
I'm in the progress of demo for a slab-on-grade bath/shower remodel.
Removed the UPC shower base.....

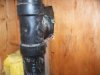
Busted up the concrete & my knuckes yesterday some only 2 inches thick... but near footing overpour (pic.6056) just jackhammered 3 inches off the top.
WOW is that fun or what.BUT NO REBAR just some 6x6 mesh!!!!..how about the dust from a diamond blade on a skill saw......you have to experience that at least once in life and the cleanup afterwards......

My Plan:
Roll-in curbless entry with possibly a Quick Drain scupper or a Kerdi drain/system or maybe TWO FLOOR drains.
Also to determine whether a small berm or just a small rubber collapsible dam might also be used.... at least the rubber can be glued on later....

Effectively trying to tile the whole floor, half-way up the walls be able to hose everything out and make it drain......will float slightly thicker tile near walls and under any cabinets, or counters... counters are poured concrete, severe terrazzo that I make myself and are hung on walls with frame that I weld up and get powder coated...did the kitchen same way.....
Also will put a 4 by 8 sheet of electric heating under so that will build up tile just slightly outside of shower pan.

How to connect two floor drains into one existing p-trap..just tee and elbow?
Is the Quick drain worth the $600........wow.....sure looks cool!
Can I extend/place the existing p-trap any where under the proposed shower pan...it presently comes straight out from near main about 3-4 feet then the trap then up...I assume I can put a sweep in it and move it a couple of feet no problems? but adding another drain a couple of feet away in series is beyond my very limited experience.......

I'm definitely not a plumber...just a hermit who spends time researching and studying and trying...most of the time it works very well and is ABOVE any code that I have seen on paper....and if anyone lived in my area who I could hire....I WOULD!!!!

Thanks and Regards,

Pitownpi,
Homeowner/Homesteader/Engineer....and hermit...I don't own my property any more it owns me and I love it!!!
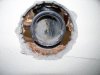
the other pics are of an open TEE I found in a sink drain...I had always wondered why I couldn't use the sink without the water running down the wall....SEEMS original contractor forgot to cap it.....faced outwards to outside wall and even had sheeting cut for it...BUT STUCCO CREW JUST PAPERED OVER AND THE REST IS HISTORY..was able to drill it out...

Can I drain my washing maching now into this hole?
 

Attachments

  • 100_6056.JPG
    100_6056.JPG
    29.3 KB · Views: 884
  • 100_6033.JPG
    100_6033.JPG
    30.2 KB · Views: 868
  • 100_6028.JPG
    100_6028.JPG
    30.8 KB · Views: 862

lajoe

FlooringSupply
Messages
4
Reaction score
0
Points
0
Location
Los Angeles CA
Website
www.flooringsupplyshop.com
O.k...... $600 for the Quick drains…its look good on the floor but, I don’t know I think it’s a bit to high but on the other hand if you have the budget go for it…its look really nice, there is many product in the market that’s look really nice check this one http://www.ebbe-america.com/ .
About the two drains we did it once like you said with T and elbow and its still working good…. So go for it.
And to save you the headache you can all ways customs the preformed shower pans even with two drains, and it will save you the cost and the mess of the water proofing http://www.flooringsupplyshop.com/s...dy-to-tile-shower-pan-36-x-36-right-1082.html
And add pictures after you done with the project let us see how its come out,

Joe :cool:
 

Pitownpi

New Member
Messages
4
Reaction score
0
Points
0
Location
Pioneertown
Update Feb 2010

Using Single Kerdi Drain/100sq ft Membrane.
Main pan will be approx. 3 by 5 area. in concrete which I chipped up..yet to build

I'm concerned about pouring new concrete around the ABS....ANYTHING TO DO like wrap with closed cell foam?

I cut out old P-Trap...noticed that the extension to main line actually in a little uphill!.

The drain works well....bottom has about 1/2 inch of stuff that I'll clean out before I put on new p-train kerdi drain.
.in fact the one for the sink was going uphill as well. I was able to prop it up when installing new drywall/Durock.

Finally removed toilet: always flushed well, but looking in there...
noticed the ABS plastic may have been cracked during original concrete pour and some concrete has barely seeped through effectively 'sealing' what may be a very small crack...if indeed it is a crack or just some??....I'm going to use a brush to see if it's just not some poo!

This is definitely not an area of concrete I want to chip up as opposed to the shower pan which I already did...

the center of floor/entry way from door will have 30sq feet of electric heating under tile, which ends 2 feet from walls and just at where the kerdi membrane in the pan will end.

using diamond lath, I plan on raising the tile on the outside near the walls 1/8 inch, and matching the electric heat 1/8 inch build-up.

Hopefully this will drain the entire bathroom....not that I really intend on regularly flooding it...but thought it would be very functional for cleaning......

Thanks for any comments or ideas!
-Pi
 

Jadnashua

Retired Defense Industry Engineer xxx
Messages
32,770
Reaction score
1,190
Points
113
Location
New England
The whole floor needs slope to the drain, nominally at 1/4" per foot or the water will just sit there and need to be squeegeed where you want it. If you are going to treat the whole room as a wet room, you should waterproof the whole thing, at least the floor and part way up (at least to the showerhead in the shower). I wouldn't want electric heating elements there without some waterproofing on top of them. Normally, outside of the shower, you'd use Ditra, not Kerdi, but the Kerdi will waterproof, but not provide the decoupling that is good on top of the electric heat. Looks like you are going with one drain...each drain should have its own p-trap, if you add a second one, not a long arm between and only one. if you haven't checked out www.johnbridge.com, you should.
 

Pitownpi

New Member
Messages
4
Reaction score
0
Points
0
Location
Pioneertown
'Kerdi me this"

March Update:

Kerdi Drain and Membrane done
Finished just b4 midnight of course...

I have "Kerdi bubbles", so how to fix the problem (not the song)

I had a nightmare that the whole sheet of Kerdi/tile flaked off the wall in 'the big one' onto my mom in her wheelchair, first one wall, then the others....so I did the flloor/drain as my first Kerdi Experience"

FIRST QUESTIONS/IDEAS
1) Inject Kerdi Fix at a small hole made the center and work it around, squeeze excess back out hole and done!
1a) what about other adhesives? 1b)Are small bubbles still a problem

2) Cut the membrane and then put thinset and then patching....sounds backwards and wrong somehow, like major inpatient surgery for an outpatient problem...some insurance skam like opportunity to sell more Kerdi!

Other ponders
a) On Walls, must fix air bubbles unless very small?
aa) Air bubbles seem to come up later in an area that I had surely pressed into the thinset.....
I had to keep vigilant and go back and check other sheets!, even used big pieces of PVC to roll stuff out, could hear/see the actually thinset moving behind Kerdi, then of course squeezing out.

b) On Floor, do air bubbles really matter? It will be covered in plenty of thinset/tile/grout and I pile it on!

c) Thinset IS NOT A SEALANT. if it were, we would not need a membrane!
THEREFORE, why do they lap/flash the membrane improperly from a WATER SHEDDING VIEWPOINT?
I've seen some Schluter diagrams/video that show the membrane flashed properly and then other diagrams and people who just 'flash' it as a lap where the water would go behind the corner piece!

Observations
i) In beginning, skinning up pretty bad, didn't really get how wet everything has to be! Sprayed/sponged H2O onto Durock...2 people better as one can just keep the Durock hydrated, mix mud, clean stuff.

ii)Ended up having to mix thinset so runny compared what I'm used to....had to fight years of mixing mud a certain way.... it was hard to keep on my 12" trowel, I used trowels of every size too as needed, one in each hand like some warrior battling a monster who's blood was thinset...'Trowlin Master'.....ha ha
 

Attachments

  • Kerdishower..JPG
    Kerdishower..JPG
    84.3 KB · Views: 729
Last edited:

Jadnashua

Retired Defense Industry Engineer xxx
Messages
32,770
Reaction score
1,190
Points
113
Location
New England
If the bubbles aren't very large, and they don't involve a seam, you can probably just leave them. Otherwise, the approved method is to cut out that area, and put a patch over it with the required minimum of 2" overlap onto the intact sheet. Lapping the seams on Kerdi is not subject to 'normal' rules, since the stuff is hydrophobic - it repells water. So, if you have the thinset mixed properly, and get good contact and embedd in the thinset, there isn't much thinset underneath - only enough to hold the fleece of the two sheets together. It won't leak. Take a scrap, roll it into a cone, fill with water. It will hold, even with the small hole in the end. Now, add the thinset to hold the sheets together at the seams, and you're good. A shower doens't normally have standing water in it and water won't go far into a seam, so the direction of the lap is mostly irrellevant. A conventional shower could have some standing water in it if the preslope is not done right or the weep holes in the drain are blocked, and is the source of many failed showers.

Keep in mind that thinset is rated for a 28-day cure before it reaches the specified strength. It actually continues to get stronger after that. Because the membrane is waterproof, the thinset has to cure, and can't dry out by evaporation, which is the way to ensure the strongest bond. www.johnbridge.com is your best resource for help on using Kerdi and building a shower, either with this, or any other conventional method.
 
Top
Hey, wait a minute.

This is awkward, but...

It looks like you're using an ad blocker. We get it, but (1) terrylove.com can't live without ads, and (2) ad blockers can cause issues with videos and comments. If you'd like to support the site, please allow ads.

If any particular ad is your REASON for blocking ads, please let us know. We might be able to do something about it. Thanks.
I've Disabled AdBlock    No Thanks