Replacement of leaking exhaust fan duct

Users who are viewing this thread

MiamiCanes

New Member
Messages
103
Reaction score
0
Points
0
Location
Pembroke Pines, FL
Website
www.youtube.com
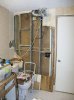
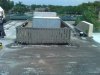
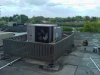
Over the past few days, I've come to the conclusion that the bathroom exhaust fan's duct is almost certainly letting water into the wall. I don't have a 32-foot ladder & can't get up on the roof to easily check, but I'm guessing that it has either leaking flashing or no flashing at all, and might very well be missing the "tophat" above the duct itself as well.

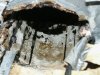
The duct itself is a 3" diameter flexible metal duct. It has at least 3-6" of vertical "play" (the duct itself as a whole, not expansion of its accordion joints; I didn't pull on it terribly hard to test the true limits of its vertical motion for obvious reasons). It enters the bathroom inside an interior wall through a hole in the concrete (cast in place, steel pan deck) roof above.

When I bought the house, I discovered that the duct was blocked, and had been blocked for a long time. A few days ago, when I started removing the bathroom's old, moldy drywall, I bought a vent cleaning brush and proudly cleaned it out. At the time, big chunks of asphalt roofing material came out. I was disgusted, thinking that some careless roofers dumped tar & gravel into it when they re-did the roof (~10 years ago, from what the seller told me when I bought it). It occurred to me this morning on my way to work that the roofers might have intentionally covered the whole duct because it was leaking, and I might have successfully punched a bigger hole in the roof (regardless of their motives for doing it, recent water infiltration definitely seems to have been happening anyway). Oops.

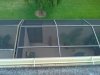
The evidence of recent water damage is overwhelming. The back of the drywall on the OTHER side of the wall (I ripped out the drywall on the bathroom side) doesn't feel damp, but LOOKS like it's been soaked on a regular basis over the years, is hosting a thriving mold colony, and has a moisture reading of 10-11% (I bought a 2-pronged moisture reader a few days ago). By contrast, other walls nearby have moisture readings of 4-5%.

Anyway, I think it's safe to say that the exhaust duct needs to be rebuilt -- probably replaced with a 3" PVC pipe that's firmly fastened to the studs (for strain relief), with new flashing, waterproofing, and something at the opening to keep rainwater out. Does anybody have any idea what I'm looking at cost-wise if I hire someone to do it? Is this a project I could viably do myself if I somehow got a hold of a 32' extension ladder (so I can get on the roof)?
 

Jadnashua

Retired Defense Industry Engineer xxx
Messages
32,770
Reaction score
1,190
Points
113
Location
New England
Installing one of these things isn't rocket science, but because you could end up on the roof, quite dangerous. Because of the height, OSHA rules (if they are followed) will add a fair amount of time to the task to prepare the proper fall protection. Most don't use pvc. A solid duct is better than flexible.

I really like my tubular skylight with optional exhaust fan. I replaced my existing light/fan assembly in the bathroom with this. It requires one hole for the skylight (I used the 10" model - no structural work), and a second if you use the optional fan. This would only work if you had attic above the room. It works very well, the remote fan is very quiet; so much so, that a switch with a timer or indicator light might be a good idea. Check it out at www.solatube.com.
 

MiamiCanes

New Member
Messages
103
Reaction score
0
Points
0
Location
Pembroke Pines, FL
Website
www.youtube.com
Well, in my case, the only risk of falling comes from the ladder. The roof itself is a flat concrete deck w/tarred gravel. :)

The main thing stopping me from doing it myself is the need for an outrageously expensive 30+ foot extension ladder. The roof itself isn't that high, but there's no direct route TO it. The back yard is walled in and topped with a pool-type screen enclosure. The front has pergolas blocking every straightforward route to the roof -- my own OR the neighbors. I can't climb up to the neighbors' corners from my own front yard, because there are pergolas in the way on both sides that extend out as far as the front wall of the neighbors' homes. The DirecTV guy had to route the extension ladder at almost a 45-degree angle to clear the pergola over the front door (the bottom of the ladder was almost in the bushes with red flowers you see at the front right).

I wish the extension-A-frame hybrid ladders could lock at a position somewhere between 130 and 160 degrees (instead of 180). THEN I could get by with a relatively affordable 22-foot ladder by making the ladder relatively steep between the ground and first bend somewhere above the pergola's height, then make the second half a little shallower (basically, folding the ladder around the pergola). Unfortunately, the Werner 22' ladder I saw at Lowes can only lock into 3 positions: closed, A-frame, and 180 degrees.
 

Attachments

  • front.jpg
    front.jpg
    77.7 KB · Views: 523
Last edited:

Iminaquagmire

DIY Senior Member
Messages
206
Reaction score
0
Points
0
Rental store. They should rent a long enough ladder. Coming from the fire service though, I'll tell you that a 35' extension ladder is going to be HEAVY and not easily or safely placed by one person. I've done it, but I wouldn't do it on my own house.

As said, ridgid ducting is much preferred to flexible. I don't think PVC would be a good choice here simply because it would be next to impossible to make up any joints in closed walls though I think I'd open up all the walls along the path anyway to get rid of any mold that may be there.
 

MiamiCanes

New Member
Messages
103
Reaction score
0
Points
0
Location
Pembroke Pines, FL
Website
www.youtube.com
Oh, that's not a problem. The wall is completely stripped of drywall on the 'bathroom' side, and the hole through which the duct passes is directly above the void in the middle of the wall.

If I were to rent a ladder (I found a place that's $32 for 2pm Fri through 9am Monday), is this what I'd need, or do I need anything else/instead?

* 8' of 3" PVC pipe (CPVC? ABS?)

* expanding foam (to fill the void around the pipe where it passes through the hole in the slab after it's in place & provide water resistance

* one or more "C" brackets to firmly anchor the pipe to a wall stud so it won't dislodge and create a gap in the foam/waterproofing above if it gets wiggled while installing the fan.

* One or more metal brackets to shim the pipe a little bit away from the stud to which it's fastened (might not be needed)

* Metal flashing of some kind (can you post a pic of what it looks like)?

* Some kind of caulk-like substance to form a barrier between the flashing's base and the built-up roof bed below and "glue" the flashing to the built-up roof bed.

* Some other kind of "goop" to apply OVER the flashing, cover the point where the flashing ends and built-up roofing begins, and form a mini-dam around its perimeter to keep water running (slowly) along its slightly-sloping surface from seeping under the flashing. Elastomeric paint, perhaps?

* Something to keep rain from entering the pipe. A 180-degree elbow, perhaps? Remember, hurricanes are a real threat, and "hat" type deflectors are probably more vulnerable than a 180-degree elbow. The pipe would end up rising ~2 feet above the roof before bending & end up about a foot above the roof surface. Good idea, or bad for some reason?

For reference, here's a pic of the wall as of last night with the fan (temporary... my real one's a Panasonic & won't be here until next week) temporarily rigged up to suck out the drywall dust. As you can see, the rear of the wall on the other side has been completely trashed by water coming from somewhere. Interestingly, the drywall I removed (on the bathroom side) was nowhere near as bad as the drywall you see in this pic. It had some mold, but didn't have much outright water damage, and the mold itself was mostly scattered patches instead of "rolling fields".
 

Attachments

  • 2009-06-10-eastwall.jpg
    2009-06-10-eastwall.jpg
    51.6 KB · Views: 447
Last edited:

Jadnashua

Retired Defense Industry Engineer xxx
Messages
32,770
Reaction score
1,190
Points
113
Location
New England
Unless the installation instructions specifically say the use of PVC is okay for the duct, it's not a good idea...use a solid metal duct. If you screw it together at the joints and seal it with the metalized duct tape (not fabric duct tape!), it should not leak.

Some of the Panasonic fans require a 4" duct. Note, you could convert to a rectangular duct in the wall to make things fit, convert back to round, if needed, higher up.

Depending on whether the roof is a membrane, or what would determine how to connect and seal the penetration. If a membrane, you need another piece to patch, the special contact cement, and then caulk the seam. You probably will want a boot designed for that penetration. Because access is not easy, you want this done right the first time.

Flat roofs are much less tolerant of poor installations. A sloped roof has water flowing over it...a flat roof can have standing water, so the requirements to seal things are quite different.
 

MiamiCanes

New Member
Messages
103
Reaction score
0
Points
0
Location
Pembroke Pines, FL
Website
www.youtube.com
I'm pretty sure it's NOT a membrane, mostly because the roof deck itself is concrete. With a concrete roof deck, penetrations are just about the only place you CAN get significant water infiltration. Remember, concrete soaks up water like a sponge (well, not quite, but you get the simile). If a wood roof has a crack in the plywood, water is going to gush in. If a concrete roof has a crack, most of the water that enters will get absorbed into the drier parts of the concrete matrix before the area around the crack gets saturated enough for water to make it all the way through and drip out. So, you don't want leaks... but tiny little isolated leaks aren't as big of a problem. Plus, wood=mold food. Damp wood from a tiny leak = happy mold farm. Damp concrete from a tiny leak = well... damp concrete.

That said, penetrations are the one place where even a concrete roof soaked in Xypex can leak like a piece of split-open plywood. But once again, you have a lot more leeway with concrete. If expanding foam forms a seal that's "almost" perfect, what little water makes it through will probably get absorbed into the concrete long before it drips through. In the case of MY roof, it looks like the original duct was built with no "Plan B" (expanding foam). I've noticed that builders are really fond of building homes with single points of failure, where it either works 100%, or fails 100%. As opposed to "flashing keeps 99% of the water away, the foam sealant blocks the next .9%, the concrete soaks up the next .09% & hot afternoon sun eventually evaporates it away, and the final .01% that makes it through evaporates when it hits the highly-dehumidified air inside. Once in a blue moon, if it rains nonstop for a week after a hurricane when the power's out and indoor air is humid, enough water to cause damage might get through... but if it gets to that point, someone with a wood roof is probably homeless. ;-)
 
Last edited:

MiamiCanes

New Member
Messages
103
Reaction score
0
Points
0
Location
Pembroke Pines, FL
Website
www.youtube.com
OK, I'm home from work now, got to see the vent for the first time in daylight, and took some pics.

I'm not really sure whether it's good or bad news, but there DOES seem to be flashing and a cap... but from the pics, I think it's pretty obvious that it's leaking like a sieve, and has been for quite a while.

I also made a happy discovery... it looks like a 24' extension ladder *just* might be long enough to reach the roof. From parapet wall to ground, along an angle with the ladder resting on one of the pergola beams (a beam I might very well remove tomorrow if necessary to save a hundred bucks on a ladder), it's a hair under 22 feet. Sadly, a hair too long for a Werner MT-22 MultiLadder to likely work, but should be OK with 24'. Not quite kosher, but not much more dangerous than a 26' or 28' ladder would be, anyway.

After seeing it clearly with bright light from above, the relationship of the vent pipe to the duct became readily apparent: it's just inside it, attached to nothing. I pulled it down & out to get the pics of the shaft, then put it back up like it was before. Kind of a bummer, though... if I'd known the shaft were so wide, I would have considered trying to somehow build a raised area to accommodate a fan with 4" or larger duct.

Pics, from top to bottom:

#1: View of the duct area. The electrical box is for the vanity light in the dressing area on the other side of the wall... looking at the condition of the drywall with a flashlight, I'm sure I'm going to be tearing out and replacing the drywall over there, too.

#2: looking up towards the shaft

#3: looking a little higher up into the shaft

#4: looking at what's presumably the flashing and vent cap on the roof. It actually doesn't look bad from down here, but for all I know it might have a gaping void. I tried looking up the shaft with my wall inspection camera (basically, a webcam with 2 white LEDs on a 3' gooseneck rod with wireless LCD display), but the camera on it is crap (think: late-90s webcam) and has no dynamic range or focal depth to speak of... the sunlight near the top just completely overwhelmed it, and all I could see was white (the pics below, including the last one, were taken with a DSLR with zoom lens).
 

Attachments

  • 2009-06-12.vent1.jpg
    2009-06-12.vent1.jpg
    54.2 KB · Views: 419
  • 2009-06-12-vent2.jpg
    2009-06-12-vent2.jpg
    50.8 KB · Views: 415
  • 2009-06-12_vent3.jpg
    2009-06-12_vent3.jpg
    92 KB · Views: 426
  • 2009-06-12_vent4.jpg
    2009-06-12_vent4.jpg
    43 KB · Views: 409

MiamiCanes

New Member
Messages
103
Reaction score
0
Points
0
Location
Pembroke Pines, FL
Website
www.youtube.com
Well, as luck would have it, Home Depot had a 24' ladder marked down to $106 because it had some minor damage. I bought it, and learned a few things:

1) There's no way in HELL I would have been able to get a 32-foot ladder home. The 24' ladder BARELY fit with the gate down, bed extender flipped out, rear half of the tonneau open, and the top strapped down to the roof rack. A 28' might (repeat: might) be do-able with some major care and a distance of under a mile, but anything longer just isn't going to happen. My SportTrac was too expensive to risk damaging it that way.

2) A 24' ladder is the absolute minimum capable of reaching the roof. By "reach", I mean the top half's pads were even with the top of the parapet wall. Climbing onto the roof was scary. Climbing off, onto the ladder, was scarier. Carrying anything up there that wouldn't have fit in a backpack or weighed more than 3-5 pounds would have been impossible.

3) Never, ever buy a cheap aluminum ladder, or a ladder with a dent or bend on a foot. It'll never be safe, and will only get worse. Rent one if you must, but for god's sake don't buy it. (I took it back)

4) The fan vent's flashing is the least of my problems. I need roofers.

Basically, what I found are a few big (3+ inches high) mushy blisters. The roof's surface is basically tarred-over paper. Ugly, but the roofs aren't visible from the ground anyway, so it's OK. They look kind of like what tile roofs look like before the actual tile goes on.

My new theory is that water is getting under the tarred paper, then flowing UNDER the flashing into the nearest hole. One thing I noticed was that the vents and a/c power condiut on one neighbor's roof looked like artificial islands with sea walls... surrounded by some kind of solid retainng structure, and built up ~6-10" above the surrounding roof. The other neighbors didn't, but I noticed something else... that same neighbor's roof was almost completely dry. My roof was almost completely submerged under at least an inch or two of water everywhere, as were most of the other neighbors' roofs. I think I'm going to ask him who his roofer was...

The only thing that worries me now, is how the hell anyone can do roofing when it rains for several hours every single day (as has been the case for at least the past month), and nothing ever really gets a chance to dry out completely in between rain. Even if all they really HAVE to do is puncture the blisters and seal the whole roof under a few hundred gallons of tar (or elastomeric paint), I don't see how they can do it under the current weather conditions.
 

Jadnashua

Retired Defense Industry Engineer xxx
Messages
32,770
Reaction score
1,190
Points
113
Location
New England
I'm not a roofer. My thought, though, is that you'd be much better with a elastomeric membrane. Tar and tar paper is a leak waiting to happen. You also need some drains. For things to drain, there has to be some slope. Building up platforms for the mechanicals isn't a bad idea, as mounting them means making holes, and if they happen to be a low spot, opportunities to leak.
 

MiamiCanes

New Member
Messages
103
Reaction score
0
Points
0
Location
Pembroke Pines, FL
Website
www.youtube.com
Actually, I've been kicking myself for the past 2 hours for not buying a ladder and applying elastomeric waterproofing gel to the roof myself back in January or February. I think it can even be applied on top of an existing built-up roof. The problem is, I think you can ONLY apply it over an existing BUR if it's dry, and it's not going to rain for at least 48 hours. In Florida, that means sometime in November -- maybe October, if we get incredibly lucky :(

I ran through one online estimator, and choked when I saw the ~$8,000 estimate to remove an old 2-layer roof and replace it with IB (18x45 feet). As much as I hate to admit it, at this point I'm probably going to have to settle for just burning $2,000 or so to get it superficially fixed (lancing the blisters, shoring up the flashing, and dumping a few hundred gallons of tar on it), and plan to get it replaced outright in ~5 years or so when I can afford to have it done properly.

In all honesty, though, what I REALLY want is EPS sprayed foam... but I can't find a single company south of Orlando that actually does it and will return phone calls for a residential job. Part of the reason I *didn't* get the roof fixed immediately last year after buying the house was because I read about EPS, decided it was what I wanted, then spent the next 9 months (on and off) trying to either get someone to give me a firm quote on what it would cost to cover the roof with ~6 inches of EPS, or at least tell me point blank that it would be cost-prohibitive and to forget about it. :(

Update! Found some pics of the roof I took last year when I took advantage of the DirecTV installer's ladder to get up on the roof for the first time. The vent you see to the right of the air conditioner in the middle pic is the one where the water leakage was observed. It's not too visible in the pic, but the blister I suspect is responsible is approximately centered along the seam between two sheets of tar paper that's one sheet closer to where I was standing than the vent stack itself (the tip of the white pipe at the lower right that's pointing at the yellow tool bag lies a few inches away from the seam I'm talking about). The third pics shows why my roof is inaccessible via ladder from the rear.

For what it's worth, the pic perfectly illustrates the real-world benefits of a concrete roof in Florida. This is a roof that looks like hell and has been through a hurricane (Wilma) that destroyed wood-framed houses built nearby & left just about every wood roof in Broward County with major damage... yet, despite having not been repaired since then, or having had any significant maintenance in a decade, didn't even leak badly enough to discolor the painted surface of the drywall's "room" side. As bad as the wall looks in the pic a few postings back, you'd never know anything is amiss if you look at the other side of that wall. I was actually pretty shocked to see what the wall's rear side looked like.
 

Attachments

  • IMAGE_104.jpg
    IMAGE_104.jpg
    79.2 KB · Views: 424
  • IMAGE_112.jpg
    IMAGE_112.jpg
    61.7 KB · Views: 424
  • IMAGE_121.jpg
    IMAGE_121.jpg
    65.4 KB · Views: 419
Last edited:

Iminaquagmire

DIY Senior Member
Messages
206
Reaction score
0
Points
0
What you have there is not a flat roof. The tarpaper you think you see is what appears to me to be a torchdown roof. You could get that replaced for much less than $8,000. You could save even more money if you tear it off yourself.
 

MiamiCanes

New Member
Messages
103
Reaction score
0
Points
0
Location
Pembroke Pines, FL
Website
www.youtube.com
Well, I got my first estimate for tear-off and replacement yesterday: $9,500. Good god. My neighbors paid $8,000 1-3 months after Hurricane Wilma, when 85% of the roofs in Broward County were being replaced. We're now more than a year into an allegedly deflationary recession, no recent hurricane to drive up costs backed by insurance companies forced to pay whatever the market will bear, and they want to charge more than $1,500 more (by the way, it's the same company who did my neighbors' roofs).

Current plan: patch the flashing myself with Wet-R-Dry roof cement this weekend, cut and reglue the blisters with Wet-R-Dry over the next few weeks, and give the roof a coat of Ames Super Elasto-Barrier. This winter, when it dries out, I'll give it the full treatment... another coat or two of SE-B, a coat with embedded roof fabric, another coat of SE-B, and two coats of one of Ames' white toppings. Estimated cost: ~$3,500.

I just wish Ames sold stuff in containers that were a tiny bit smaller (at proportionally-reduced cost) so they could ship via Amtrak Express and slip under the 50-lb max weight limit for each individual item. It's dirt cheap if you're shipping ~100-500 pounds (they charge you based on the collective weight of your shipment as if it were a single item), and no slower than UPS Ground (basically, it's the same time it would take a passenger to get from A to B on Amtrak). The only catch is that you have to pick it up yourself at the station, but seeing how I'd have to go through lots of trouble to meet a truck for a freight delivery anyway, and the nearest station is ~5 miles from my house, that's no big deal. As it stands, I ended up paying almost $35/5gal container just in shipping charges. All I can say is, it better be worth paying approximately double what Home Depot/Lowe's charges for allegedly comparable products (ergo, the reason I'm starting with one container). If it weren't for the shipping, I would have thrown in a 5gal container of their primer, too, but the shipping charges raised the cost just a little bit beyond the tipping point for something that's officially listed by them as "nice, but not strictly necessary unless it's being applied to a rubber roof."
 
Top
Hey, wait a minute.

This is awkward, but...

It looks like you're using an ad blocker. We get it, but (1) terrylove.com can't live without ads, and (2) ad blockers can cause issues with videos and comments. If you'd like to support the site, please allow ads.

If any particular ad is your REASON for blocking ads, please let us know. We might be able to do something about it. Thanks.
I've Disabled AdBlock    No Thanks