Toto 1.6gpf -- Long Term Leak

Users who are viewing this thread

ScrewedByNCGC

New Member
Messages
14
Reaction score
0
Points
0
Location
North Carolina
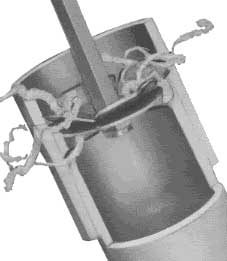
I am the original owner of a house bought in 2003. Dec 2008 I discovered a large water stain in the kitchen ceiling. I also noticed the hardwood floor beneath the stain was cupping. I cut out various areas of drywall and discovered rotted wood beneath what appears to be waste piping from the upstairs bathroom and a leak that has drained down the length of the wall and pooled underneath my hardwood. After turning off the upstairs water for 6+ weeks things have dried out (mostly) so I removed the toilet to check things out. It's a Toto 1.6 but I don't know the model.

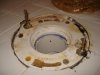
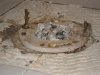
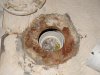
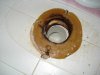
From the posts here it seems the Toto is a popular and reliable brand for a low-flow but after removing the toilet it appears liquid has been leaking over the top of the wax ring and down through the many openings in the tile (which looks like it was "cut" with a hammer). The tile "cutout" is larger than the wax ring in some areas but hidden by the toilet base. The liquid has (I assume) leaked through the tile down into the subfloor and rotted out my drywall downstairs. The best example is a large growth of mold where the wax ring does not cover the opening in the tile leading to the subfloor.

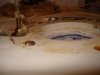
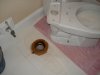
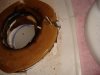
It appears the wax ring was not meeting the base of the toilet. When I flipped over the toilet I see water stains on the bottom away from the opening, like it was seeping between the wax and toilet base. The water stain pretty evenly covers the back half of the toilet base. Before I removed the toilet it was not rocking, seemed solid, too.

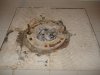
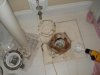
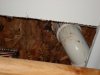
Is it possible to get an even bigger or thicker wax ring? Do I need to perform some sort of tile repair for the area underneath the wax ring? Any comments appreciated. The last photo is the shot of the kitchen ceiling beneath the upstairs bathroom. This house is a winner.

Chuck

Looks to be a Reliant CST703 bowl
 

Attachments

  • Toilet Leak 2008 (LoRes) 001.jpg
    Toilet Leak 2008 (LoRes) 001.jpg
    26.4 KB · Views: 883
  • Toilet Leak 2008 (LoRes) 002.jpg
    Toilet Leak 2008 (LoRes) 002.jpg
    38.7 KB · Views: 866
  • Toilet Leak 2008 (LoRes) 003.jpg
    Toilet Leak 2008 (LoRes) 003.jpg
    35.8 KB · Views: 810
  • Toilet Leak 2008 (LoRes) 004.jpg
    Toilet Leak 2008 (LoRes) 004.jpg
    32.8 KB · Views: 793
Last edited by a moderator:

Gary Swart

In the Trades
Messages
8,101
Reaction score
84
Points
48
Location
Yakima, WA
I suspect the problem is not the toilet itself but the installation. The old wax ring still in place make it difficult to tell for sure, but my guess is the flange is recessed below the level of the floor. When properly installed, a flange will set on top of the finished floor. I think the flange was probably set first then the tile laid around it. There are three ways to fix this, but first you must repair the water damage to the floor. You could then have a plumber remove the existing flange and install a new flange at the proper height, or you could reuse the existing flange as is but add extension ring(s), or you could just use a thicker wax ring. It would appear you will have to demo the old floor anyway, so option #1 might not be too bad of an idea. I would suggest a plumber as well as a building contractor be employed for this repair as it is fairly extensive.
 

ScrewedByNCGC

New Member
Messages
14
Reaction score
0
Points
0
Location
North Carolina
From my perspective hiring a plumber and a bldg contractor from around here does not appeal to me at all; on the other side of the coin I don't have any experience working on tile or toilets. Is the flange extension a reliable, long-term fix or more like a band-aid?
 

Gary Swart

In the Trades
Messages
8,101
Reaction score
84
Points
48
Location
Yakima, WA
Extension rings are a permanent repair. They come in various thicknesses and are attached to the flange with stainless steel screws and are sealed between the rings and flange with silicone. It really depends on how much the height needs to be increased as whether or not to use extension rings or just a thicker wax ring. Wax rings come in 3 thicknesses. Thicker wax very well may be a good option if you do not wish to change the flange and if the height to be increase is not too much. My concern is that by your description this has been a fairly long term leak. That tells me that you likely have unseen damage that will require fairly extensive demolition and repair of the floor and the ceiling below. One thing in your favor for DIY is the plumbing is PVC and relatively easy to cut and extend. This certainly would make it easier to do the floor work because you would not have to piece around the flange. The flange must be screwed through the finished floor and into the sub floor. I use #12 SS of sufficient length for this. You will have to be the judge as to how much damage there is and how much demo will have to be done.
 

Jadnashua

Retired Defense Industry Engineer xxx
Messages
32,770
Reaction score
1,190
Points
113
Location
New England
It appears that that wax ring was not compressed when the toilet was set down, indicating that the flange is, indeed, not sitting on TOP of the finished floor. You need to determine if the subfloor is rotten. Ideally, the flange is installed where it is supposed to be. Extenders are possible. Double or extra thick wax rings can work. A waxless seal (Fluidmaster is available at a big box store) will also work as it has a long projection that would make a seal in a flange that is not where it is supposed to be.
 

ScrewedByNCGC

New Member
Messages
14
Reaction score
0
Points
0
Location
North Carolina
I've stopped using the upstairs b/r for at least 45 days. The downstairs walls have dried out; I poked around the bottom of the subfloor with a small screwdriver and it does not appear rotted for some reason. In any case, I removed the wax ring and posted more photos. Anything between the flange and the finished floor besides a layer of silicone, like a membrane or a rubberised gasket?

I removed large sections of sheetrock that I thought may have retained water, whether or not they were stained. If they were within 12" of the stain I cut it out and replaced them. I still have some sections to finish. I figure I will replace about 16 square feet of drywall when it's done.

I'm removing the four tiles around the flange first. I want to inspect more of the top layer of plywood before I perform any flange replacement or other repairs.

The flange -- isn't this an inspection item? It's not atop the finished floor, it's cracked and it's drops down at least 1/4" on one side. Why'd he bother putting one in at all?
 

Attachments

  • Toilet Leak 2008 (LoRes) 005.jpg
    Toilet Leak 2008 (LoRes) 005.jpg
    38.8 KB · Views: 769
  • Toilet Leak 2008 (LoRes) 006.jpg
    Toilet Leak 2008 (LoRes) 006.jpg
    28.1 KB · Views: 677

SewerRatz

Illinois Licensed Plumber
Messages
1,681
Reaction score
10
Points
38
Location
Chicago, IL
Website
www.a-archer.net
Every leaking water closet I been on has been a cracked plastic flange, or tank to bowl bolts where leaking. In your case obviously its a cracked flange.
 

SewerRatz

Illinois Licensed Plumber
Messages
1,681
Reaction score
10
Points
38
Location
Chicago, IL
Website
www.a-archer.net
To make the repair easer get your hands on a Ram Bit or a Pipe Hog for the size of pipe you have there. You can drill out the pipe from the 3" PVC elbow and glue a new piece in with a new flange with a stainless steal flange.

pipe-hog-reamer-400.jpg


pvcsaver_bit.jpg
 
Last edited by a moderator:

ScrewedByNCGC

New Member
Messages
14
Reaction score
0
Points
0
Location
North Carolina
How about the flange mount. This one wasn't even sitting on the backer board. There were globs of thinset underneath one side of it, probably to jack it up. The tile on the left side was cantilevered maximum of 1" between the gap in the back and the actual flange.

The ram bit looks like it would make a straight inside cut on the PVC. If I can't get one I'm just going to Dremel it.
 

Attachments

  • Toilet Leak 2008 007 (LoRes).jpg
    Toilet Leak 2008 007 (LoRes).jpg
    44.8 KB · Views: 666
  • Toilet Leak 2008 (LoRes) 009.jpg
    Toilet Leak 2008 (LoRes) 009.jpg
    53.5 KB · Views: 662

SewerRatz

Illinois Licensed Plumber
Messages
1,681
Reaction score
10
Points
38
Location
Chicago, IL
Website
www.a-archer.net
Any good plumbing supply house will have the ram bit. As for the flange it must be secured to a solid surface to prevent it from moving and cracking again.
 
Last edited by a moderator:

ScrewedByNCGC

New Member
Messages
14
Reaction score
0
Points
0
Location
North Carolina
Just to be clear, the new flange sits atop the tiles, it does not contact the plywood subfloor nor does it sit on the backerboard. I am worried about the new flange cutting or splitting my new tiles.

The pipe hog was too expensive for me and I had to buy the guide as well; I also read that it makes the hole too big so I decided to use a 3.5" hole saw instead.

I'm going to remove the old backer in the space of the 4 x 4 tiles then install a new, one-piece backer with a 4" hole drilled in it; attach to sub, replace tiles then add flange so that it sits directly on the top of my new ceramic tiles. I bought the metal flange as suggested.
 

ScrewedByNCGC

New Member
Messages
14
Reaction score
0
Points
0
Location
North Carolina
Some more photos of the work so far.
 

Attachments

  • Flange Removed (LoRes).jpg
    Flange Removed (LoRes).jpg
    38.3 KB · Views: 604
  • Flange Removed Closeup (LoRes).jpg
    Flange Removed Closeup (LoRes).jpg
    58.1 KB · Views: 580
Top
Hey, wait a minute.

This is awkward, but...

It looks like you're using an ad blocker. We get it, but (1) terrylove.com can't live without ads, and (2) ad blockers can cause issues with videos and comments. If you'd like to support the site, please allow ads.

If any particular ad is your REASON for blocking ads, please let us know. We might be able to do something about it. Thanks.
I've Disabled AdBlock    No Thanks