Will this level entry shower design work?

Users who are viewing this thread

dimprov

New Member
Messages
38
Reaction score
0
Points
0
Location
Austin, Texas
I could use some advice on whether a remodel design for a level entry shower will work. Basically:
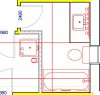
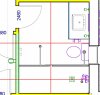
beforeF.png is the as-built floorplan for a guest bathroom and part of a laundry.room.
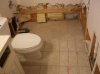
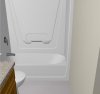
beforeR.jpg is a rendering of the as-built guest bathroom.
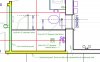
afterF.jpg is the remodelled guest bathroom. It steals some space from the laundry room, and adds two linear drains.
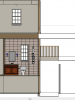
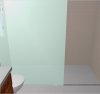
afterR.jpg is the corresponding rendering.
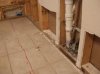
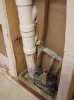
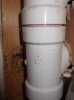
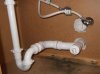
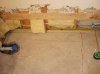
now.jpg is in-between before and after. It is a photo I took after doing some forensic demolition this past Saturday of the as-built bathtub.

Why "forensic" demolition? Because I wanted to locate the bath trap and its relationship to some post-tension cables running through the slab. As best I could using the instruments I had, I located the post-tension cables and marked their location on the concrete slab using a red marker. I also represented them on the floorplans using red lines.

So, here's the issue: the drain for the just demolished bathtub is on the "wrong" side of the post-tension cables vis-a-vis the linear drain I want to install. However, it seems that if I used two separate linear drains, I could tie one into the waste line currently used by the soon-to-be demolished laundry-room sink, and the other I could (I hope) tie into the toilet's waste line, which I have to move 4 inches anyway to give more elbowroom in the shower. By doing it this way, I could can steer clear of the post-tension cables.

Does this approach to the plumbing seem feasible, or would it break some obvious international building code (like maybe connecting a shower waste lline too close to a toilet waste line or something)?

If it doesn't break code, then this design has the side benefit of providing a sort of drain redundancy (reserve/backup drain) for the remodelled level-entry shower. For instance, if one drain got clogged with hair, then the other drain could catch the overflow.

David
Austin, TX
 

Attachments

  • beforeF.jpg
    beforeF.jpg
    54.8 KB · Views: 1,274
  • beforeR.jpg
    beforeR.jpg
    21.9 KB · Views: 1,326
  • afterF.jpg
    afterF.jpg
    50.1 KB · Views: 1,268
  • afterR.jpg
    afterR.jpg
    20.2 KB · Views: 1,259
  • now.jpg
    now.jpg
    25.7 KB · Views: 1,342

hj

Master Plumber
Messages
33,603
Reaction score
1,042
Points
113
Location
Cave Creek, Arizona
Website
www.terrylove.com
slab

I guess this means you either did not read, or intend to disregard the notice in your garage floor stating, "Post tension slab. DO NOT drill or make holes in the floor."
 

Iminaquagmire

DIY Senior Member
Messages
206
Reaction score
0
Points
0
In order to make the curbless shower, you have to slope the floor to your drain. The only way you can do that is to cut the slab out in the shower, redo it lower, and build you mudbed on top of that. You cannot cut your slab out so that's irrelevant. Besides all that, you need a 2" drain line for the shower which you cannot change to without tearing out the slab that you cannot tear out. Sorry, but without EXTENSIVE work, you're SOL.
 

dimprov

New Member
Messages
38
Reaction score
0
Points
0
Location
Austin, Texas
Thanks for your feedback.

Nope, HJ, I didn't see any such notice either in or on the garage floor. Is that where critical warnings get pasted in Arizona nowadays? :) I grew up in Tucson and can't remember seeing any then either.

OK, I accept that this may not be a cakewalk, but is it really all that dire? Does any of the following information change your mind regarding feasibility?

1. As for Iminaquagmire's second point, I'm lucky in that Drain #1 (the drain from the demolished laundry room sink) is 2" diameter. See attachment afterF2.jpg. For the reasons indicated at the start of this thread, I wasn't planning to involve the bathtub drain (drain #3) in draining the shower.
2. The load bearing walls stand directly over stemwalls.
3. The slab immediately around the trap for the as-built bathtub drain (drain #3) is at least 8" thick. It seems that there is rebar in the slab around that location because part of the rebar was exposed by whoever jackhammered that portion of the trap, and because my measuring instrument shows there to be a few other pieces in that area at a depth of around 3 to 4 inches. The exposed piece looks like 1/2" rebar.
4. As for Iminaquagmire's first point, I was planning to use either Kerdi or Noble (see attachment thinbed.jpg) to construct a thin bed shower on top of the slab that would drain in a monoplane from the back wall toward the linear drains (scupper- drains/trough-drains/trench-drains/whatever-name-you-want-to-call-it). I figured that way I wouldn't need to recess the shower bed into the slab. This means that the floor at the back wall (shown as the yellow wall at the bottom of the picture) would be about 3/4" higher than the top of the linear drain so that the floor can slope 1/4" per foot toward the linear drain. Of course, space for the linear drains, P-trap's, and piping to Drain #1 and Drain #2 would still need to be carved out from the slab. This might resemble two T's, if viewed from the sink looking toward the back wall.
5. I'm not quite sure why HJ referred to the garage slab, but if it makes any difference the top of the garage slab is 5 feet below the top of the bathroom slab. To better orient you, attached is a glasshouse view of the remodelled bathroom as seen from the garage. Also attached is a backclipped cross-section that shows the relationship.

David
Austin, TX
 

Attachments

  • afterF2.jpg
    afterF2.jpg
    43.9 KB · Views: 1,233
  • thinbed.jpg
    thinbed.jpg
    70.7 KB · Views: 1,186
  • glasshouse.jpg
    glasshouse.jpg
    25.7 KB · Views: 1,199
  • backclip.png
    backclip.png
    13.5 KB · Views: 1,164
Last edited:

Iminaquagmire

DIY Senior Member
Messages
206
Reaction score
0
Points
0
The warning is usually stamped into the garage slab someplace. That's what he meant.

I'm trying to wrap my head around how you plan to put the drain in for the shower, linear or not. They are not just flat drains, and even if they were, they still need a trap, which needs to be recessed if you want a barrier free shower. I see no way of putting in any sort of drain and running any length of pipe connecting it to anything without breaking out concrete. Seems to me that your cables are in the way of every conceivable configuration. Could you possibly post some pictures of your shower area from different angles showing the boundaries and their relationship to the cables. Also, post some pictures of the drain setup from the "demolished" laundry room.
 

hj

Master Plumber
Messages
33,603
Reaction score
1,042
Points
113
Location
Cave Creek, Arizona
Website
www.terrylove.com
slab

The warning is stamped into the garage floor slab and often in the outdoor sidewalks also, but it applies to the ENTIRE building. The idea being to make it so noticeable that homeowners do NOT start chopping the floor and doing remodeling. HOW you do what you are asking, will determine whether it is legal or not, and codes usually just define HOW you can do things. What did your building department say about you breaking into the floor for these revisions, which DO require a building permit and inspections?
 
Last edited:

dimprov

New Member
Messages
38
Reaction score
0
Points
0
Location
Austin, Texas
Also, post some pictures of the drain setup from the "demolished" laundry room.

OK, photos are attached. The last photo shows the current arrangement for the laundry sink that's on the other side of the wall.

David
Austin, TX
 

Attachments

  • sdrain1_1.jpg
    sdrain1_1.jpg
    21.5 KB · Views: 1,135
  • sdrain1_2.jpg
    sdrain1_2.jpg
    22.9 KB · Views: 1,124
  • sdrain1_3.jpg
    sdrain1_3.jpg
    26 KB · Views: 1,121
  • sdrain1_4.jpg
    sdrain1_4.jpg
    19.4 KB · Views: 1,117
  • sdrain1_5.jpg
    sdrain1_5.jpg
    22 KB · Views: 1,113
Last edited:

dimprov

New Member
Messages
38
Reaction score
0
Points
0
Location
Austin, Texas
What did your building department say about you breaking into the floor for these revisions, which DO require a building permit and inspections?

They said they're not a help desk. They said pay a fee and submit a plan for approval. They said it must satify these codes:

2006 International Residential Code - Residential Building and Mechanical Construction
2003 Uniform Plumbing Code - Residential and Commercial Construction
2005 National Electrical Code - All electrical installations

David
Austin, TX
 

hj

Master Plumber
Messages
33,603
Reaction score
1,042
Points
113
Location
Cave Creek, Arizona
Website
www.terrylove.com
buildign department

Usually they ARE a help desk to civilians who are not contractors or engineers. But I guess this is a case where you might not find out you have a problem until the inspector turns it down. In this case, all you can do is draw the plumbing the way you think it will work and then get a permit. The permit will be stamped, "This permit approves the drawing as submitted, BUT does not, however, allow any installation which violates any sections of the building code", or something similar which is a CYA ALL permits include so the department cannot be charged with allowing violations if found at a later date. If the permit approves it but the inspector does not like it you are SOL, and will have to regroup and try again. The problem being, if he has a problem with you breaking a poststressed floor, there is NO way to correct it.
 

Gary Swart

In the Trades
Messages
8,101
Reaction score
84
Points
48
Location
Yakima, WA
Considering the possible consequences, it appears to me that hiring a professional contractor would be a prudent choice. At least get a professional opinion from someone familiar with local codes.
 

dimprov

New Member
Messages
38
Reaction score
0
Points
0
Location
Austin, Texas
Very well, assume for the moment that I hired a licensed structural engineer and assume that he said that changes to the slab are a non-issue. Are there any plumbing gotchas in what I've proposed?

David
 

Jimbo

Plumber
Messages
8,918
Reaction score
18
Points
0
Location
San Diego, CA
Well, the laundry drain may already tie into the same lateral that the toilet drains into, so there is probably little real advantage from that standpoint in having two drains in the shower.

Also, using linear drains, or actually any type of drain, you do involve one of the three inviolable principles of plumbing: water flows down hill. SO how do you arrange the slope of the floor to accompodate that?

If you do have post tension cables located per your lines, I wonder how much slab-breaking you would be allowed to do, so close to the cable. You MUST get this issue resolved.
 

Jadnashua

Retired Defense Industry Engineer xxx
Messages
32,770
Reaction score
1,190
Points
113
Location
New England
It can be VERY dangerous, and detrimental to the entire structure if you compromise a cable or the supporting structure around a cable (i.e., the slab). You need someone who really understands this and can work out the math and maybe more important, has a bond large enough to cover whatever damage that may occur if he gets it wrong up to having the house condemmed.
 

C NUMB

Plumbing Contractor
Messages
132
Reaction score
0
Points
0
Location
NPR, FL
Website
www.ericsmithplumbing.com
Another note, that second drain would require a trap primer. In my area a shower without curb requires 2" from finish floor to top of shower drain with at least a 1/2" step down.
 

Terry

The Plumbing Wizard
Staff member
Messages
29,942
Reaction score
3,459
Points
113
Location
Bothell, Washington
Website
terrylove.com
I don't see an engineer saying it's okay to cut past the pre-stressed cables.
I would like to see that one in writing.

There are many shower pans that locate the drain near one end of the shower.
If you forget about perfectly centering the drain, put it where it can go, and then sloping toward the drain, you are much better off.

You may want to ask this at the JohnBridge about how the pan would work in your situation.

We can advise on plumbing, but they have better tile setters.
 

dimprov

New Member
Messages
38
Reaction score
0
Points
0
Location
Austin, Texas
Thanks for the feedback.

1. Are you sure a trap primer is required? If so, I'm guessing it's to mitigate a vacuum effect that might empty the shower p-trap on Drain #2 when the toilet flushes? Wouldn't proper venting prevent that from happening?

2. This is the first I've heard of a 2" requirement from the finish floor to top of shower drain. Is this a common plumbing requirement? NOW you've got me worried. This could be the unknown project-killer I was worried might be lurking. I had thought that aside from p-traps, 2" drain diameters, and adequate venting, the only plumbing requirement was for a 1/4" slope toward the drain. This shower is NOT attempting to be an ADA shower, and it is NOT attempting to be wheel chair accessible, but even when I look at those documents, it looks like only a 1" drop is involved (see attached), and I had assumed that was because 4' of space was needed to park the wheelchair (i.e. 4 feet x 1/4"/foot = 1"). Granted, these drawings aren't plumbing code...

3. You mean a 1/2" step down from the "high point" (see attached photo for reference)? You mean a 1/2" "ramp-down" instead of step-down would not suffice? Does anyone know if this is a common plumbing code (if that's what it is)? Again, I haven't seen it in any of the curbless shower drawings I've seen... In fact, it doesn't even sound curbless. More like a mini-curb.

David
Austin, TX
 

Attachments

  • curbless.jpg
    curbless.jpg
    50.9 KB · Views: 6,446
Last edited:

JohnfrWhipple

BATHROOM DESIGN & BUILD
Messages
3,225
Reaction score
102
Points
48
Location
North Vancouver, BC
Floor grading

As I see it the exsiting ptrap is exposed and the damage is done. I would see if its possible to tie into the exsiting 2" ptrap with the kerdi drain or a low profile clamping drain and see how tight that can be mounted to the floor.

Then bring in your tile guy and tiles and see what slope you need to run the water well. I would be raising the level of the floor near the vantity 1" and grading that back to the entry, keep the area near the toilet and vanity flat then grade everything back to the drain.

It is a multi step process but getting the grade right then waterpoofing on top with an approved waterproofing system. ANSI 118.10

Water test (leak test) your design before setting any tile....

You might need to build a temporary shower dam for this step.

If you are using Kerdi make sure to read this Kerdi Inspection Check List
good luck

Always get construction advice double checked by your local city hall. Flood Test Every Shower - Every Time.

"When It's perfect. It's Good Enough."
- JW
 
Last edited by a moderator:
Top
Hey, wait a minute.

This is awkward, but...

It looks like you're using an ad blocker. We get it, but (1) terrylove.com can't live without ads, and (2) ad blockers can cause issues with videos and comments. If you'd like to support the site, please allow ads.

If any particular ad is your REASON for blocking ads, please let us know. We might be able to do something about it. Thanks.
I've Disabled AdBlock    No Thanks