Should I add a CSV?

Users who are viewing this thread

JMMJR

New Member
Messages
16
Reaction score
0
Points
0
Location
Bucks County, PA
I've got a well system in my home. Here's a quick breakdown:

Goulds 7GS05411 (installed 11/06 - hope it has a Franklin motor) - 106' below pitless adapter
22-gallon diaphragm pressure tank (charged to 38PSI)
40/60 pressure switch

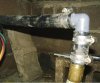
Our home used to have a jet pump, shortly after we moved in (less than a year) it gave up the ghost and we converted to a submersible system. The existing black PE pipe that previously ran down to the foot valve was reused and now connects the submersible to the pitless adapter. The same pipe runs 6' from the pitless adapter into the crawlspace where it hits a check valve (which maybe shouldn't be there according to what I've read on this forum) and connects to the tee/tank assembly with the pressure switch, gauge, hose bib, etc.

I'm looking to install a CSV1Z (where the check valve is currently located, perhaps?). We've got 2.5 baths, dishwasher, washing machine, refrigerator with icemaker, etc.

The way I see it, I should install the CSV with a setting of 50 PSI. I just want to make sure the PE pipe can handle it, as I understand it'll be under increased (constant?) pressure between the CSV and the submersible. And, do I even need one? It seems like a good idea, a cheap investment that will prolong the life of the system, and constant water pressure would be nice.

Any input is appreciated. Thanks in advance.
 
Last edited:

Valveman

Cary Austin
Staff member
Messages
14,622
Reaction score
1,299
Points
113
Location
Lubbock, Texas
Website
cyclestopvalves.com
A 22 gallon tank only holds about 6 gallons of water. At that depth and pressure, the 7G05 is trying to pump about 8 GPM. That means if you are using a 4 GPM shower or sprinkler, the other 4 GPM goes into the pressure tank for 1.5 minutes and the pump shuts off. Then the 4 GPM drains the tank in 1.5 minutes and the pump comes back on. That is a cycle every 3 minutes, which can be 480 cycles in a 24 hour period, or 120 cycles in a 6 hour sprinkler zone.

I am sure you are also noticing the pressure in the shower change from 40 to 60 and back again every couple of minutes, which can be irritating. A CSV1Z set at about 55 PSI will deliver constant pressure to the shower or sprinklers. The back pressure from the 7G05 will only be 130 PSI, so even 160# pipe is fine. Yes it should go in place of the above ground check valve. The CSV will increase the life of your pump system, and give you much better pressure in the shower.
 

Valveman

Cary Austin
Staff member
Messages
14,622
Reaction score
1,299
Points
113
Location
Lubbock, Texas
Website
cyclestopvalves.com
No. You will have to adjust the valve. Just turn the bolt until it holds steady at about 55 PSI, while you are running the kitchen sink. (or about 2 GPM)
 

JMMJR

New Member
Messages
16
Reaction score
0
Points
0
Location
Bucks County, PA
Thanks again. The reason I ended up here...

As described in my original post, we did the conversion to the submersible nearly 2 years ago. It wasn't cheap, it was flat-out expensive. Less than 2 years later, we found ourself with an inoperable well pump. The problem ended up being the wires rubbed through. When that got repaired, I was told my pressure tank was bad. I found this hard to believe, because it was new (was only about a year old at the time we did the submersible conversion). I decided to educate myself a little, and I learned enough to check it out myself. I found it wasn't charged. I precharged it to 38PSI and confirmed it is not leaking. My best guess is that it wasn't charged and wasn't checked when they did the submersible install. So, for nearly 2 years the pump cycled like crazy - and that's what did the wiring in I would guess.

More spacers were installed and a much better job of installing/taping the wire was done when they did the wiring replacement. So, I am hoping it holds up...

My anger over the situation has led me to spend alot of time learning as much as I can. Just from reading this forum, I found out about torque arrestors. But, after reading more - I realized I probably don't need one and hopefully the installation of the CSV will eliminate excess cycling and protect my wires.

As soon as I find the best price I can on a CSV1Z, I'll be getting one and installing it in short order.
 

JMMJR

New Member
Messages
16
Reaction score
0
Points
0
Location
Bucks County, PA
www.cyclestopvalves.com I think I have the best pricing on CSV's.

bob...

Thanks for the reply. I checked out your site. I guess I'll have to call to find out what shipping would cost. Price is comparable to what I've found.
 
Last edited by a moderator:

JMMJR

New Member
Messages
16
Reaction score
0
Points
0
Location
Bucks County, PA
Various things got in the way so I never got around to installing the CSV.

But, I just had to replace my pressure tank which blew. So, this has renewed my interest. I'll be posting a few pictures of the setup in my crawlspace. I do not trust the plastic elbow with hoseclamps that the plumbers used when they installed the submersible to make the transition from the black PE pipe coming from the well to the copper inside the house at the pressure tank tee.

I am afraid if I put the CSV in place beyond that point the backpressure will blow this half-assed connection apart.

I'll go back in the crawlspace tomorrow and take a few pictures to post here.
 
Last edited:

Valveman

Cary Austin
Staff member
Messages
14,622
Reaction score
1,299
Points
113
Location
Lubbock, Texas
Website
cyclestopvalves.com
"An ounce of prevention is worth a pound of cure." A CSV back then would have kept your tank from blowing now. I agree with you on the half ass connection.
 

JMMJR

New Member
Messages
16
Reaction score
0
Points
0
Location
Bucks County, PA
I agree, to a point.

The thing is, after I pulled it - I found out that the old tank was much older than I was told by the previous owner of the house. We bought the house in May '05 and were told the tank was only a few years old. It looked new and shiny. Well, it turns out it was installed in 1994. Our crawlspace has a concrete floor, and the walls are block. It's always bone dry so of course it would still LOOK good evne though it was that old. The back side against the wall is where it blew out.

Once my wife is done in our laundry room and I can access the crawlspace I'll go in and take those pictures.

EDIT: Picture of the crappy connection attached.
 

Attachments

  • PEtocopper.jpg
    PEtocopper.jpg
    48.5 KB · Views: 553
Last edited:

Gary Slusser

That's all folks!
Messages
6,921
Reaction score
22
Points
38
Location
Wherever I park the motorhome.
Website
www.qualitywaterassociates.com
"crappy connection"... there are millions of them that have been used on water lines, including city water service lines, for 50 yrs, they are just as good as any other connection. And you don't have to have space for wrenches, use pipe dope or tape so what do you see wrong with it, has it leaked (since 1994 was it)?

The only thing I see is that the main line was too short to use a 1" MPT elbow x insert instead of the male adapter and short piece of PE and then the elbow.
 
Last edited:

JMMJR

New Member
Messages
16
Reaction score
0
Points
0
Location
Bucks County, PA
That connection is from 2006 when we were converted from a jet pump to submersible. The pressure tank was from 1994, a holdover from the jet pump.

There's plenty of room for wrenches. The picture is decieving but there is two feet of space between that fitting and the block wall pictured behind it.

Think that connection will stand up to the 130 PSI backpressure if I install a CSV beyond it? If so, then I'll leave it as it is.

The short piece of PE below the elbow was hacked off the end of the main piece that is coming out of the wall from the pitless adapter. The brass you see it clamped to is actually a check valve.

Below the check valve is 6" of copper, then an elbow which then connects to the tee assembly.
 

Gary Slusser

That's all folks!
Messages
6,921
Reaction score
22
Points
38
Location
Wherever I park the motorhome.
Website
www.qualitywaterassociates.com
The picture is decieving but there is two feet of space between that fitting and the block wall pictured behind it.

Think that connection will stand up to the 130 PSI backpressure if I install a CSV beyond it? If so, then I'll leave it as it is.

The short piece of PE below the elbow was hacked off the end of the main piece that is coming out of the wall from the pitless adapter. The brass you see it clamped to is actually a check valve.

Below the check valve is 6" of copper, then an elbow which then connects to the tee assembly.
Two feet out of the wall is much better than 3" coming out of the wall. But there is no problem with how many feet come out of the wall. Although I would have taken the line down so far out of the wall and then straight into the tank tee, there's nothing wrong with the way it was plumbed.

Up to 1.5 hp pumps are hung on PE pipe down wells to 500"+. You probably have 160 psi rated PE, the pipe is marked about every 18-24". And unless your pump is way over sized, it will probably never build deadhead pressure unless you shut off the output of the pump totally; which a CSV doesn't do.

If that brass part is a check valve, it should be removed. Having an additional one opter than the one on/in the pump hides leaks before it and that's not good.

BTW, I've never seen an insert/barbed check valve, so if the PE is just clampoed on the the threaded end of a check valve, that is no good.
 

JMMJR

New Member
Messages
16
Reaction score
0
Points
0
Location
Bucks County, PA
Thanks for the reply. I am certain that the short piece of PE is just clamped onto the threads of that check valve.

I posted earlier that I know now the check valve needs to go based on what I read on this forum.

The thing is, how do I eliminate the check valve and fix this connection correctly?
 
Last edited:

Gary Slusser

That's all folks!
Messages
6,921
Reaction score
22
Points
38
Location
Wherever I park the motorhome.
Website
www.qualitywaterassociates.com
You'll need to configure the existing pipe to reach or get a new longer piece and use a mail adapter by insert fitting to replace the check valve.

I always carried 5-6 pieces of new PE in various lengths and ratings from like a foot long up to like 6' long to use in cases like this. Any well driller, pump guy or some plumbers would have a foot long piece. Just make sure it is 125 psi or higher rating.

On the other hand, an extended barb male adapter will be longer than the check valve and you may not need a longer piece of PE. But get the stuff before tearing anything apart. You'll have to slit the PE to get it off a barbed insert.
 

JMMJR

New Member
Messages
16
Reaction score
0
Points
0
Location
Bucks County, PA
Thanks for the reply. I gues I will see if I can get an extended barbed fitting to connect to that piece of PE to make the transition to copper.

I had someone tell me I could use one of those Sharkbite fittings to make the transition to copper right off the piece of PE coming out of the wall and get rid of the plastic elbow hoseclamps, etc.

But I found information saying they aren't for use with PE pipe as well as conflicting information saying they can be used with PE.
 

Gary Slusser

That's all folks!
Messages
6,921
Reaction score
22
Points
38
Location
Wherever I park the motorhome.
Website
www.qualitywaterassociates.com
What do you see wrong with the PE coming out of the wall as far as it does? And if you cut it off, someday you'll possibly regret it and possibly be digging down outside the wall to install a longer piece. I suggest you quit looking at things as to how they look and get practical.

No Sharkbites can't be used on PE because it is IPS pipe, not CTS tubing.
 

JMMJR

New Member
Messages
16
Reaction score
0
Points
0
Location
Bucks County, PA
You misunderstand my whole point here.

I see nothing wrong with the PE coming out of the wall as far as it does. My ONLY issue is with the elbow joint to the small piece of PE to the brass checkvalve. The reason I first referred to it as a crappy connection (which you initially challenged) is due to the fact that it leaked like a sieve when they first did it. Then they hit it with the torch again and cranked the hoseclamp. After seeing that, I never trusted it. You confirmed my misgivings by making note of the fact that the short piece of PE is clamped onto the threads on the brass check valve, as opposed to being a barbed connector.

I want to make the transition to copper at the END of the 2' long piece that is coming out of the wall. I don't know what gives you the impression that I wanted to do anything different. In all honesty, I don't give a damn how it looks. It's in a crawlspace. I just want to know it's solid and isn't going to blow apart or leak. That's where my concern ends. Clearly the checkvalve doesn't belong there and needs to go. I want to address that and make sure the connection is solid. Period.
 

Gary Slusser

That's all folks!
Messages
6,921
Reaction score
22
Points
38
Location
Wherever I park the motorhome.
Website
www.qualitywaterassociates.com
Jr, now we're getting to the heart of your fears, for the first time, because up until now, you haven't been totally candid. ;)

It leaking when they first made the connection on the check valve's threads is understandable to me and you're scared of it and the sch 80 PVC elbow and hose clamps too.

I would not use copper from there to my pressure tank tee, I'd use PE because copper will reduce the ID and even 1" M copper is smaller than 1" PE, which could cause erosion corrosion of the copper and leaks in the future. Sch 40 PVC (it's ISP) is a much better choice, it's the same ID and the least expensive and easiest to use.
 

JMMJR

New Member
Messages
16
Reaction score
0
Points
0
Location
Bucks County, PA
Sorry for the confusion. My whole reason for not having installed a CSV yet was my fear of that questionable connection blowing apart. Upon learning that check valve doesn't even belong there, I'm even more concerned about the quality of the work. That check valve was added by the plumbers who converted me from the jet pump to the submersible.

The check valve is screwed into a 3/4" copper female adapter which is soldered to a straight 6" piece of copper, which is soldered to a copper elbow, then a copper ball-valve, then the tank tee. After the tank tee, another copper ball-valve and my inside plumbing is all copper.
 
Top
Hey, wait a minute.

This is awkward, but...

It looks like you're using an ad blocker. We get it, but (1) terrylove.com can't live without ads, and (2) ad blockers can cause issues with videos and comments. If you'd like to support the site, please allow ads.

If any particular ad is your REASON for blocking ads, please let us know. We might be able to do something about it. Thanks.
I've Disabled AdBlock    No Thanks