RedneckPlumber
New Member
- Messages
- 3
- Reaction score
- 0
- Points
- 0
Since plumbing is sometimes art and sometimes science, I thought I would share
some lessons I learned the hard way regarding how to solder copper tubing.
It seemed simple enough to me at the age I was then, ripe old age of 23. Just put some flux
on each end of the pipes you're joining, put the coupler on, fire up the handheld torch
heat the copper and then apply the solder. I mean, it couldn't have been that hard, as many times as
I saw the old man do it. Boy was I wrong, it took many tries on my first one and I ended up quitting for the
night once I finally settled on just temporarily capping the line.
Here are the things I wish someone would have told me:
1)When or if you cut the tubing you are joining, make sure you have a good clean cut by using a pipe cutter in good condition, make full circles around
the tubing until it is cut off.
2)If you need to bend or curve the tubing, use the correct tool like the one that can be seen
at http://www.findtoolsnow.com
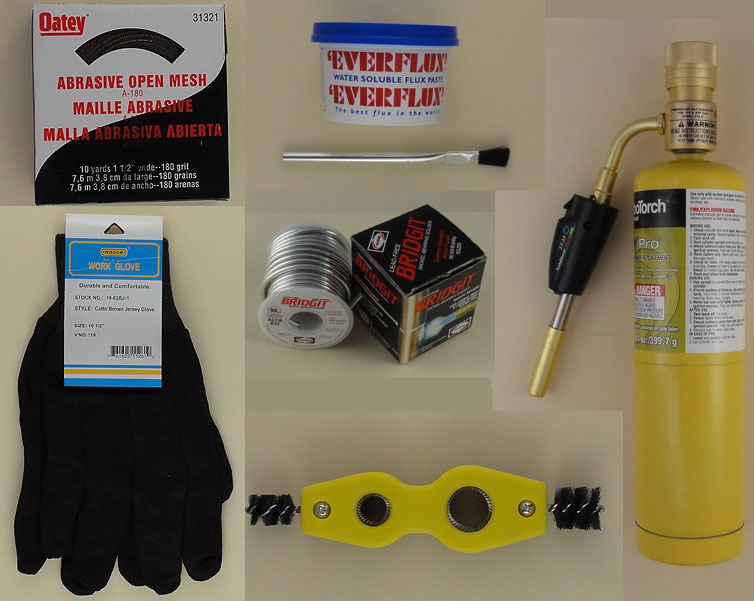
3)Don't try to heat the tubing using anything other than the correct tool, I always use a small hand held torch like the ones that can be
seen at http://www.findtoolsnow.com/Grounds-Maintenance-Torch-Kits.html
4)Aside from the steps already mentioned above, and this is REALLY important if you
want your soldering to hold - clean/sand/rough up all the parts of the tubing that you
are about to solder. A lot of amatuers don't know this. I would suggest using two wire brush tools that
are made specifically for copper tubing. You can find them at almost any hardware store. There is one male for the joints and one female that you
can use for each end of the pipe. Buy them - they are worth their weight in gold! Use them until the affected area is noticably roughed up - and the varnish is removed.
5)Make sure the affected pipes no longer are under pressure and are properly drained. This cannot be stressed enough. If there is any water near the
point you are soldering it is an uphill battle due the natural cooling effect.
Now you are ready to do the obvious of placing the flux applying the heat and then solder etc.
Just be sure to follow all the tool and supply manufacturers' warnings and wear the proper safety equipment. Especially eye protection. Be careful where you point that torch!
I also suggest practicing on some pipes and joints that are not in use. Just buy one long piece of the copper tubing, and a few unions of various shapes and practice cutting and soldering.
It will make you that much more confident in your ability, pay off in dividends, and make the real deal much more enjoyable.
Once you get the hang of it, it will come easy. And you'll wonder why so many people use plastic - I still haven't figured that one out.
Good luck, The Redneck Plumber")
some lessons I learned the hard way regarding how to solder copper tubing.
It seemed simple enough to me at the age I was then, ripe old age of 23. Just put some flux
on each end of the pipes you're joining, put the coupler on, fire up the handheld torch
heat the copper and then apply the solder. I mean, it couldn't have been that hard, as many times as
I saw the old man do it. Boy was I wrong, it took many tries on my first one and I ended up quitting for the
night once I finally settled on just temporarily capping the line.
Here are the things I wish someone would have told me:
1)When or if you cut the tubing you are joining, make sure you have a good clean cut by using a pipe cutter in good condition, make full circles around
the tubing until it is cut off.
2)If you need to bend or curve the tubing, use the correct tool like the one that can be seen
at http://www.findtoolsnow.com
3)Don't try to heat the tubing using anything other than the correct tool, I always use a small hand held torch like the ones that can be
seen at http://www.findtoolsnow.com/Grounds-Maintenance-Torch-Kits.html
4)Aside from the steps already mentioned above, and this is REALLY important if you
want your soldering to hold - clean/sand/rough up all the parts of the tubing that you
are about to solder. A lot of amatuers don't know this. I would suggest using two wire brush tools that
are made specifically for copper tubing. You can find them at almost any hardware store. There is one male for the joints and one female that you
can use for each end of the pipe. Buy them - they are worth their weight in gold! Use them until the affected area is noticably roughed up - and the varnish is removed.
5)Make sure the affected pipes no longer are under pressure and are properly drained. This cannot be stressed enough. If there is any water near the
point you are soldering it is an uphill battle due the natural cooling effect.
Now you are ready to do the obvious of placing the flux applying the heat and then solder etc.
Just be sure to follow all the tool and supply manufacturers' warnings and wear the proper safety equipment. Especially eye protection. Be careful where you point that torch!
I also suggest practicing on some pipes and joints that are not in use. Just buy one long piece of the copper tubing, and a few unions of various shapes and practice cutting and soldering.
It will make you that much more confident in your ability, pay off in dividends, and make the real deal much more enjoyable.
Once you get the hang of it, it will come easy. And you'll wonder why so many people use plastic - I still haven't figured that one out.
Good luck, The Redneck Plumber