Shower make-over

Users who are viewing this thread

Andre

New Member
Messages
7
Reaction score
0
Points
0
Hi folks: This my first post of any kind - ever - so be gentle.
Project started as a simple re-tiling of a 1970s shower-toilet-vanity. Replace the floor tiles (and install in-floor heating at the same time), replace the wall tile around the shower and toilet area, and replace the floor tile in shower.
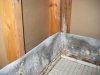
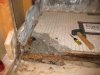
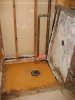
I found the bottom row of wall tiles around the shower just fell off into my hands. The gyproc behind was wet, so I ripped off all the gyproc around the shower to see if there was any damage to the framing (None, thankfully).
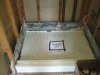
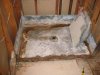
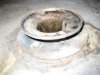
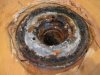
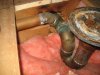
The shower pan is galvanized, 48"x34". I dug out the wet gyproc around the mud+tile slab, which left a 3/4" trough all the way round the inside of the floor pan. There was some free water in the bottom (I wonder why that would not have drained away?)
The shower never leaked. It's on the 2nd floor with no access from below without major damage to 1st floor ceiling. I want to use the Kerdi membrane on the shower walls.
Q1: Is it wise to keep the galvanized floor pan? If not, I have to rip out the entire floor and start again?
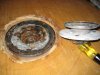
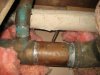
Q2: If I can keep it and chip off the existing shower floor tiles, I would want to run the Kerdi membrane down the walls and across the floor pan before installing the new shower floor tiles: Is it possible to tie the Kerdi membrane to the existing shower drain? Or do I have to excavate the old drain and replace it with the Shluter drain? Is that even possible?
 

Attachments

  • close-up.JPG
    close-up.JPG
    24.9 KB · Views: 1,102
  • shower pan.JPG
    shower pan.JPG
    25.1 KB · Views: 1,506

hj

Master Plumber
Messages
33,603
Reaction score
1,042
Points
113
Location
Cave Creek, Arizona
Website
www.terrylove.com
pan

Regarless of what the pan looks like above the shower, I have NEVER seen an older one which was not almost completely rusted through under the tile. And if it is not already so, it will probably be worn out shortly. I would take it out and start over.
 

Jadnashua

Retired Defense Industry Engineer xxx
Messages
32,770
Reaction score
1,190
Points
113
Location
New England
That pan is almost certainly flat on the floor. By code, the waterproof layer (the pan, not the tile) must be sloped to the drain. There will be water that gets below the tile and the pan must slope to the drain to allow it to flow out. While it doesn't leak (yet), your pan is not built properly and should be removed and replaced.

Kerdi is only designed as a system...walls, pan, drain. It would not be warranteed unless you use the whole system (note, you do not need to use their preformed pan as part of the system, but can if it fits your needs). There isn't a good way to attach Kerdi to a conventional drain.

Tear it out!

Read up on proper shower construction at www.johnbridge.com.
 

Andre

New Member
Messages
7
Reaction score
0
Points
0
Thanks JADNASHUA and HJ for your replies.
Great advice, even though you confirmed my worst fear - having to rip out the entire shower floor. What started as a simple re-tiling project...well, you know how that goes. I'd rather do it right, though, so I will rip out the shower floor. And you are correct: The pan is flat to the floor. No wonder water collected around the edges.

Q1: Am I best to chip away at the edges and work my way towards the drain, or is it possible to excavate the drain, cut it and then lift out the entire floor pan? It would weigh a couple hundred pounds I imagine, so I'm guessing that's not the way.

In the same project, I have a question about a toilet flange. Along with the old floor tiles I have taken up the old 5/16" ply subfloor, except around the toilet flange which is still sitting on the old tiles-and-subfloor. I will be raising the height of the floor by almost an inch (thicker subfloor plus in-floor heating). The existing flange, by its color, seems to be brass or bronze, soldered (I'm guessing) to the 3" copper waste pipe. The "advisor" at our local building supply center suggested I leave the existing flange in place and insert a 4"x3" ABS flange into it. This would add 5/8" to the total flange height, not quite as much as the increase in floor height (13/16"). I bought one and it fits nice and tight into the existing flange. The "advisor" suggested I only need to silicone it to seal them together. He was cagey when I asked if this would meet code.
Q2: What do you think of the idea of adding a second flange on top of the first? If not, is my only alternative to cut the copper drain to get the old flange off, and then use a flex coupling to install a new plastic riser and flange?
 

Redwood

Master Plumber
Messages
7,335
Reaction score
13
Points
0
Location
Connecticut
I'll add the third strike... It's outta here!
The John Bridge site that Jadnashua linked will be a most valuable resource to you on your project. There is a forum there as well.
 

Jadnashua

Retired Defense Industry Engineer xxx
Messages
32,770
Reaction score
1,190
Points
113
Location
New England
It might be possible to remove the existing flange and reuse it - the coupling part may be deep enough.

If you have access from below, you could cut it off, then add on a riser and new flange properly installed and supported by the new floor.
 

Redwood

Master Plumber
Messages
7,335
Reaction score
13
Points
0
Location
Connecticut
Its funny how smockman suggests repairs like that then when asked about code he gets a little cagey.
 

Andre

New Member
Messages
7
Reaction score
0
Points
0
As promised, and following your excellent advice, I removed the shower floor. After messing around with a hammer and chisel for a couple of hours, I discovered a short-cut: I chipped off a row of tiles and drilled a row of holes with a masonry bit, levered up the slab just a fraction and then hit it with a mini sledge, and it cleaved along the line of holes. 15 minutes and it was done.

Q: How do I remove the pan now? The drain has a flange at the junction with the pan. There are three hex bolt heads through the flange and pan (one is visible in the picture). Even if I undo the bolts, and then unscrew the flange, I can't get it off over the drain because that mushrooms out at the top. So, do I cut the pan?
 

Attachments

  • starting on the base.JPG
    starting on the base.JPG
    30.8 KB · Views: 742
  • Base all gone.JPG
    Base all gone.JPG
    26.9 KB · Views: 800
  • Shower drain.JPG
    Shower drain.JPG
    26.9 KB · Views: 798

Jadnashua

Retired Defense Industry Engineer xxx
Messages
32,770
Reaction score
1,190
Points
113
Location
New England
The drain should separate when you get the bolts out. Then, it's easy. It looks to me you'll need to replace the drain anyways, so you could cut it off, too.
 

Andre

New Member
Messages
7
Reaction score
0
Points
0
Thanks, JADNASHUA: The drain did indeed come apart after the bolts came out. I am amazed to see that there's no gasket or seal between the two halves of the drain and the shower pan.
The 5/16" ply subfloor is coming off next. One of the attached photos shows some water damage in a small area along the back wall, but I am replacing all the subfloor in the whole room anyway with 1/2" ext.grade ply.

All the drains and vents in the house are copper: In the case of this shower drain, it's 2".
Q1: If I have to cut off the existing bottom part of the drain, I assume it's easiest to open the floor and cut the horizontal pipe after the trap?

Q2: Hacksaw, or is there a better way?

Q3: Then install flex coupling and new plastic trap and riser, ready to receive the Schluter drain: Would that be the order of the day?
 

Attachments

  • pan raised.JPG
    pan raised.JPG
    25.8 KB · Views: 780
  • Drain close-up.JPG
    Drain close-up.JPG
    31.3 KB · Views: 751
  • Drain detail.JPG
    Drain detail.JPG
    30.2 KB · Views: 765

Jadnashua

Retired Defense Industry Engineer xxx
Messages
32,770
Reaction score
1,190
Points
113
Location
New England
You don't want a flexible connector there! Use a no-hub. This is a neoprene rubber sleeve with a metal shroud and a couple of hose clamps. You may have to pick this up at a plumbing store since the ones usually available at a big box store are designed for CI to CI or pvc to pvc...the OD of copper is smaller and yes, they do make one for this.

You may want to take this opportunity to ensure the new drain and trap are exactly centered within the area of the shower. While not absolutely essential, it does make layout and building it easier.

If you haven't been over to www.johnbridge.com, building it back up to tile is covered very well there.

Make SURE that the riser from the trap is perfectly plumb. The drain must sit on there and be level, or you'll have big pains.
 

Andre

New Member
Messages
7
Reaction score
0
Points
0
Got it.
I've seen the coupling that you mention so I'll be sure the get the correct kind.

Is cutting the copper pipe a simple hacksaw job, or a power recip saw, or what?
 

Jadnashua

Retired Defense Industry Engineer xxx
Messages
32,770
Reaction score
1,190
Points
113
Location
New England
Hack saw, sawsall, or if you have one big enough (probably not) a pipe cutter. Clean off the burrs. The harder part is getting it fairly square - a pipe cutter almost guarantees that, but probably not enough room to swing it anyways.
 

Andre

New Member
Messages
7
Reaction score
0
Points
0
Shower drain first:
There's no way to remove the trap because the junctions are all up against one another (photo) but I have enough height that I can cut the riser, install a coupling, and have a couple of inches left to mate with the Kerdi drain. It's too cramped to get the power saw in there so I'll have to hacksaw the copper. Any other suggestions?

Toilet drain:
Again, the vent junction limits the options. I've measured and drawn the installation and, with the coupling and new ABS bits, the height is OK. But, if I cut close enough to the vent junction to leave a stub of copper for the coupling to connect with, the new installation puts me 3/4" over laterally from the present position (off to the right as you look at the photo). I don't believe that would be noticeable (or would it?). I've seen an offset closet flange at our local HD: What do you think of that idea? It could bring the flange back into position, no? Are offsets more prone to blockage?
 

Attachments

  • Shower drain2 close-up.JPG
    Shower drain2 close-up.JPG
    28.2 KB · Views: 966
  • Toilet drain close-up.JPG
    Toilet drain close-up.JPG
    26.9 KB · Views: 747

Redwood

Master Plumber
Messages
7,335
Reaction score
13
Points
0
Location
Connecticut
You want to remove those 2 90's after the trap up against the joist. They make an extra deep trap that can result in slow drainage.

As JAD Nashua stated remove the burrs from the copper... We don't want any hair catching going on!

How it that shower vented? In your pictures I don't see any vent. There should be one before it elbows down to the toilet line.
 

Andre

New Member
Messages
7
Reaction score
0
Points
0
Hi Redwood:
The drain line follows the plane of the trap and goes through the joist at the top of the photo - the angle of the photo makes it hard to notice.
The "2 90s" to which you refer are in fact a T and a 45 for the vent which goes off to the left in the photo.
The only clear bit of copper pipe that I can cut into is the riser from the trap. But I think that'll work because I have enough height, as I explained before.

The toilet line worries me more because the coupling and new ABS bits would move the flange over by 3/4". The new narrower toilets will have no problem fitting in the space available: What does concern me is whether or not folks would notice that the toilet is a little closer to one wall than the other. Is an offset flange, then, a sensible idea, or does it present its own set of issues (greater risk of blockage?), or is it just not worth bothering about?
 

Redwood

Master Plumber
Messages
7,335
Reaction score
13
Points
0
Location
Connecticut
I'm sorry, I see my eyes were playing tricks on me...:eek:

Proceed!

On the toilet if they have an eye good enough to see the 3/4" off center, and are concerned about it, well, thats their problem. I wouldn't use an offset flange. I do however, highly recommend that you use an ABS flange that has a stainless steel ring on it, installed on top of the finished floor. Also use #12 stainless steel or, brass screws long enough to grip through all the floor and sub floor.
 

Jadnashua

Retired Defense Industry Engineer xxx
Messages
32,770
Reaction score
1,190
Points
113
Location
New England
As long as you have at least the 15" either side of the drain to meet code, I woudn't worry about moving it over a little.
 
Top
Hey, wait a minute.

This is awkward, but...

It looks like you're using an ad blocker. We get it, but (1) terrylove.com can't live without ads, and (2) ad blockers can cause issues with videos and comments. If you'd like to support the site, please allow ads.

If any particular ad is your REASON for blocking ads, please let us know. We might be able to do something about it. Thanks.
I've Disabled AdBlock    No Thanks