What to do?????

Users who are viewing this thread

Chestnuts

DIY Member
Messages
33
Reaction score
0
Points
0
We decided to remodel a back room of our house. It appears to been a room added to the back of the house years ago. We found the original siding beneath sheetrock. It has always been hot during th esummer and cold during the winter. WE found alot of gaps in the wood and siding. We also found some surprises. Like a live garter snake behind the sheetrock and a snake skeleton behind some insulation. The back door was the biggest surprise. Look how the locks where attached. You know 3" screws only work when they go into wood, not the sheetrock. Now I need some help as to how to fix this problem.
 

Attachments

  • DSC00030_2.jpg
    DSC00030_2.jpg
    51.8 KB · Views: 410
  • IMGA0597_2.JPG
    IMGA0597_2.JPG
    32.1 KB · Views: 415
  • IMGA0595_2.JPG
    IMGA0595_2.JPG
    52.9 KB · Views: 404
  • IMGA0590_2.JPG
    IMGA0590_2.JPG
    35.5 KB · Views: 397

Statjunk

DIY Senior Member
Messages
540
Reaction score
0
Points
0
I kind of agree with HJ. The answer is kind of obvious. You're going to need to fur out that wall. Likely on both sides of the door. I'm really surprised that the temperature change of that room didn't warp the jam so bad the door wouldn't open and close. If you want to leave it as is you could try to wrap the opening for the dead bolt with sheet metal for added strength but the door would be easily kicked in at the jam.

Good Luck

Tom
 

Statjunk

DIY Senior Member
Messages
540
Reaction score
0
Points
0
HJ,

Good eye! I didn't even notice that the stud sitting next to the door was a 2x4.

That would make a good what is wrong with this picture test. LOL

Tom
 

Mikey

Aspiring Old Fart, EE, computer & networking geek
Messages
3,024
Reaction score
17
Points
38
Location
Hansville, Washington
I've had similar problems with prehung doors whose hinges are set such that only one screw can hit the adjoining stud, and even that one only catches about 3/16" of the stud. For a new doorway, I rip a 2x to 4" wide, giving me a jack stud which winds up flush with the drywall on the inside of the door. For an existing doorway, I glue-and-screw 1/2" thick pieces ripped from a 2x4 onto the existing stud at the hinge locations. The doorframe is placed as close to the stud as possible when the door is hung, and the drywall butts against the stud. (In old work, the existing drywall is notched around the pieces.) The case molding covers the edge of the stud or the pieces.

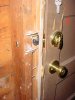
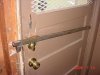
This is not as much work as it seems, and the resulting door installation is very solid. I think the OP could use a similar technique to build out the jamb where the bolt goes through, and strengthen it considerably. Don't know how he might finish it, but there are several options. If that wall is fairly short, just fur out the entire wall that way and sheetrock it; if not, just make the extra woodwork around the door as attractive as possible.

Another door tip - for some reason known only to God and Stanley, the "standard" screws used in most door hinges are #9 screws. Try to find 2 1/2" long #9 brass, Philips-head screws anywhere. However, Grabber makes a #9 yellow zinc, square-drive screw in 2 1/2", 2 3/4", and 3" lengths that make dandy hinge screws (http://grabberman.com). Probably not as much shear strength as a wood screw, but in my experience the screw pulls out of the jamb (or the door) long before the shear strength is tested.

As for the snakes -- be happy they aren't rats. Snakes are your friends.
 
Last edited:

Chestnuts

DIY Member
Messages
33
Reaction score
0
Points
0
More on the back door......

Here is what the previous onwer did to try to stop someone from kicking in the door. A bar with a 3" lag screw. He also placed the metal screen over the window so no one could break the glass, reach in and unlock the door.
 

Attachments

  • Back door Lock.jpg
    Back door Lock.jpg
    50.6 KB · Views: 347
  • Back door _2.jpg
    Back door _2.jpg
    55.8 KB · Views: 341
  • back door_3.jpg
    back door_3.jpg
    38.5 KB · Views: 343
  • back door _4.jpg
    back door _4.jpg
    33.9 KB · Views: 336

Chestnuts

DIY Member
Messages
33
Reaction score
0
Points
0
Yes, I knew the obvious answer was to replace the door, I was just not wanting to have to go that far. After removing the old door, I found a rotting 2X4 next to the frame. We cut out the board and installed a new one that had been treated with watersealer. Then we installed a new prehung steel door. It took 3 doors (well, the first was my measuring error, but the second door frame was built wrong), but it is finally installed. Now I can continue the work on this room.
 

Attachments

  • rotted wood beside old door.jpg
    rotted wood beside old door.jpg
    77.8 KB · Views: 279
  • old door rot.jpg
    old door rot.jpg
    97.2 KB · Views: 288
  • Replaced rotted wood.jpg
    Replaced rotted wood.jpg
    63.5 KB · Views: 295
  • New back door installed.jpg
    New back door installed.jpg
    44.8 KB · Views: 316

Mikey

Aspiring Old Fart, EE, computer & networking geek
Messages
3,024
Reaction score
17
Points
38
Location
Hansville, Washington
It looks like the door isn't parallel to the wall -- the hinge side looks to be set deeper than the striker side. Is this just an optical delusion? (I've got an interior door like that. The walls on either side of the opening weren't in the same plane.)
 

B2CHR

New Member
Messages
35
Reaction score
0
Points
0
Location
Central NC
After installing many of them over the years, and I might add in kind of shady neighborhoods, I have found if you take two 2 1/2" screws and counter sink the into the edge of the door jamb about 1/2" above the lockset it "helps" keep the door from being kicked in as easy. Remolded 5 homes in a row on the same street here a year ago and after the first two having the doors kicked in I started doing this and the doors held when they tried it again. One small kick and the jamb splits right at the holes that are bored for the lockset. Putty or patch the screws holes and install you trim with the 1/4" revile and your set to go.

Also I believe I would have used treated 2x4 for the sill plate if that is concrete that it is sitting on.
 
Last edited:
Top
Hey, wait a minute.

This is awkward, but...

It looks like you're using an ad blocker. We get it, but (1) terrylove.com can't live without ads, and (2) ad blockers can cause issues with videos and comments. If you'd like to support the site, please allow ads.

If any particular ad is your REASON for blocking ads, please let us know. We might be able to do something about it. Thanks.
I've Disabled AdBlock    No Thanks