Testing for gas leaks

Users who are viewing this thread

Mikebarone

DIY Senior Member
Messages
206
Reaction score
0
Points
0
Location
Phoenix, AZ
I am in the process of leak testing a gas line for a double wide modular home. The gas line is black iron pipe, and it only supplies two appliances, (a furnace, and the stove/oven combination). The home uses propane from a 250 gallon tank.
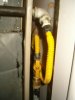
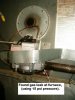
I am using compressed air at 15 psi, with a gas pressure gage to test for leaks. At the 15 psi, I have found so far, a by-passing gas valve and a flex line connection leak. I have also found a leak where the black iron pipe screws into the regulator, (see photos) all at the furnace location. I have replace the valve, the flex line, and sealed up the leak at the pipe / regulator connection for the furnace area, (all tested again with soapy water).
As I am getting closer to having the gas line, “bullet proofâ€, I also noticed that the stove/oven combination was leaking from an orifice on one of the burners. I have shut off the valve to the stove/ over.
I have tested the main and branch lines to both of the shut off valves and they are bullet proof, and I still have a leak somewhere. I suspect that the air pressure is going through the regulator for the furnace. Could this be because the regulator is designed to operate at ½ psi, and I have 15 psi supplied to it for the test? Could I have the same problem at the stove….too much supplied testing pressure? Could I have messed up the regulators for the furnace and the stove because of too high testing pressure?

Thanks for the help on this one!

Mike
 

Attachments

  • New gas line and valve..JPG
    New gas line and valve..JPG
    52.9 KB · Views: 1,902
  • Found gas leak at furnace..JPG
    Found gas leak at furnace..JPG
    40.5 KB · Views: 1,868

Furd

Engineer
Messages
448
Reaction score
1
Points
16
Location
Wet side of Washington State
I hate to tell you but you quite likely destroyed that combination gas valve on the furnace.

No combination gas valve that I am aware of will withstand an inlet pressure of 15psi. The valves are designated as having a MAXIMUM inlet pressure of 1/2 psi.

It appears that you are using some salvaged fittings, that's a no-no. And why are you using a gate valve? Only approved AGA (American Gas Association) valves should be used in gas piping.
 

Furd

Engineer
Messages
448
Reaction score
1
Points
16
Location
Wet side of Washington State
I'm sure I read "gate valve" in the description but now all I see is "gas valve". :eek:

I have found AGA gas valves to be defective from the factory. One I found had a piece of fine steel wire embedded in the soft seat.

In my area natural gas lines are usually tested to 3 psi for 4 hours. That is six times the maximum working pressure of 1/2 psi. There is no need to test such lines to 50 psi.

A propane system usually has a primary regulator at the tank that is set at 10 psi and then a house regulator that is set at 11 inches of water column. Sometimes the house regulator is not used but a secondary regulator at each appliance is then used and set at 11 inches water column.

When testing for long periods of time an allowance may need to be made for the temperature change from the time the test was applied to the end of the test period. If the temperature has dropped (typical for an overnight test) then the pressure in the line will also drop even with zero leakage.
 

Mikebarone

DIY Senior Member
Messages
206
Reaction score
0
Points
0
Location
Phoenix, AZ
I hate to tell you but you quite likely destroyed that combination gas valve on the furnace.

No combination gas valve that I am aware of will withstand an inlet pressure of 15psi. The valves are designated as having a MAXIMUM inlet pressure of 1/2 psi.

It appears that you are using some salvaged fittings, that's a no-no. And why are you using a gate valve? Only approved AGA (American Gas Association) valves should be used in gas piping.

Thanks so much for the info. That combination gas valve was on the furnace when I started working on the home, (with the sheet metal strap holding it on) nice. I did locate a 4-1/2" gas gage that has increments of 1/10 lb and a range of 0 to 15 lbs. for $27.50....probably a good investment huh.
Do you know if there is a direct formula, to convert water column to air presure psi?

Thanks again!
 

Mikey

Aspiring Old Fart, EE, computer & networking geek
Messages
3,024
Reaction score
17
Points
38
Location
Hansville, Washington
From another website:

1" of water column = 0.0360 PSI and
1 PSI = 27.7612 inches of water column

Sounds right. If you remember that normal atmospheric pressure is about 14.7 psi, or 29.92" of mercury, and mercury is about 13.6 times as dense as water, the numbers all work out.
 

Mikebarone

DIY Senior Member
Messages
206
Reaction score
0
Points
0
Location
Phoenix, AZ
From another website:

1" of water column = 0.0360 PSI and
1 PSI = 27.7612 inches of water column

Sounds right. If you remember that normal atmospheric pressure is about 14.7 psi, or 29.92" of mercury, and mercury is about 13.6 times as dense as water, the numbers all work out.

Thank you very much for that info. I saved that one for later reference, for sure!
 

hj

Master Plumber
Messages
33,603
Reaction score
1,042
Points
113
Location
Cave Creek, Arizona
Website
www.terrylove.com
gas

Here, and in many places, the gas lines are tested from the meter to the end of the CAPPED OFF flexible lines and the appliance line shutoff valves open. The test is at 10 psi, using a sensitive gauge with 1/10 increments. ANY drop is a leak and has to be located and repaired. You do not test to the regulators or appliance gas controls.
 

Mikebarone

DIY Senior Member
Messages
206
Reaction score
0
Points
0
Location
Phoenix, AZ
Thanks so much!

Here, and in many places, the gas lines are tested from the meter to the end of the CAPPED OFF flexible lines and the appliance line shutoff valves open. The test is at 10 psi, using a sensitive gauge with 1/10 increments. ANY drop is a leak and has to be located and repaired. You do not test to the regulators or appliance gas controls.


Thanks for the great advice. I hate to say it but live and learn. I took the range to a repair shop and I told them what I had done and I asked them if I might have messed up the ranges built in regulator, (by testing it at the 15 psi). He said, (be it fact or fiction…I hope fact) that if it was set up to run on LP gas, that I probably didn’t mess anything up because they operate at the 11 psi range, from the LP tank's regulator. Then I asked him if I might have messed up the control valve at the furnace, and he said almost the same thing. He said when the furnace is converted to run on LP gas, there is something, (didn’t get the name of it, because he was really busy) that is screw in to the control valve, and by screwing it in, it will disengage the built in regulator. Now he did say that if both of them were set to run on natural gas I would have damaged them for sure, because the pressure is down around ½ psi.
I left the stove with him to check out anyways because I did get more of a, “leak indication†from testing the main line, and then, when I opened the valve to the range and tested again. Then again…it could be something I messed up. I hate learning the hard way, but boy it sure sticks with you when you do.

Thanks so much,

Mike
 

Winslow

Plumber
Messages
445
Reaction score
0
Points
0
Location
Hawaii
Here, and in many places, the gas lines are tested from the meter to the end of the CAPPED OFF flexible lines and the appliance line shutoff valves open. The test is at 10 psi, using a sensitive gauge with 1/10 increments. ANY drop is a leak and has to be located and repaired. You do not test to the regulators or appliance gas controls.


Here in hawaii I test the rough piping (up to the appliance) with 6" mercury. Then when I set fixtures I hook everyhting up, turn on the valve at the appliance (the appliance itself is off) and test a either 12" or 14" water column, depending on if the system is nat or lpg. The gas company here will not hook up the tank unless they see the valves to the fixtures open and it holds the water column without dropping for 15 minutes..

I used to pressure test with air but it takes too long to determine if it has a leak. A manometer will tell you immediately if you have a leak.
 

Mikebarone

DIY Senior Member
Messages
206
Reaction score
0
Points
0
Location
Phoenix, AZ
Here in hawaii I test the rough piping (up to the appliance) with 6" mercury. Then when I set fixtures I hook everyhting up, turn on the valve at the appliance (the appliance itself is off) and test a either 12" or 14" water column, depending on if the system is nat or lpg. The gas company here will not hook up the tank unless they see the valves to the fixtures open and it holds the water column without dropping for 15 minutes..

I used to pressure test with air but it takes too long to determine if it has a leak. A manometer will tell you immediately if you have a leak.

I have used, (about 25 years ago) a mercy tester. At the risk of exposing my ignorance, what does the term, “Water column†refer to? Is there a water column testing device as there is a mercy testing device? I’ve tried to look it up on the net, but so far I haven’t had any luck finding a, “water column testerâ€. I did find a manometer on the net. I’ve called around to the local rental companies, and I guess they don’t rent mercy testers any more, (probably because of the mercy liability itself). Thanks so much for all of the wealth of information; it is greatly appreciated!

Mike
 

hj

Master Plumber
Messages
33,603
Reaction score
1,042
Points
113
Location
Cave Creek, Arizona
Website
www.terrylove.com
test

Mercury gauges were the standard here, until mercury became a nasty word. Then the 10 psi air test became the standard. The LP person was wrong. The appliance regulators are set for 11 INCHES, not pounds. The tank regulator is high pressure but that has nothing to do with the line you are testing. Fortunately, in many cases the appliance regulators will "lock out" and not be damaged, but there is no assurance that they will not be damaged by excessive pressure.
 

Mikebarone

DIY Senior Member
Messages
206
Reaction score
0
Points
0
Location
Phoenix, AZ
Mercury gauges were the standard here, until mercury became a nasty word. Then the 10 psi air test became the standard. The LP person was wrong. The appliance regulators are set for 11 INCHES, not pounds. The tank regulator is high pressure but that has nothing to do with the line you are testing. Fortunately, in many cases the appliance regulators will "lock out" and not be damaged, but there is no assurance that they will not be damaged by excessive pressure.


Based on your response, (that I thank you for very much) I think I might have messed up the control valve on the furnace, (photo above). I think it is by-passing in the off position, but I’m going to wait to test it until I get a manometer. That repair guy told me those control valves range from $100.00 to $500.00 so if I don’t learn from this one, something is wrong.
So is there a, “water column testing device, or is the phrase, “water column†just a term that is used, and that everyone just converts it to, “pounds per square inch�

Thanks again,

Mike
 

Mikey

Aspiring Old Fart, EE, computer & networking geek
Messages
3,024
Reaction score
17
Points
38
Location
Hansville, Washington
You can make a "water column testing device", aka manometer, by bending a piece of flexible plastic tubing into a U shape. If you're going to be looking for around 11" of water, make the legs of the U about 20" long. Fill the U about half-full of water, so there's about 10" of water in each leg. Now connect the system to be tested to one end of the U and leave the other end open. As the system is pressurized, the water will be forced down in the connected leg, and will rise in the open leg. When the difference in height is 11", you've got 11" of water in the pressurized system. If there's a leak in the system, the pressure will eventually fall to 0", when the heights in the two legs of the U are equal.

There's an interesting application of a homemade water manometer, with detailed instructions for its construction, at http://www.bagpipejourney.com/articles/manometer.shtml.

Or, you're not experimentally inclined, you can buy a commercially available water manometer for $20 (and up):
http://store.noahsarkhomecare.com/fipawacoma.html

Google "water manometer" for a wide selection available on line.
 

Mikebarone

DIY Senior Member
Messages
206
Reaction score
0
Points
0
Location
Phoenix, AZ
You can make a "water column testing device", aka manometer, by bending a piece of flexible plastic tubing into a U shape. If you're going to be looking for around 11" of water, make the legs of the U about 20" long. Fill the U about half-full of water, so there's about 10" of water in each leg. Now connect the system to be tested to one end of the U and leave the other end open. As the system is pressurized, the water will be forced down in the connected leg, and will rise in the open leg. When the difference in height is 11", you've got 11" of water in the pressurized system. If there's a leak in the system, the pressure will eventually fall to 0", when the heights in the two legs of the U are equal.

There's an interesting application of a homemade water manometer, with detailed instructions for its construction, at http://www.bagpipejourney.com/articles/manometer.shtml.

Or, you're not experimentally inclined, you can buy a commercially available water manometer for $20 (and up):
http://store.noahsarkhomecare.com/fipawacoma.html

Google "water manometer" for a wide selection available on line.

Thank you, thank you, thank you, you have cleared up, (one of the many) fogged up things in my mind. I will check out those web sites, and I'll get one or try to build a water column tester. And maybe, just maybe, I won’t mess up any more control valve!

Thank you again!

Mike
 

Mikebarone

DIY Senior Member
Messages
206
Reaction score
0
Points
0
Location
Phoenix, AZ
Digital Manometers read the same thing, only without the actual water, and are generally more accurate.
http://www.ueitest.com/product-em150.html
this is the one our in-house techs use to test gas valves.

Thank you for the info. I went to that web site and and then called tem up.They said that the 150 retails for around $89.00…not bad at all. The real cool thing is that I am also going to pressurize my buddy’s house and look for air leaks in his A/C duct work, (with a smoke bomb). I read the manual to the 150 and it will also detect draft pressures in residential or light commercial properties. A two for one; now that doesn’t happen very often.

Thank you so much for the info,

Mike
 

Winslow

Plumber
Messages
445
Reaction score
0
Points
0
Location
Hawaii
Thank you for the info. I went to that web site and and then called tem up.They said that the 150 retails for around $89.00…not bad at all. The real cool thing is that I am also going to pressurize my buddy’s house and look for air leaks in his A/C duct work, (with a smoke bomb). I read the manual to the 150 and it will also detect draft pressures in residential or light commercial properties. A two for one; now that doesn’t happen very often.

Thank you so much for the info,

Mike

a reg manometer from dwyer only cost about $25.

You basically have three options.

1. fill the manometer with water (with a dye solution so it is easily read) and measure with inches of water column.

2. Fill the manometer with oil (doesn't evaporate like water, but requires a manometer gauged for oil) and test at inches of water column.

3. Fill the manometer with mercury (available from dwyer) and test at inches of mercury.

As I stated earlier I test the rough plumbing at 6" mercury (as per the UPC), then when setting finish I hook up the fixtures and test at the appropriate inches of water column.

You can buy electronic gauges but they are very sensitive (to being damaged or knocked out of calibration), much more expensive, and need to be calibrated.
 

Mikebarone

DIY Senior Member
Messages
206
Reaction score
0
Points
0
Location
Phoenix, AZ
a reg manometer from dwyer only cost about $25.

You basically have three options.

1. fill the manometer with water (with a dye solution so it is easily read) and measure with inches of water column.

2. Fill the manometer with oil (doesn't evaporate like water, but requires a manometer gauged for oil) and test at inches of water column.

3. Fill the manometer with mercury (available from dwyer) and test at inches of mercury.

As I stated earlier I test the rough plumbing at 6" mercury (as per the UPC), then when setting finish I hook up the fixtures and test at the appropriate inches of water column.

You can buy electronic gauges but they are very sensitive (to being damaged or knocked out of calibration), much more expensive, and need to be calibrated.

I want to take this opportunity to thank you and everyone else that has responded to my thread. If there was a coin slot on the side of my computer, I sure would be throwing in the quarters for the wealth of information I’ve learned on this topic.

After calling the list of distributors from the EUI, and finding the EM150 is a special order and is really $110.00, I have re-thought building my own manometer. (The EM200 is a month out, even directly from EUI).
I did find another web site, (“the RVers corner) that also show you how to build your own manometer, and they use the manometer to check your propane tank’s regulator, (along with checking for leaks in you system).
As you stated, “I test the rough plumbing at 6" mercury (as per the UPC), then when setting finish I hook up the fixtures and test at the appropriate inches of water columnâ€. Is there a reason that you use mercury first and then go to a water column, (besides the heaver specific gravity weight mercury, and if you used water, you may need a 10’ tall water column tester? (And besides, (as you mentioned) it is per UPC).

Thanks again,

Mike
 

Mikebarone

DIY Senior Member
Messages
206
Reaction score
0
Points
0
Location
Phoenix, AZ
Any good source of information on how to do that?


Well, I found info on that by typing in, “Blower door test†on the net. From what I’ve learned, (if my little brain processed the information correctly) while doing a, blower door test, the fan they use blows out of the house, creating a vacuum in the house. Then a digital device is used to measure the vacuum difference between the outside and inside of the house.
What I’m going to do is take an A/C air handler, (that I had laying around, that came out of a 12’x 60’ motor home) and attach a piece of plywood to the discharge end of it, with a hole cut out of it so the air can come out. The plywood will be the same size as one of the screens in my buddy’s windows. (Of course, weather stripping the area around the air handler to plywood connection and around the window frame to plywood connection). Then I’m going to do the same thing with another piece of plywood on the opposite side of the house in another window; drilling a small hole in the plywood and inserting the tube off of my home made manometer, (caulking around the hole). I’m going to tape off all the out going vents in the house. Then insert a smoke bomb, (that I got from a whole sale A/C place) and turn on the air handler. Then we are going to go up into his attic and look for smoke.
When I turn on the air handler, I am going to get a reading from the manometer. Then I am going to cover up his A/C air handler and take another reading on the manometer. The difference should indicate the size of the leaks he has in his A/C vents. (Remember all of the outgoing vents in the house are sealed up with tape).
They do make smoke in a can, they have smoke candles, (for checking leaks out of outlets, can light etc) but we are going to start with a smoke bomb. (He was told by that A/C supply house that the smoke bomb was the best).
After we, (hopefully) get all of the leaks sealed up in the attic duct work, then we area going to make a judgment call, (based on the reading off of the manometer) if his house is air tight enough, or if we are going to have to check outlets, can lights etc.
I would like to, (if time permits before I take my contraption to my buddy’s house) is to build a box out of plywood 4’ x 4’ x 8’ and mount the air handler to the end of it, (similar to how I’m going to mount it to my buddy’s window) and then drill a hole in the side of the box and insert the tube to my (home made) manometer. This should give me some kind of a control reading of how many water column inches his house would be, if he had zero leaks in his house. I’m also thinking of rigging up a floppy door, (made out of thin plexy glass and mounted in the intake side of the air handler, with a piano hinge). This would also give me an indication of air flow going through the air handler.

Well if you hear on the news that a four alarm fire was at a home in Phoenix, but when the fire department arrived there, there wasn’t anything burning….it was my buddy’s home…just with a lot of leaks…..LOL.

Wish me luck,

Mike
 
Top
Hey, wait a minute.

This is awkward, but...

It looks like you're using an ad blocker. We get it, but (1) terrylove.com can't live without ads, and (2) ad blockers can cause issues with videos and comments. If you'd like to support the site, please allow ads.

If any particular ad is your REASON for blocking ads, please let us know. We might be able to do something about it. Thanks.
I've Disabled AdBlock    No Thanks