How not to melt washer outlet box?

Users who are viewing this thread

johnseeley

New Member
Messages
10
Reaction score
0
Points
1
Location
New Jersey
Digging up an old thread. I was in the middle of replacing my washer and dryer and found that these valves are now leaking from the spout when shut. and valve handles are STIFF. I have the outdoor faucet type like nuckphoto which are 23 years old and I tried to remove the valve assembly to change the compression washer, but these WOULD NOT BUDGE despite all the soaking.

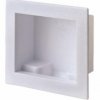
I wanted to ask HJ - or anyone - Which long shank valves would you recommend? The only two I noticed were mueller and webstone. And how long are the shanks? What I'm thinking is, I have the type of washer box like nuckphoto(with the waste in the middle) but with my box, the valve areas are 1" higher than the bottom of the box(with cover removed). This type: So when I stick these long shanks in, how far from the bottom of the box will they protrude? Will it be far enough from the box to sweat without melting?
Thanks so much.
John
 

Attachments

  • oatey_washer_box.jpg
    oatey_washer_box.jpg
    4.5 KB · Views: 843
Last edited by a moderator:

hj

Master Plumber
Messages
33,603
Reaction score
1,042
Points
113
Location
Cave Creek, Arizona
Website
www.terrylove.com
The advantage of having the supply and drain in the same box is that if the valve leaks the water has a place to go, besides onto the floor. Using the valve in the picture means the copper lines come through the plastic and the connection is inside the box. The only way to prevent the box from melting with those valves is either a "silicone burn blanket" surrounding the connections, or a sheet metal barrier to keep the flame from getting to the plastic. A big torch heats faster, but reaches farther, a small flame heats slower so it causes a heat buildup. Both/either ways will damage the plastic if it is not shielded.
 

Hairyhosebib

New Member
Messages
172
Reaction score
0
Points
0
Location
Arizona
Get yourself a spray bottle of Laco Cool Gel or Bernzomatic Cold Coat. I saw the cold coat in my local Ace Hardware store. You can spray this stuff on a piece of cardboard, hold a torch to it and it will not catch fire. You could also just cover what you don't want to melt with a good wet rag.
 

johnseeley

New Member
Messages
10
Reaction score
0
Points
1
Location
New Jersey
is that a response to my post? If so, I thought the whole purpose of the long shank as HJ mentioned early on in this thread, was to sweat it to pipe below the box? I was wondering if HJ can recommend a good brand of long shank valve and how long is the shank? I'm trying to find out, because if the long shank isn't long enough to sweat below the box, I would like to use couplers further down...keeping the flame away from the box. Thank you so much for any advice.

Thanks Terry for cleaning up my first post.
 
Last edited:

Terry

The Plumbing Wizard
Staff member
Messages
29,942
Reaction score
3,459
Points
113
Location
Bothell, Washington
Website
terrylove.com
I sweat the valves to pipe first, and then install them into the box after they have cooled.
Then I use fittings farther away, the extra distance helps.
I don't even try to solder pipe to the valve when they are in the box.
 

johnseeley

New Member
Messages
10
Reaction score
0
Points
1
Location
New Jersey
Sounds great Terry. What is a good valve to get? What do you think of the quarter-turn ones? Doesn't have to be long shank now using your method.
 

johnseeley

New Member
Messages
10
Reaction score
0
Points
1
Location
New Jersey
Happy 4th!!

Terry, Thanks for your help. I finally replaced my washer box and valves yesterday. Here is the pic. I bought a simple ball valve(1/4 turn) from Home Depot. I bought the box from Lowes. What do you thnk? One mistake was I didn't face the valves inward a bit.. to allow an easier bend of the hoses behind the washer. Oh well.

First after measuring everything, I attached the box to a new section of 2" PVC and added the coupler. Then attached the assembly the orig. drain trying to keep the box straight. For the copper...I sweated short pipes to the valves and one end of the couplers. Then in the wall, I performed the last two sweats- coupler to orig. pipe. Don't forget to put your rubber washers(above) and plastic plastic lock nuts(below) on the pipe before you do the final two sweats. For the rubber washers, I used garden hose washers. Worked great.

I hope this is handy for the next newbie coming along.
Constructive comments are welcome!!
 

Attachments

  • box.jpg
    box.jpg
    22.6 KB · Views: 913
Last edited:

Terry

The Plumbing Wizard
Staff member
Messages
29,942
Reaction score
3,459
Points
113
Location
Bothell, Washington
Website
terrylove.com
John,
That looks like it worked out okay.
For the others, never solder just half of a coupling, it may make the fitting harder to solder the second half, and it adds time to the job.
The coupling could have been heated once and done.

But still, nice job.
 

johnseeley

New Member
Messages
10
Reaction score
0
Points
1
Location
New Jersey
Good to know and that goes for elbows, valves, etc where there's two ends? Thank you.
 
Last edited:

Dlarrivee

New Member
Messages
1,150
Reaction score
0
Points
0
Location
Canada
How do you plan to make that drywall look good now that you've created 4 butt joints for no reason...?
 

Terry

The Plumbing Wizard
Staff member
Messages
29,942
Reaction score
3,459
Points
113
Location
Bothell, Washington
Website
terrylove.com
He had to replace the valves, and that meant cutting drywall.
Sometimes you do what you have to do.
Fixing the drywall shouldn't be that hard. I like to use 20 or 40 minute mud with a few different size blades. A finish coat of topping mud, and then some texture over that.
If I were doing it, and considering it's behind a washer, how much time do you spend looking at the box that is behind and lower then the washer anyway. It would look perfect, which is too bad, because all the fine looking work would be behind the washer.
 

johnseeley

New Member
Messages
10
Reaction score
0
Points
1
Location
New Jersey
07-17 12-53-52_rs_rs.jpg


That's right. I also had to replace the old washer box which meant opening up the sides. It's in the back of a laundry closet. It's going good. One more coat of mud. I'm looking at 3/8 to 1/2 nap to get orange peel to match orig. wall. Correct?

EDIT: Added Photo
 
Last edited:

johnseeley

New Member
Messages
10
Reaction score
0
Points
1
Location
New Jersey
Hey guys, I'm digging up this ANCIENT thread. Eleven years few by! One of these valves (posts above) has failed. These were the Mueller Pro-Line Quarter Master series boiler valves from Home Depot. So every few weeks for 11 years, I would give the valves a quarter turn back and forth, to keep them from becoming frozen. I noticed the cold water valve started to gradually fail inside where it was loose and I could feel rubber squeaking inside with NO resistance for much of the 1/4 turn. At first I thought the handle was stretched but the issue is inside. I contacted Mueller and they were nice enough to send me out another pair... same type except threaded.

Can the ball valve be repaired intact inside the washer box with new teflon washers? I have the schematic they sent. I'd rather do that than rip my wall again and sweat pipe. EDIT: Actually it looks like a large allen key will do the job.

Or if I was to replace them with the ones Mueller sent, are these boiler valves durable enough for a washer box? Should I have not turned them every few weeks to keep them from getting frozen? Maybe they're not designed to be turned frequently?
Thanks so much.

03-12  23-42-07_rs_rs.jpg
 
Last edited:
Top
Hey, wait a minute.

This is awkward, but...

It looks like you're using an ad blocker. We get it, but (1) terrylove.com can't live without ads, and (2) ad blockers can cause issues with videos and comments. If you'd like to support the site, please allow ads.

If any particular ad is your REASON for blocking ads, please let us know. We might be able to do something about it. Thanks.
I've Disabled AdBlock    No Thanks