AS Compact Cadet 3 EL Install

Users who are viewing this thread

Johnnie_Rocket

New Member
Messages
10
Reaction score
0
Points
1
Location
League City, Texas
My first post here... I used this site as a lurker to research a replacement toilet for a bathroom remodel. I learned a lot so I thought I'd give a little back by posting my experience with the American Standard Compact Cadet 3 Elongated Bowl. I searched quite a bit for info on this model but couldn't find much. In fact it is not even mentioned on the AS web site. I discovered that it was released some time in May 07. Maybe they just don't know how to update their wen site very well.

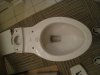
Anyway, I was forced to replace the tile in my guest bathroom because the builder apparently did not know how to use thin set and all the tiles popped off the slab which made them very easy to remove. I wanted to use the project as an excuse to replace the builders toilet with a nicer model and hopefully an EL bowl. Unfortunately space was kind of tight and a normal EL would sit out a few inches more into the door swing. I stumbled across this toilet at my local home store and after researching I decided to buy it. It received good ratings on the MaP ratings (1,000g of yummy soy paste) but I believe this was the "new" test material. The original "Cadet" apparently did not work as well as the new "Cadet 3" so if you are looking for a Cadet make sure you buy the "Cadet 3" which has a larger 3" flapper size vice the older 2".

I'm not a plumber but I've installed a few toilets on various projects. So I thought I'd post a novice's experience installing this toilet. A pro might do things differently but this is how I did it.

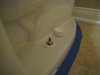
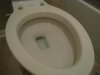
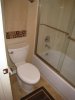
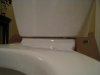
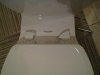
Cutting to the chase.... the compact design of this toilet does indeed allow you to install an EL bowl in the space of most Round bowls. The toilet works well and is quiet and seems to flush efficiently. It is a major step up from the builders special in both looks and performance. The tank mechanics seem to be of good quality, but the bowl suffered from warping which needed shims to sit flat. I had seen this was a common problem and had toilet shims on hand. But in the end I am very happy with this toilet and felt the price was decent. It doesn't have many "miles" on it so I don't know how the long term durability will be, but the technology in the tank is the "standard" flapper type which I can easily service myself assuming I can find the larger 3" flapper. I've read of some Champion owners who have a hard time getting parts.

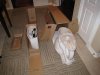
So on to the "step-by-step" of my install. I will probably check back in here to see if there are any questions, but seeing as how I don't often shop for toilets I may not keep track of this thread for a long time. I hope someone finds this useful. I realize there are a lot of pros on here and hopefully they will chime in, but this is aimed at potential home buyers and DIY'ers.

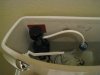
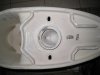
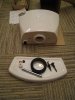
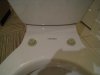
For the Compact Cadet 3, you must get the matching compact bowl and tank. The compact tank is narrower and taller than a regular Cadet 3 which allows it to be squeezed length wise. I assume the back end of the bowl is also a little shorter than normal to match the tank. Notice the label says "Cadet3 Flush Right" which you might think means the tank flushes on the right, but it is really a marketing name "Flush Right" vice "Flush Wrong"... kind of a confusing name. The tank flushes on the left like most tanks.
 

Attachments

  • tn_IMG_4374.JPG
    tn_IMG_4374.JPG
    36.1 KB · Views: 3,271

Johnnie_Rocket

New Member
Messages
10
Reaction score
0
Points
1
Location
League City, Texas
What You Need

To install this toilet you need the following items as the only thing included in the boxes are the tank with internals, tanks gasket and bolts, and the bowl.

- Wax Rings (I used two #1 rings since my tile raised the floor level a bit higher than the flange)
- Closet bolts
- Plastic closet bolt caps
- Toilet Shims (count on needing them)
- Caulk
- Some plumber grease (optional)
- Toilet Seat
- Toilet Fill Line

Tools
- Large screw driver
- Hack saw (maybe)
- Wrench for the closet bolts
- Level

The pics below show what's in the boxes. Check to see that the inside of the waste trap is glazed. The tank includes the gasket and the bolts with a rubber seal. Also a deep socket tool to tighten the bolts. Notice that the underside of the bowl was not glazed completely. I guess they think you can't normally see this part (which is true) but to me it means they just didn't care to glaze those spots, lack of attention to detail or just don't care. It doesn't effect the performance of the bowl, just my opinion of American Standard. Oh well...
 

Attachments

  • tn_IMG_4375.JPG
    tn_IMG_4375.JPG
    28.1 KB · Views: 3,225
  • tn_IMG_4376.JPG
    tn_IMG_4376.JPG
    19.8 KB · Views: 3,204
  • tn_IMG_4378.JPG
    tn_IMG_4378.JPG
    12.4 KB · Views: 3,180
  • tn_IMG_4379.JPG
    tn_IMG_4379.JPG
    42.8 KB · Views: 3,204
  • tn_IMG_4380.JPG
    tn_IMG_4380.JPG
    25 KB · Views: 3,185
Last edited:

Johnnie_Rocket

New Member
Messages
10
Reaction score
0
Points
1
Location
League City, Texas
"Dry" Assembly

This step is not needed but I read so many posts on how hard it was to get the tank to seat onto the bowl. So I installed them together in the easy space of the hallway. You have to remove the bolts from the rubber seals to get them through the holes in the bottom. On a previous toilet install I had leakage between the bolts and the rubber gasket. So I put a little bit of plumber grease on the surface of the gasket touching the tank, and the space between the bolt and the gasket. I didn't want to get this installed and get water into it only to see water seeping out of this joint. It must have worked because I did not have any leaks. Might have worked without the grease, the grease is optional.

You do need to crank down the bolts fairly tight to get the tank to seat on the bowl, but it does seat. Make sure you tighten each side a little at a time and work back and forth, side to side, little by little. The back of the tank touches first. In these pics I did not seat it completely, but when I installed it in the bathroom it seated on both front and back and does not rock. You do have to tightent a little harder than you might think you should push it.

While tightening the bolts, one bolt got some glaze and/or loose china on the threads and when you tighten it, it makes a cracking sound. Not something you want to hear at this point! But this was harmless. When I took the bolt out I cleaned the threads and it did not re-occur. The china is pretty strong but once the tank seats, stop tightening!!! You don't need to go any further than just touching. You can crack the china if you tighten too far.
 

Attachments

  • tn_IMG_4382.JPG
    tn_IMG_4382.JPG
    32.6 KB · Views: 3,182
  • tn_IMG_4383.JPG
    tn_IMG_4383.JPG
    30.5 KB · Views: 3,184
  • tn_IMG_4389.JPG
    tn_IMG_4389.JPG
    15.1 KB · Views: 3,169
  • tn_IMG_4390.JPG
    tn_IMG_4390.JPG
    11.5 KB · Views: 3,150

Johnnie_Rocket

New Member
Messages
10
Reaction score
0
Points
1
Location
League City, Texas
Seat Install

I found this nice seat from Bemis that has a "quick disconnect" feature allowing you to easily remove the seat and clean underneath. It is a nice seat and under 20 bucks. It has these "knobs" you install in the holes and then the seat goes on top on them. So while I could easily get around the toilet I put the seat on. In the second picture, the left hand seat connector is "locked" and the right hand is "unlocked" for removal. Slick.

The height of the rim is 15"... this is the standard height vice the new "Right Height" or ADA height that seems to be more and more popular.
I don't know if this model comes in the higher seat version.
 

Attachments

  • tn_IMG_4391.JPG
    tn_IMG_4391.JPG
    14.1 KB · Views: 3,173
  • tn_IMG_4392.JPG
    tn_IMG_4392.JPG
    16.4 KB · Views: 3,202
  • tn_IMG_4393.JPG
    tn_IMG_4393.JPG
    21.3 KB · Views: 3,175

Johnnie_Rocket

New Member
Messages
10
Reaction score
0
Points
1
Location
League City, Texas
Checking out the Floor

Now that the fun part is over... I spent some time setting the tiles around the toilet flange to make sure they were level and flat. Other toilets I've set on tile have rocked slightly. I thought this was due to the tile. I heard from others that AS bowls may not be very flat. Mine was no exception. In fact it was down right tilting, or rocking more than I would have liked. I bought the toilet shims for this purpose and I also thought about taking it back. But the store only had one other compact bowl and there was no reason to think that one would be better. I set it in place (before the wax ring) and used the shims to level it out. It needed almost the entire shim. You can buy these plastic shims in the toilet parts area of you local home store. DON'T use wooden shims. These are plastic and will not rot. You can see a shim resting on the level in the last picture. Once you see how much shim you need, you can cut the excess with a chisel and a whack of a hammer. Notice how level my floor :D 
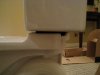
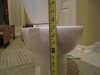
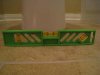
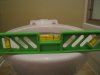
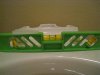
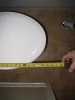
and how off the toilet is :mad: but with the shims it is back to level :)

You need to get the bowl level for the proper water flow.
 

Attachments

  • tn_IMG_4396.JPG
    tn_IMG_4396.JPG
    20.5 KB · Views: 3,408
  • tn_IMG_4397.JPG
    tn_IMG_4397.JPG
    18.5 KB · Views: 151,270
  • tn_IMG_4399.JPG
    tn_IMG_4399.JPG
    21.9 KB · Views: 3,137

Johnnie_Rocket

New Member
Messages
10
Reaction score
0
Points
1
Location
League City, Texas
Getting the Flange/Floor Ready

Now that you know what you need to do to level the bowl you can prepare the flange and floor to set the bowl. You only want to do this once. I don't think it is recommended to remove the bowl after you have set it into the wax.

While the bowl was down on the floor I used blue tape to mark the edge of the bowl around the floor and the location of the shims. I did this so I could put some caulk down on the floor under the bowl. This will help the bowl conform to the tiles and seal it to the floor. Most bowls I've seen only have caulk around the edge, after the bowl is set, and it is easier to remove a bowl like this. I've never caulked here before, but the instructions say to do it and it made sense to me. Actually the instructions say to turn the bowl over and do this but it is easier to lift it right-side-up.

Set the closet bolts and use the plastic part to keep them in place. I used two "#1" wax rings since my floor height is a little above the flange. I also didn't use the rings with the plastic "funnel" incorporated. My toilet flange was a little larger than I've seen before and I wanted a clean path for whatever was coming out of the toilet. I set the rings one on top of the other and pressed them down a bit and shaped them. Use some disposable latex gloves for this.

Then set the bowl down on the wax ring, threading the closet bolts through the holes in the bowl. Oh and aligning it to the caulk bead. You should be able to feel the bowl coming to rest on the wax and press it down slightly. If you needed shims, slide the shims into place and use your level to make sure the bowl is level. Try not to have the shims stick out past the rim of the bowl, it looks ugly. If you dry ran the shims and cut them to length you should not have to pull them out and cut them at this point.

Once it is level and your shims are in place, install the bottom of the plastic cap over the closet bolt (there is an Up side and a Down side), then a washer, than the bolt. Tighten them down but don't over tighten. Once the caulk sets up it will hold the bowl in place unless you are very "energetic" lets say while using the toilet. You might need to cut the bolts down a little or else the cap may not fit. They are designed to snap off but for the life of me I could not get them to snap. So I used a hack saw blade to cut them down. Then the cap fits on.

Hey, doesn't that tile look great! :D
 

Attachments

  • tn_IMG_4400.JPG
    tn_IMG_4400.JPG
    24.5 KB · Views: 3,117
  • tn_IMG_4401.JPG
    tn_IMG_4401.JPG
    17.5 KB · Views: 3,112
Last edited:

Johnnie_Rocket

New Member
Messages
10
Reaction score
0
Points
1
Location
League City, Texas
Install the Tank and You are Done

Now that the bowl is down you can clean up the caulk and put a nice bead around the edge.

The tank was ready to go from my dry run. I installed it and tightened the bolts little by little, side to side, and it set down on the front and back resting spots on the bowl. Then I stopped tightening! Then attach the toilet water supply line to the bottom of the tank. Don't over tighten. In fact you should be able to tighten these pretty much by hand. Turn on the water and look for leaks. Mine was water tight.

The narrower tank I think led to a slight clearance issue with the float. I noticed the float was rubbing against the back of the tank. It would not be a good day if the float did not float and the tank over flowed. It was not so bad that it did not move, but I wanted to make sure it cleared and there was no interference. So I took some gasket material and glued it behind the value mechanism with some polyurethane glue. This tilted the top of the water fill tower away from the back of the tank far enough to allow the float to float easily in the tank.

There is a screw on the fill valve to adjust the level of the water in the tank. The instructions say to adjust it to the fill line. The problem is there is no fill line inside the tank. So I adjusted it about 1.5" below the level of the overflow tower. It seemed to flush just fine at lower levels. I tried to take a picture of the water level inside the bowl. I think it is acceptable.

So the toilet is installed and it sits a little less than 29" from the wall. I think my rough in was a tiny bit more than 12". And the seat actually overhangs the bowl about .25 Inches. It clears the door swing with plenty of room and I think it looks nice. Though the build quality of the china was not the greatest, it is now installed and works well and looks good. Overall I'm happy.

Happy toilet installing and thanks to those who post to this site. Very educational.
 

Attachments

  • tn_IMG_4402.JPG
    tn_IMG_4402.JPG
    23.4 KB · Views: 120,359
  • tn_IMG_4403.JPG
    tn_IMG_4403.JPG
    15.9 KB · Views: 3,111
  • tn_IMG_4405.JPG
    tn_IMG_4405.JPG
    22.3 KB · Views: 3,129
  • tn_IMG_4408.JPG
    tn_IMG_4408.JPG
    20 KB · Views: 3,123
  • tn_IMG_4409.JPG
    tn_IMG_4409.JPG
    24.9 KB · Views: 3,105
Last edited:

Terry

The Plumbing Wizard
Staff member
Messages
29,942
Reaction score
3,459
Points
113
Location
Bothell, Washington
Website
terrylove.com
Johnnie,
Very good job on the pictures.

This is why I don't go out of my way to install these.
The bowl is leaning way too much. It should have been taken back, and American Standard should have given you a better bowl.

When is bowl is so crooked you have to shim a level and flat floor, that becomes too poor of quality for a plunging contractor to install.
A handyman may put up with that, but not a professional.
The first picture I saw with the leaning bowl, I thought maybe it was the camera lense.
Thanks for throwing the level on the bowl to put things in perspective.
That bowl should not have been shipped.
But they do ship them. So if you want the leaning tower of Pissa in your bathroom, you know what to buy.

attachment.php
 
Last edited:

Cass

Plumber
Messages
5,947
Reaction score
7
Points
0
Location
Ohio
It looks nice and if your happy that is what matters but the flange is below or at floor level, it should sit on it.

Caulking the floor and then setting the toilet on it is #1 the hard way to do it and #2 may make it almost imposable to remove at a later date, without busting the toilet, should you need to change the wax ring due to failure.. Normaly you just caulk it after it has been set, that way it is not under the toilet but up to it.
You could have still used the tape after the bowl was set.

The bolts hold it to the floor and the caulk, which I never use, prevents water from coming out from underneath the toilet in the event the wax fails. But you also sometimes dont know it fails if it is caulked.

polyseamseal_clear.jpg
 
Last edited by a moderator:

Redwood

Master Plumber
Messages
7,335
Reaction score
13
Points
0
Location
Connecticut
I do hope that you used a latex caulk on that toilet! If you used Silicone RTV that toilet is never going to come up! Some times toilets do have to be lifted to replace a leaking wax ring which often occurrs when 2 wax rings are used instead of using a flange spacer. Or, if there is an object in the bowl trapway that the auger can't hook from above.

We caulk around the outside because it seals and it doesn't glue the toilet down.

Please report back on how well your new toilet performs over the years.
 
Last edited by a moderator:

Johnnie_Rocket

New Member
Messages
10
Reaction score
0
Points
1
Location
League City, Texas
Terry, yes I can see how this poor quality is not time effective for a pro. I know I could have taken it back but the only other bowl the store had could have been just as bad and I needed to get the toilet set. So for a DIY'er it may take longer but I did get it done. But the poor QA on American Standard's part is unfortunate. I do need to eventually get one more for the other bathroom. I'll either open it up in the store or plan farther ahead so have time to return it if needed.

Yes I used a latex caulk and I've not caulked under a toilet before, just around the edge. But the instructions clearly asks you to do this (they probably shouldn't). I agree if I ever need to take it up it will be a pain. Next time I won't do this. Thanks for the feedback.

I'm not worried about the two wax rings. I took some time to "massage" them together and seal the joint. I have used a spacer ring in the past but I've never seen a flange like the one that was used in my house and this would have required me to drill into the slab and the wax rings were easier.
 

Johnnie_Rocket

New Member
Messages
10
Reaction score
0
Points
1
Location
League City, Texas
So it has been over 2 years since I installed this toilet. I was over on ********* and saw a post by Terry Love and recalled that I had posted here on how I installed the Cadet 3 which I think at the time was a new design. Redwood said to post back and let people know how it was holding up. After this post I installed another Cadet 3 in the master bath. This one I recall did not have a glazed trap. It was also not level but not as bad as the first. I returned that bowl and got a new one. The guy at the big box store said he doubted the trap was not glazed until I showed him. I inspected the replacement and it was okay, not perfectly level but close enough. I installed that one as well, this time not caulking the toilet into place. Even though the quality control was lousy, I do have to say the toilets have been trouble free for 2 years now. No clogging, no repairs needed. Much better than the builders products that they replaced. But in the future I will look for a better brand, probably Toto, when I need a new toilet. For the price these Cadets worked for me at the time, next time I'll spend a little more for better quality.

Great forum. Terry I'm glad you are doing better!
 

Redwood

Master Plumber
Messages
7,335
Reaction score
13
Points
0
Location
Connecticut
Hey Johnnie,
Thanks for getting back...
Good to hear they are working out for you...
 

toiletuser

New Member
Messages
1
Reaction score
0
Points
0
Location
NY United States
Not trying to hijack your thread, but since there was already one started for this toilet, I recently bought and installed two of these from Lowe's (they were on sale over Memorial Day weekend). They seem to have good flushing power, but the tank walls are very thin. Also, mine are the 1.28 GPF models, and I'm not clear on the proper procedure for flushing--are you supposed to press and hold the lever until the tank empties, or press it once and release it? If the answer is the latter, the P-trap on these models seems to be very tall, and there is a lot of "backwash" after the bowl clears. There's enough "backwash" that I'm concerned about the bowl not really being clean after the "press once and release" flush. Any comments?
 

CarlH

Member
Messages
179
Reaction score
1
Points
16
Location
Northern VA
Press and release, If you press an hold, you are using more than 1.28 GPF. Try the press and release for a while and see how it works out. The flush on these types of toilets is fairly quick. If you are used to the the oldet toilets that swirled forever and then cleared the bowl, these newer model might seem too quick to really clear the contents.
 
Top
Hey, wait a minute.

This is awkward, but...

It looks like you're using an ad blocker. We get it, but (1) terrylove.com can't live without ads, and (2) ad blockers can cause issues with videos and comments. If you'd like to support the site, please allow ads.

If any particular ad is your REASON for blocking ads, please let us know. We might be able to do something about it. Thanks.
I've Disabled AdBlock    No Thanks